When implementing continuous integration, continuous delivery (CI/CD) software, teams will start by defining and executing build operations with a build automation tool. This allows developers to automate key tasks, such as running tests, compiling code, and implementing dependency management.
Apache Maven and Jenkins are undoubtedly two of the most popular build automation tools currently on the market. They are open source, are easily configurable, and have huge communities that can provide support when needed.
If you're trying to understand how use Maven and Jenkins, and how the tools work together, then you've come to the right place. This article will provide an overview of each tool, including supported languages, user experience, benefits, limitations, and overall community support.
Jenkins
As previously stated, Jenkins is an open source build automation tool that's a popular choice for CI processes. With Jenkins, developers can check code into repositories, schedule test runs, and examine merge requests throughout the software development lifecycle (SDLC).
Jenkins is a popular choice for numerous reasons, including the fact that it is free and has strong community support. There are roughly 15 million Jenkins developers, and it boasts more than 1,800 plugins.
In addition, Jenkins works with a wide range of programming languages, such as Java, JavaScript, Groovy, Golang, Ruby, and Shell scripts.
However, Jenkins doesn't offer managed solutions and must be hosted by the user. This can accrue unpredictable infrastructure costs and take away personnel from other tasks.
Developer experience
Jenkins is relatively easy for developers to learn because, throughout the entire pipeline functionality, you can play around with various steps and stages and configure the pipeline as needed. This includes parameters such as adding timeouts, defining execution environments, or using environment variables (i.e., telling an agent to execute a task on a specific URL).
After accessing Jenkins via localhost, developers will discover its UI is intuitive and easy to navigate:
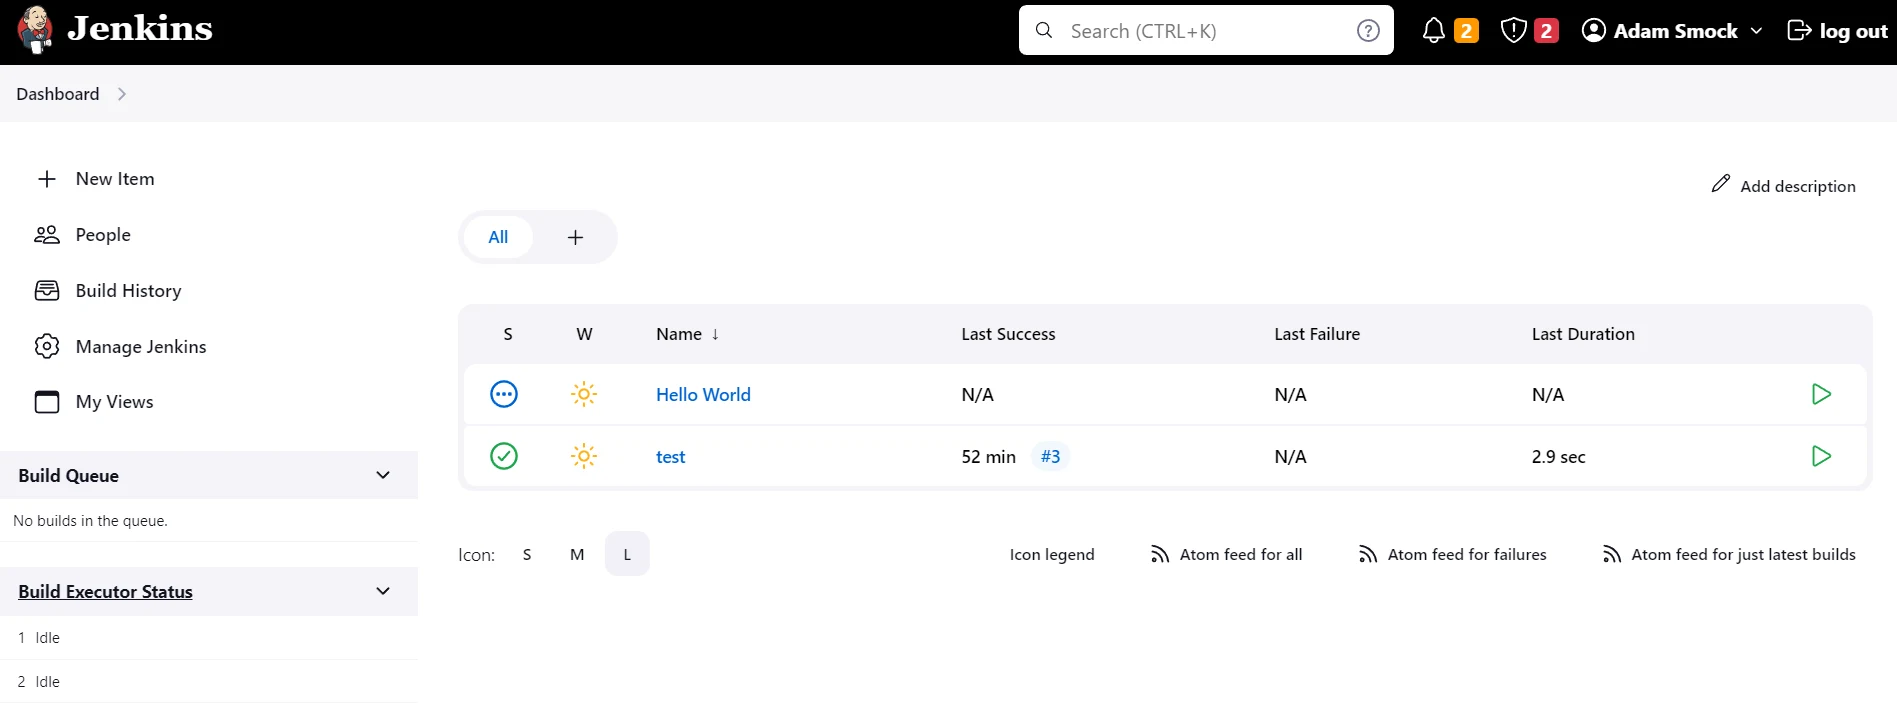
To create a pipeline, you simply add a new item and click Pipeline. However, configuring a pipeline isn't as straightforward as copy-pasting dependencies in a Maven project. Developers need to declare various stages (i.e., build, test, and deploy) and assign steps to each individual stage.
Steps are executed by commands that take time to learn. This includes echo (the equivalent of println) and sh (to execute shell commands).
Alternatively, developers can use a declarative syntax to modify their pipeline via a Jenkinsfile or a text file that stores the definitions for your pipeline and is checked at source control.
Although Jenkins is more complicated to learn than Maven, it can bring significant benefits to developers who invest time in mastering it. With Jenkins, developers can streamline critical CI/CD processes, such as building, testing, and deploying code.
For developers who aren't familiar with CI processes or simply get stuck trying to learn Jenkins, many resources are available. For instance, Stack Overflow is an excellent resource for Jenkins newbies. With nearly 50,000 questions asked, you can easily find help from an experienced Jenkins admin who has dealt with similar issues.
Jenkins config files
Jenkins config files can be used throughout the entire CI pipeline. Developers can find the default config.xml locally in C:\ProgramData\Jenkins.jenkins and then easily change the directory workspace and build location, version number, pipeline information, and security parameters.
Here's what you'll see when you open config.xml:
1<hudson>2<disabledAdministrativeMonitors/>3<version>2.385</version>4<numExecutors>2</numExecutors>5<mode>NORMAL</mode>6<useSecurity>true</useSecurity>7<authorizationStrategy class="hudson.security.FullControlOnceLoggedInAuthorizationStrategy">8<denyAnonymousReadAccess>true</denyAnonymousReadAccess></authorizationStrategy>9<securityRealm class="hudson.security.HudsonPrivateSecurityRealm">10<disableSignup>true</disableSignup>11<enableCaptcha>false</enableCaptcha>12</securityRealm>13<disableRememberMe>false</disableRememberMe>14<projectNamingStrategy class="jenkins.model.ProjectNamingStrategy$DefaultProjectNamingStrategy"/>15<workspaceDir>${JENKINS_HOME}/workspace/${ITEM_FULL_NAME}</workspaceDir>16<buildsDir>${ITEM_ROOTDIR}/builds</buildsDir>17<jdks/>18<viewsTabBar class="hudson.views.DefaultViewsTabBar"/>19<myViewsTabBar class="hudson.views.DefaultMyViewsTabBar"/>20<clouds/>21<scmCheckoutRetryCount>0</scmCheckoutRetryCount>22<views>23<hudson.model.AllView>24<owner class="hudson" reference="../../.."/>25<name>all</name>26<filterExecutors>false</filterExecutors>27<filterQueue>false</filterQueue>28<properties class="hudson.model.View$PropertyList"/>29</hudson.model.AllView>30</views>31<primaryView>all</primaryView>32<slaveAgentPort>-1</slaveAgentPort>33<label/>34<crumbIssuer class="hudson.security.csrf.DefaultCrumbIssuer">35<excludeClientIPFromCrumb>false</excludeClientIPFromCrumb>36</crumbIssuer>37<nodeProperties/>38<globalNodeProperties/><nodeRenameMigrationNeeded>false</nodeRenameMigrationNeeded>39</hudson>
In this code, you can view and edit numerous global parameters that affect Jenkins. For example, the workspaceDir parameter includes your workspace directory, which is set to ${JENKINS_HOME}/workspace/${ITEM_FULL_NAME}. Your build's root path can also be customized with the buildsDir parameter.
A few other key parameters to keep track of are as follows:
useSecurity: can enable or disable authorization into Jenkins. While it's strongly advised you don't do this, you can set useSecurity to false if you manage to lose your password.
mode: controls how Jenkins allocates jobs to agents. Developers have two options: normal and exclusive. Exclusive tells Jenkins to run jobs with a specific label, while normal designates jobs to a specific node as much as possible.
numExecutors: controls the number of concurrent builds that Jenkins can perform on an agent. Increasing this number would cause each build to take longer, but it can also increase the overall throughput.
slaveAgentPort: specifies the default TCP agent port, where -1 disables it (i.e., all agents by default run on port 80 if HTTP or 3360 for IP networks), 0 is for a random port, or you can insert other values for a custom port.
Community support
With 15 million developers using Jenkins for their CI processes, it's easy to find tutorials and how-to guides online. For example, on Udemy, there are over 1,700 Jenkins courses available.
If you're a newbie looking to get started with Jenkins, you can find additional resources on Stack Overflow, Reddit, or Jenkins's own dedicated forum.
Benefits
As previously stated, one of the major benefits of Jenkins, and a contributing factor to its popularity, is its open source nature and the fact that it has a huge community with countless tutorials and how-to guides. In addition, Jenkins is easily distributable across work machines and operating systems, such as Windows, Linux, and macOS.
Moreover, with a simple installation and management, developers can enhance their CI processes with over 1,800 free plugins and can introduce integration via plugins with tools such as Git, Maven, and Amazon Elastic Compute Cloud (Amazon EC2).
Another advantage is Jenkins's parent-child architecture. Jenkins works by having a parent device distribute tasks to nodes for parallel execution. This is especially important if you're working on multiple jobs for a project. It also enables developers to speed up deployment by quickly and efficiently giving workloads to machines in different environments and systems.
Limitations
While Jenkins has many notable advantages, it's also important to consider a few of its drawbacks, including the fact that Jenkins has an outdated UI that may confuse new users. And while Blue Ocean can help modernize Jenkins's UI, it requires several dependencies that may need updating. Moreover, since plugins are frequently reliant on one another, Jenkins admins will have to jump back and forth to ensure each plugin is properly updated to avoid issues.
And while Jenkins has a large variety of plugins, many of them aren't maintained by development teams. This means it's imperative that developers carefully choose which plugins to use. A good rule of thumb is to look for plugins that have code pushed within the last twelve months.
Jenkins also requires constant maintenance, so you need a skilled server admin to maintain it. This is because Jenkins runs on a dedicated server, and installing multiple plugins can quickly make your simple CI server complex. In addition, the more complex your Jenkins server becomes, the more expenses you incur by hiring more DevOps experts.
Maven
While Jenkins is a build automation tool for CI processes, Maven focuses on builds and dependency management within Java projects. This means if your project is heavily reliant on plugins and you need it to do tasks such as build, test, package, install, and deploy processes, Maven is the better choice.
This is one of the reasons Maven is an incredibly popular build tool for Java, accounting for 44.36% of all Java projects. It's no wonder, given that Maven simplifies dependency management by storing all dependencies on a single, portable file.
You can use Maven for projects written in C#, Ruby, and Scala, and it uses an XML file that contains configuration details about the project itself, including dependencies, build directories, plugins, and versions. In addition, Maven can compile and package code into Java Archive (JAR) files that can be tested or deployed quickly and efficiently via the command prompt. This is accomplished using the mvn package command and enables developers to store their JAR files in a target folder.
Developer experience
Similar to Jenkins, getting started with Maven is easy. It's so simple, in fact, that Maven created their own Maven in 5 Minutes article for executing basic tasks on the build tool.
If you're a first-time Maven user, all you need to do is open your IDE and create a new Maven project. This project includes pom.xml and structured directories for your tests and code files:
You can begin filling up pom.xml with dependencies found on the Maven repository by plugging in artifacts or elements that projects can use and then begin importing them into your code.
Unlike Jenkins, where developers can change steps, jobs, pipeline parameters, and configurations, Maven is more straightforward. Most configurations revolve around adding or removing dependencies, but you can choose where your dependencies go and target where your Maven root folder is.
Maven uses a design pattern known as page object model (POM) that acts as a repository for all user settings and project dependencies. By default, POM handles user configurations and dependencies on a per-project basis. This is in contrast to Jenkins, which relies on a local config.xml file to handle global parameters.
Maven config files
Developers who want to customize Maven will use settings.xml, a settings file that defines Maven configuration values, such as local or remote repository location, global plugins (i.e., Selenium and Jetty), and URL mirrors. By default, settings.xml isn't created after installing Maven. This is because Maven runs off default values stored in the POM. However, if users wish to add global parameters, they can manually create a settings.xml file.
However, developers will most likely interact with pom.xml to implement and store all project dependencies.
Maven by itself doesn't include a settings.xml file unless it's manually created. Unless you want to change the default settings, you can disregard creating and modifying settings.xml.
However, if you opt to modify the default settings, developers need to navigate to C:\Users\<your username>\.m2 and create the settings.xml file. After this, you can configure values globally for your Maven projects, such as server login credentials, mirrors, and proxies.
Here's an example file of the top elements of settings.xml provided by Maven's official documentation:
1<settings xmlns="http://maven.apache.org/SETTINGS/1.0.0" xmlns:xsi="http://www.w3.org/2001/XMLSchema-instance"2xsi:schemaLocation="http://maven.apache.org/SETTINGS/1.0.0 https://maven.apache.org/xsd/settings-1.0.0.xsd">3<localRepository/>4<interactiveMode/>5<offline/>6<pluginGroups/>7<servers/>8<mirrors/>9<proxies/>10<profiles/>11<activeProfiles/>12</settings>
In this code, developers can view and edit their Maven settings. Here's a list of key parameters to look out for:
localRepository: is the path of your build system's local repository. This allows developers to set the location of their main build server that logged-in users can check their code into. The default value for localRepository is ${user.home}/.m2/repository.
interactiveMode: allows Maven to interact with the user for input. The default value is true.
offline: tells Maven if your builds should work in offline mode. This is particularly useful if your build server is local or can't connect to remote servers for network setup or security reasons.
pluginGroups: contains the groupIds of all your dependencies. For example, if you're using Selenium, you can plug in org.seleniumhq.selenium.
servers: are used to store usernames and passwords for specific servers via server IDs. Since you don't want to put confidential information on pom.xml, it should be kept here instead.
profiles: despite the name, doesn't add user profiles to your build server. It acts as an alternative set of values that can override default values. For example, you can change the Maven version, JDK version, and OS types (i.e., Windows or Mac) for different environments. This increases the overall portability of your builds.
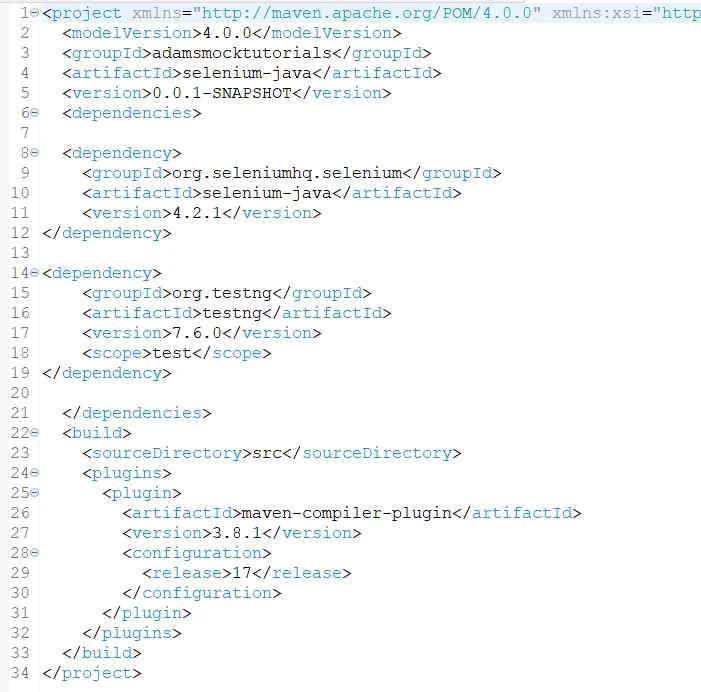
In regard to dependency management, developers can configure and add project dependencies in Maven via pom.xml. It acts as a central repository for dependencies for a single project and can extend itself to multiple modules through project inheritance. A simple example of a pom.xml file that imports Appium, TestNG, and Selenium for a single project looks like this:
1<project xmlns="http://maven.apache.org/POM/4.0.0" xmlns:xsi="http://www.w3.org/2001/XMLSchema-instance" xsi:schemaLocation="http://maven.apache.org/POM/4.0.0 https://maven.apache.org/xsd/maven-4.0.0.xsd">2<modelVersion>4.0.0</modelVersion>3<groupId>Appium</groupId>4<artifactId>Appium</artifactId>5<version>0.0.1-SNAPSHOT</version>6<build>7<sourceDirectory>src</sourceDirectory>8<plugins>9<plugin>10<artifactId>maven-compiler-plugin</artifactId>11<version>3.8.1</version>12<configuration>13<release>17</release>14</configuration>15</plugin>16</plugins>17</build>18<dependencies>19<dependency>20<groupId>io.appium</groupId>21<artifactId>java-client</artifactId>22<version>7.6.0</version>23</dependency>24<dependency>25<groupId>org.seleniumhq.selenium</groupId>26<artifactId>selenium-java</artifactId>27<version>3.141.59</version>28</dependency>29<dependency>30<groupId>org.testng</groupId>31<artifactId>testng</artifactId>32<version>7.4.0</version>33</dependency>34</dependencies>35</project>
In the previous example, groupId, artifactId, and the version number act as a way to uniquely identify dependencies attached to your project.
In addition, developers can choose among 31 million packaged artifacts and over 1,800 indexed repositories on the Maven repository to enhance their projects.
If you're ever stuck using Maven, there are many resources available. For example, Stack Overflow's Maven tag has over 86,000 questions asked on the build tool. And while it isn't as popular, a subreddit devoted to Maven can help aspiring newbies create their first Maven build.
Community support
After 19 years on the market, Maven is popular with both individual developers and tech companies. However, Maven's community support isn't as strong as Jenkins's. For example, the Apache Maven project on GitHub has 67 branches, 71 tags, 219 watches, 2,400 forks, and 3,500 stars. Meanwhile, Jenkins on GitHub has 37 branches, 1,639 tags, 867 watches, 7,900 forks, and 20,200 stars, and the open source community updates these regularly.
Still, newbies can easily find how-to guides and tutorials for Maven. For instance, Medium user javinpaul lists six popular courses for first-timers learning Maven. This includes the popular Maven Crash Course, which teaches newbies to build Maven projects from Eclipse, develop multi-module Maven projects, and understand fundamental Maven concepts.
Benefits
One of the benefits of Maven is its standardized directory layouts that make traversing your project a breeze. For example, your Java code is stored in src/main/java, while test sources are stored in src/test/java. If you don't like the layout, changes can be overridden via the project descriptor.
Meanwhile, Jenkins's directory isn't as straightforward. The standard directory is stored in $JENKINS_HOME and consists of multiple folders that store configurations, logs, and test artifacts.
In addition, all Maven dependencies are stored and configured in a single pom.xml file that's extendable to a single or multi-module project. After parsing the desired dependency, developers can easily import and save it into their pom.xml file within seconds. Moreover, the Maven repository itself offers developers a wide variety of open source libraries, plugins, and dependencies to enhance their projects.
Another advantage of Maven is that heavy configuration isn't required before creating your project. It's the definition of plug and play. After kickstarting a project, developers only need to have a basic understanding of how POM works and find dependencies to copy/paste into their pom.xml file. If developers want to run a build, they just need to type in "mvn package" via the command line to compile and package their code into an executable JAR file.
This is a far cry from Jenkins, which requires developers to install JDK 8, set Java environment variable paths, set up the local host port number, and register a username and password. After the initial setup, you'd then have to integrate your project on Jenkins and parameterize it so you can run jobs.
POM is a design pattern used by Maven to store project and configuration details in a single XML file. This improves the readability and reliability of key values required for your project to run. Since everything is located in one place, POM simplifies maintenance work and permits developers to update, add, or delete dependencies quickly.
Limitations
As with Jenkins, Maven has a few limitations you should consider prior to use, including the following:
Difficult to customize: When developers kick off a new project, Maven's rigid structure helps teams manage dependencies, source code, tests, and resources. However, if you want to add something custom to your build (i.e., the compiler plugin, unit tests, or project distribution in ZIP format), you may end up relying on plugins.
Potentially slow build times: Maven build times vary on a per-project basis, but some developers claim Maven drastically increases build times compared to Gradle, which has 3 to 30 times faster build outputs. For example, R. van Twist on Stack Overflow states it takes over 30 seconds to run a build on even simple projects using Maven. This ForgettingToCode article describes some possible fixes.
Key Takeaways
Jenkins's primary purpose is automating CI processes by allowing developers to build, test, and deploy features without lifting a finger. If you're searching for a robust CI tool that hits every step of the SDLC, opt for Jenkins.
In contrast, Maven simplifies dependency management and builds by standardizing project structures and centralizing dependencies into a single file. In addition, Maven can be integrated into Jenkins via a plugin. If you've created a new project that needs an organized structure, an easy build functionality, or a slew of dependencies requiring management, Maven is the better choice.
Models
Jenkins works by having a parent node designate builds to worker nodes that execute tasks. This increases build availability (i.e., if one node goes down, more nodes are available), enhances performance, and can help scale up your application.
In comparison, Maven uses an object repository to store dependencies and project configuration details in a single XML file. This allows developers to manage cross-team dependencies and config details across multi-module projects.
Dependency management
Jenkins doesn't have a built-in design pattern to handle dependencies compared to Maven. Instead, developers have to rely on plugins.
Meanwhile, Maven excels at dependency management, especially if you're only running a single project. However, adding shared dependencies for multi-module projects is possible. With Super POM, or a parent POM file that child projects can inherit from, developers can reduce duplication by configuring the parent POM to inherit all properties and dependencies to multiple projects.
Maven vs. Jenkins: Which Should You Choose?
Maven and Jenkins are two premier build automation tools that assist developers in building, testing, and deploying features. However, Maven and Jenkins are not interchangeable. Maven is used to build your project and Jenkins used to automate this process for the purpose of CI.
However, CI tools and dependency managers aren't enough to ensure your customers get the application they deserve. Developers can use Sauce Labs, a cloud-based continuous testing platform, to connect with either Maven or Jenkins via a plugin.
Sauce Labs lets you integrate with Jenkins to run builds, enable testing on private networks, and execute automated parallel tests without lifting a finger. In addition, one of the most helpful features is automatic multi-node job queuing for test efficiency and faster deployments.
Maven developers can choose between Sauce Lab's twenty-six dependencies, depending on your project goal. Do you need Selenium integrations? Sauce Labs has you covered. How about JUnit to test individual project components? There's a dependency for that readily available.