Blog
How to Automate a Real E2E User Flow with Appium for Android Devices
In our previous article Automating a real E2E user flow with Appium on iOS, we covered how to automate the user flow between app and browser for iOS devices. In this article we are going to cover the same scenario for Android devices.

The real E2E user flow
Let’s start with a recap of the scenario. We want to automate the real E2E user flow between app and browser in a single session. You can mimic this flow with the Swag Labs demo app by opening a link from the menu. This can be done by installing the app, logging in and then opening the menu. You will then see the following options.
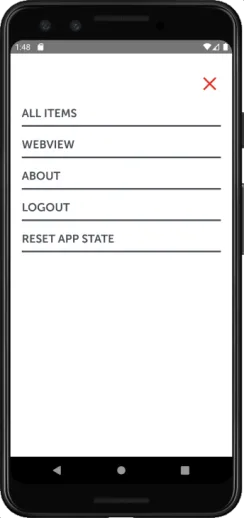
When the About item is pressed a browser will be opened which will lead you to our Sauce Labs website.
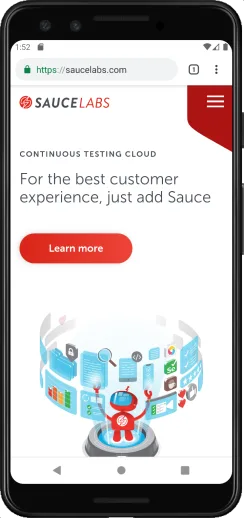
Here you can explore our website, click on buttons, get text and so on.
First let’s start by writing down the steps we need to take:
describe('Appium', () => {
   it('should be able to work with the browser that is opened by the app', () => {
       // 1. Login to the app
       // 2. Verify that you are logged in
       // 3. Open the menu and click on the about screen
       // 4. Figure out how we can verify that the browser is opened
       // 5. Verify that the page is loaded
   });
});
Like with iOS, the first three steps are the easiest to implement. The difficult part is step 4, especially because Android has a broad range of different vendors and thus different Android vendor-specific versions out on the market. This presents multiple challenges which we will discuss below.
Multiple challenges
As said Android, has multiple (different) challenges in comparison to iOS which we always need to take into consideration when we want to automate this user flow. One of the reasons is that there are multiple vendors out there that provide Android on their devices with their own skin and own apps. This might result in multiple browsers (a stock browser and a Chrome browser), older versions of browsers and so on.
If we would summarize the biggest challenges when we want to automate the real E2E user flow, we see the following:
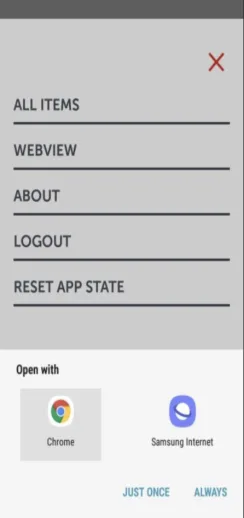
Some Android devices have two browsers, a stock browser and Chrome. This will result in triggering a native notification with the choice to open it with one of the two browsers.
A. You might have the choice to open it JUST ONCE, or ALWAYS
B. You also might not have the option to choose between JUST ONCE and ALWAYS
C. When a browser has been selected to be used as a default, you don’t get the notification anymore to select which browser you want to use
Like with iOS, Android can also have multiple Webviews
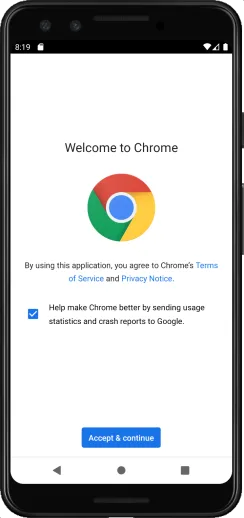
When Chrome is selected on some emulators / real devices, it will start with a welcome screen
This is because you never used the browser before and or because you started a clean emulator.
If you are using a local device or emulator, which doesn’t have the latest Chrome browser installed, Appium can’t find the matching ChromeDriver to use.

The “Open With” challenge:
Let us start with the Open with challenge. When I need to automate something for devices, where I know that the behaviour might differ between devices, I always keep that in the back of my mind. I’m doing the same with the Open with-challenge, I try to think of a cross device solution for the Android devices where we don’t know the exact state our device is in during the automation (do we have 2 browsers on our device, do we get the native notification, do we see the Just Once button and so on).
I’m making one decision during the automation here and that is that I don’t want the script to break between clicking on the About-link and opening the Chrome browser. I’m using an antipattern here, which I normally would not advise, but in this case I allow myself to use a try/catch. If there is an error between clicking on the About-link and opening the Chrome browser, then the try/catch will swallow it. An error could be for example that the Open with-notification is not shown (which is not an error on certain devices). This will result in the following code.
/**
* This is a situation, where we COULD have the notification
*
* We use a try/catch here (challenge 1c), in combination with a small amount of wait time for the notification
* (challenge 1a/1b).
* It will be there very fast, and if it is not there it will fail and go into the catch meaning
* it will not break the flow.
*/
try {
   $('*//android.widget.ListView[@resource-id="android:id/resolver_list"]').waitForDisplayed(
       // Use a max wait of 2 seconds
       2000,
       // This is a reverse parameter, when we provide a custom error
       // message we need to provide the default value
       false,
       // A custom error message
       'The notification is not shown, this is not an error.',
   );
   // Store if the button is there yes or no, this is for challenge 1a/1b
   const isJustOnceButtonShown = $('*//android.widget.Button[@resource-id="android:id/button_once"]').isDisplayed();
   // Select Chrome
   $('*//android.widget.TextView[@text="Chrome"]').click();
   // Now check if the button was there, if so, then click on it
   if (isJustOnceButtonShown) {
       $('*//android.widget.Button[@resource-id="android:id/button_once"]').click();
   }
} catch (error) {
   console.log('Something went wrong due to \n\n', error, '\n\n, but it was not severe enough to let the test fail');
}
The code above can cover challenge `1a`, `1b` and `1c`from above, making this a robust script which in case of `1c` will only cost us max 2 seconds longer.
Multiple Webviews
As mentioned, with Android you can also have multiple webviews. There is an advantage in our specific case in comparison to iOS. iOS would also give back Webview-ids of already opened tabs in Safari making it harder to select the right Webview, this does not happen for Android.
If we would log the contexts for our specific case we would get the following contexts back
['NATIVE_APP', 'WEBVIEW_com.swaglabsmobileapp', 'WEBVIEW_chrome']
The naming convention for a Webview context here is WEBVIEW_{packageName} (If you want to know how Android is detecting and creating the Webview-names, you can check the code here). In our case we want to open Chrome. So if we keep in the back of our mind that Android only gives back 1 Webview for all open tabs and we know the structure of how the context string is created we know we need to have the WEBVIEW_chrome context. This can be done with this piece of script.
// Now do all the context magic for challenge 2 and just wait until `WEBVIEW_chrome` is given back
driver.waitUntil(
   // Check if there is a context that holds `WEBVIEW_chrome`
   () => {
       return driver.getContexts().find(context => context === 'WEBVIEW_chrome');
   },
   // This time to verify if the condition is met
   15000,
   // The custom error message when the webview is not found in time
   'Could not find the right `WEBVIEW_chrome`-context',
);
// Now change to the correct webview
driver.switchContext('WEBVIEW_chrome');
And with this piece of code we covered challenge number two, selecting the correct Webview.
The Chrome Welcome Screen
This is a challenge you will face when using (clean) local devices and or emulators. There are three possible solutions to cope with this challenge.
The first option that would work for all devices and in all environments (local / cloud) is to code the waiting for the welcome screen, accept the terms and don’t sign in. If you would do that then I would advise to do it in the same way as with the Open with challenge, the code would look like this.
/**
* This is a situation, where we COULD have the welcome screen
*
* We use a try/catch here (challenge 2), in combination with a small amount of wait time for the screen to be shown.
* It will be there very fast, and if it is not there it will fail and go into the catch meaning
* it will not break the flow.
*/
try {
   $('*//android.widget.Button[@resource-id="com.android.chrome:id/terms_accept"]').waitForDisplayed(
       // Use a max wait of 2 seconds
       2000,
       // This is a reverse parameter, when we provide a custom error
       // message we need to provide the default value
       false,
       // A custom error message
       'The welcome screen is not shown, this is not an error.',
   );
   // If the `Accept & continue` is shown, click on it
   $('*//android.widget.Button[@resource-id="com.android.chrome:id/terms_accept"]').click();
   // Wait for the `No Thanks` button and click on it
   $('*//android.widget.Button[@resource-id="com.android.chrome:id/negative_button"]').waitForDisplayed(DEFAULT_TIMEOUT);
   $('*//android.widget.Button[@resource-id="com.android.chrome:id/negative_button"]').click();
} catch (error) {
   console.log('Something went wrong due to \n\n', error, '\n\n, but it was not severe enough to let the test fail');
}
To be honest, I wonder if you should do this. The reason is that the welcome screen will only be shown once (after each fresh start/install of the emulator/real device) and if you have multiple scenarios this may slow down the test execution a lot.
This is where option two would be a better solution which is to use adb shell-commands. With those commands you can tell the Android device/emulator to not show the Welcome screen when you start the browser from a fresh install. If you would run from the terminal against a local emulator/device you need to execute the following
adb shell 'echo "chrome --disable-fre --no-default-browser-check --no-first-run" > /data/local/tmp/chrome-command-line'
Opening the browser would then result in seeing the Welcome screen.
If we would look at the automation with Appium, then Appium also provides you the option to execute adb shell-commands during test execution. There is only one remark we need to make about this, you need to start your (local) Appium server with an extra argument called --allow-insecure=adb_shell, meaning we need to adjust the security level. More information about the security can be found here.
When you adjusted the security level of the Appium server you can use this script and execute it whenever the device has started, but before the browser is loaded.
// This will execute an `adb shell` command on the device to hide the Welcome screen of Chrome on startup
// after a fresh install
driver.execute('mobile:shell', {
   command: 'echo',
   args: ['"chrome --disable-fre --no-default-browser-check --no-first-run" > /data/local/tmp/chrome-command-line'],
});
But to be honest, the best solution would be option three and that is to use Sauce Labs. We already cover this for you by provisioning the real devices and emulators in such a way that you will not see this screen during manual and or automated testing.
So whatever option you choose, you can overcome challenge three.
Different Chrome Driver versions
By default a local installation of Appium always installs the latest version of ChromeDriver, even though your local device/emulator doesn’t have the latest version of Chrome installed. If the driver and the version of Chrome don’t match you can get the following error
[emulator-5554 LINUX 10 #0-0] Error: An unknown server-side error occurred while processing the command. Original error: No Chromedriver found that can automate Chrome '74.0.3729'. See https://github.com/appium/appium/blob/master/docs/en/writing-running-appium/web/chromedriver.md for more details.
The url in the logs will already provide you with the correct information on how to solve this issue on your local machine.
When you are using our Sauce Labs cloud with Android emulators or real devices, you don’t need to worry about providing the right ChromeDriver version. Our cloud holds all ChromeDriver versions and Appium will automatically pick the correct version based on the device under test. This means that challenge number four, not finding a matching ChromeDriver version, is not blocking you when you are using the Sauce Labs cloud and you need to execute some manual steps if you run your tests locally.
The complete code
In the end I was able to automate the real E2E user flow with Appium with the following code for Android.
import LoginScreen from '../screenObjects/login'
import InventoryListScreen from '../screenObjects/inventoryList'
import Menu from '../screenObjects/menu';
describe('Android Appium', () => {
   it('should be able to work with the Chrome browser that is opened with the app', () => {
       // Login to the app and verify that it succeeded
       LoginScreen.waitForIsShown();
       LoginScreen.signIn({
           username: 'standard_user',
           password: 'secret_sauce',
       });
       InventoryListScreen.waitForIsShown();
       /**
        * It depends if you want to solve challenge 2, the Welcome screen, with an `adb shell`-command, as found below,
        * or with a coding solution. Just uncomment the code
        */
       // // This will execute an `adb shell` command on the device to hide the Welcome screen of Chrome on startup
       // // after a fresh install
       // driver.execute('mobile:shell', {
       //     command: 'echo',
       //     args: ['"chrome --disable-fre --no-default-browser-check --no-first-run" > /data/local/tmp/chrome-command-line'],
       // });
expect(InventoryListScreen.isShown()).toEqual(true);
       // Open the menu and click on the about screen
       Menu.open();
       Menu.openAbout();
       /**
        * This is a situation, where we COULD have the notification
        *
        * We use a try/catch here (challenge 1c), in combination with a small amount of wait time for the notification
        * (challenge 1a/1b).
        * It will be there very fast, and if it is not there it will fail and go into the catch meaning
        * it will not break the flow.
        */
       try {
           $('*//android.widget.ListView[@resource-id="android:id/resolver_list"]').waitForDisplayed(
               // Use a max wait of 2 seconds
               2000,
               // This is a reverse parameter, when we provide a custom error
               // message we need to provide the default value
               false,
               // A custom error message
               'The notification is not shown, this is not an error.',
           );
           // Store if the button is there yes or no, this is for challenge 1a/1b
           const isJustOnceButtonShown = $('*//android.widget.Button[@resource-id="android:id/button_once"]').isDisplayed();
           // Select Chome
           $('*//android.widget.TextView[@text="Chrome"]').click();
           // Now check if the button was there, if so, then click on it
           if (isJustOnceButtonShown) {
               $('*//android.widget.Button[@resource-id="android:id/button_once"]').click();
           }
       } catch (error) {
           console.log('Something went wrong due to \n\n', error, '\n\n, but it was not severe enough to let the test fail');
       }
       /**
        * It depends if you want to solve challenge 2, the Welcome screen, with an `adb shell`-command
        * or with a coding solution as found below. Just uncomment the code
        */
       // /**
       //  * This is a situation, where we COULD have the welcome screen
       //  *
       //  * We use a try/catch here (challenge 2), in combination with a small amount of wait time for the screen to be shown.
       //  * It will be there very fast, and if it is not there it will fail and go into the catch meaning
       //  * it will not break the flow.
       //  */
       // try {
       //     $('*//android.widget.Button[@resource-id="com.android.chrome:id/terms_accept"]').waitForDisplayed(
       //         // Use a max wait of 2 seconds
       //         2000,
       //         // This is a reverse parameter, when we provide a custom error
       //         // message we need to provide the default value
       //         false,
       //         // A custom error message
       //         'The welcome screen is not shown, this is not an error.',
       //     );
       //     // If the `Accept & continue` is shown, click on it
       //     $('*//android.widget.Button[@resource-id="com.android.chrome:id/terms_accept"]').click();
       //
       //     // Wait for the `No Thanks` button and click on it
       //     $('*//android.widget.Button[@resource-id="com.android.chrome:id/negative_button"]').waitForDisplayed(DEFAULT_TIMEOUT);
       //     $('*//android.widget.Button[@resource-id="com.android.chrome:id/negative_button"]').click();
       // } catch (error) {
       //     console.log('Something went wrong due to \n\n', error, '\n\n, but it was not severe enough to let the test fail');
       // }
       // Now do all the context magic for challenge 2 and just wait until `WEBVIEW_chrome` is given back
       driver.waitUntil(
           // Check if there is a context that holds `WEBVIEW_chrome`
           () => {
               return driver.getContexts().find(context => context === 'WEBVIEW_chrome');
           },
           // This time to verify if the condition is met
           15000,
           // The custom error message when the webview is not found in time
           'Could not find the right `WEBVIEW_chrome`-context',
       );
       // Now change to the correct webview
       driver.switchContext('WEBVIEW_chrome');
       // What if there is no just once
       expect(driver.getTitle()).toEqual('Cross Browser Testing, Selenium Testing, Mobile Testing | Sauce Labs');
   });
});
Conclusion
I hope you found this tech tip useful. If you’re looking for a quick and easy way to test real E2E user flows with your own app on Android, you can try for free with Sauce Labs. Until next time….happy testing!
Wim Selles helps solve automation challenges by day—and practices his passion for front-end test automation at night. Wim enjoys creating his own node.js modules and contributing to open source projects. You can find Wim on LinkedIn and Twittter @wswebcreation.