
Whenever I think about mobile testing my head hurts. You have a kabillion devices out there, in a variety of shapes and forms. Some are Android, some iOS. You have phones, you have small tablets, you have big tablets. Some use Wifi, others communicate directly to a telecom company on a network supporting 3G, 4G, 5G? That’s only the device; we haven’t even gotten to the application running on the device. That’s another layer of complexity. How do you test? Do you put test code directly in your app, hidden behind some backdoor and then run test results to a log? If so, that’s another of headache. Now you are supporting not only the app code, but the app’s test code as well. As I said, it makes your head hurt.
But, there I found a way to circumvent the pain. Use Appium.
Appium is an open source testing framework that you can use to test iOS and Android mobile applications that contain browser based UI components, native user components or a hybrid combination of both. Not only does Appium allow native or web testing, under the covers the tool uses the Selenium driver technology. Thus, you don’t need to reinvent the wheel in order get productive. If you're familiar with using Selenium, once you understand some basic concepts, you’ll get up and running with Appium in short order. I know, I did.
So allow me to share my experience with Appium at a high level. Here’s the game plan:
I’ll cover the essential concepts you need to understand in order to use Appium.
I’ll describe how to work with the Appium Desktop tool to launch your app in an emulator and use the AppiumInspector and Recorder to identify and exercise components in your app.
I’ll show you how to use information gathered in the Appium Inspector to create tests that a test runner will run against a local instance of an Appium Server
I’ll show you how to configure tests in the test runner against an Appium server hosted by SauceLabs.
Here is what I will not cover:
How to install Appium Desktop/Server and the expected dependencies (NodeJS, Java, Android Studio, XCode) and client libraries on your machine.
The details of testing theory, test suite construction and deployment
Setting up an account on SauceLabs in order to test your application against a cloud instance of Appium.
For the most part I am assuming that you are a QA engineer or technician and that you have an interest in mobile app testing and you want understanding the basics of Appium in order to use it as a mobile app testing tool. The intention here is to give you informed overview.
Let’s begin.
The Essential Concepts for Using Appium
You can think of Appium as a mobile testing tool that allows tests to exercise web and native elements within your mobile application and monitor the behavior that is the result of the manipulations.
To start, you write the mobile application code and compile it to a deployment unit, and apk file for Android or an app file for iOS. After your application is compiled, you create another code base for the test code. Usually this test code is a separate project. The test code can be written in Java, C#, PHP, Ruby, Python, or JavaScript. (For example, I wrote the Android application I’ll show below in Android Studio. I wrote the test project in Eclipse.)
The test code contains instructions that identify elements in the application. When an element is identified, you can perform an action on it, such as tapping a button. Or your can put keystrokes in a text field or read the value of a text field. Your test code has drivers that allow you to interact with Appium. Appium has the smarts to inspect the application’s deployment artifact and execute actions therein. You do not to put any testing code in your application source. All the work is done by having your test code work with Appium, which in turn, interacts with your compiled application code. (Please see Figure 2,)
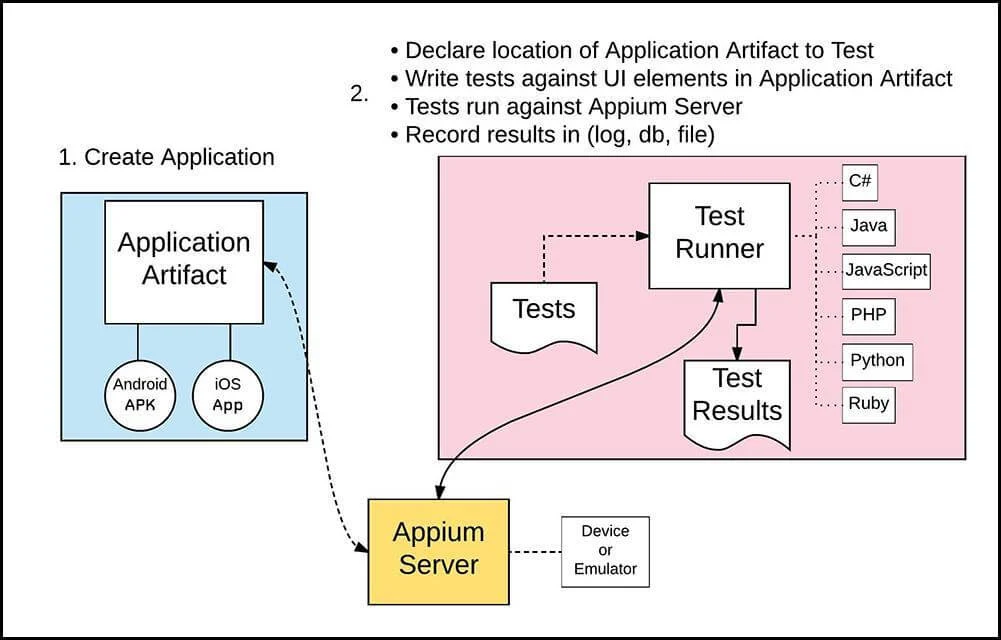
Figure 1: You write your mobile application using a tool such as Android Studio or XCode. You write tests in the language of your choice and execute the tests from an IDE such as Eclipse, Visual Studio or PHPStorm.
Appium provides service by way of the Appium Server. Your test code contains logic that provides configuration information to the Appium Server. The term that Appium uses to define a configuration setting is, desired capability. Your test code will contain an array of configuration settings that conveys to Appium information such as the location of the deployment artifact, the device to use, the entry point for the application code, etc.. Listing 1 below shows you desired capabilities in JSON for the sample app that we’ll talk about shortly.
{
"app":"/Users/reselbob/AndroidStudioProjects/MyAppimApp/app/build/outputs/apk/app-debug.apk",
"platformName": "Android",
"platformVersion": 6,
"appActivity": "MainActivity",
"appPackage": "com.example.reselbob.myappimapp",
"deviceName": "Android Emulator”
}
Listing 1: Desired capabilities for a test as defined in JSON
@BeforeTestpublic void setUp() throws MalformedURLException {
DesiredCapabilities desiredCapabilities =new DesiredCapabilities();
desiredCapabilities.setCapability("app",
"/Users/reselbob/AndroidStudioProjects/MyAppimApp/app/build/outputs/apk/app-debug.apk");
desiredCapabilities.setCapability("platformName","Android");
desiredCapabilities.setCapability("platformVersion",6);
desiredCapabilities.setCapability("appActivity","MainActivity");
desiredCapabilities.setCapability("appPackage","com.example.reselbob.myappimapp");
desiredCapabilities.setCapability("deviceName","Android Emulator");.
URL remoteUrl =newURL("http://localhost:4723/wd/hub");
driver =new AndroidDriver<WebElement>(remoteUrl, desiredCapabilities);
}
Listing 2: Desired capabilities for a test as described in Java
When you run your test, the first thing that the test will do is bind to the Appium server, either using the default location http://localhost:4723, or to an external server location (Like Sauce Labs). Then, after binding takes place, your test code works with the Appium driver associated with your testing language to identify, inspect and manipulate UI elements within the application. For example, you can have your test tap a button and then inspect the UI to read element values to ensure that the expected behavior has been executed. Your test is responsible for reporting the results of test assertions.
Let’s review: you write a mobile app and then create tests in a test runner to exercise your application, having the tests use the Appium driver to execute test behavior. Now we need to examine the obvious: given that Appium requires no foreknowledge of an application, how do we identify and exercise the elements in an application we want to test. This is where Appium Desktop comes in.
Using Appium Desktop for Mobile Testing
Appium Desktop is an application that sits on top of a local Appium server and allow you to fire up a mobile application in an emulator, identify elements within the application and perform actions upon them. You can use the Appium Desktop recorder feature to keep track of your clicks and inputs. The recorder will save the information as code in the language of choice, Java or PHP for example. You can cut and paste the recorded code as a starting point for developing comprehensive tests that you will run against Appium using a test runner such as JUnit, TestNG, or Mocha.
Understanding with the Sample Application
Before we go into the details about Appium Desktop, let me introduce the sample Android application that we’ll use as a point of reference. I wrote the app in Android Studio. The Android application has a button and a read-only text field. When you click the button, a new string of text appears in the read-only text field. (Please see Figure 2.) You can download the code from GitHub here.
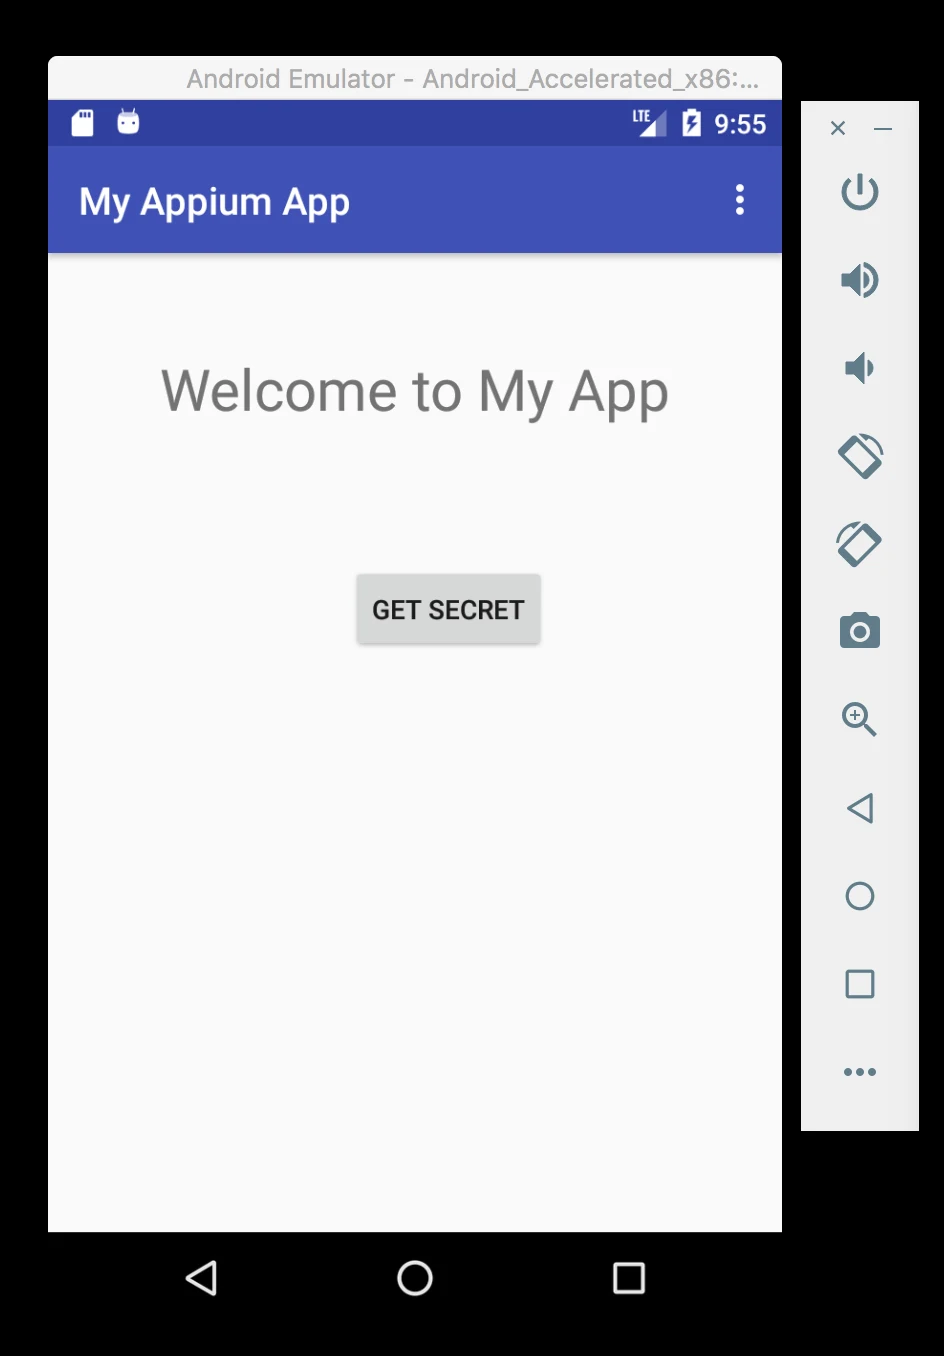
Figure 2: A simple example application written in Android Studio and available on GitHub
The sample application is what we’ll run under Appium Desktop.
Working with Appium Desktop
As mentioned above, the Appium Desktop application allows you to fire up mobile application in an emulator and then inspect the elements in the application. You download Appium Desktop from GitHub and install it according to the process associated with your computer’s operating system. Upon invoking Appium Desktop you are presented with the splash screen shown below in Figure 3.
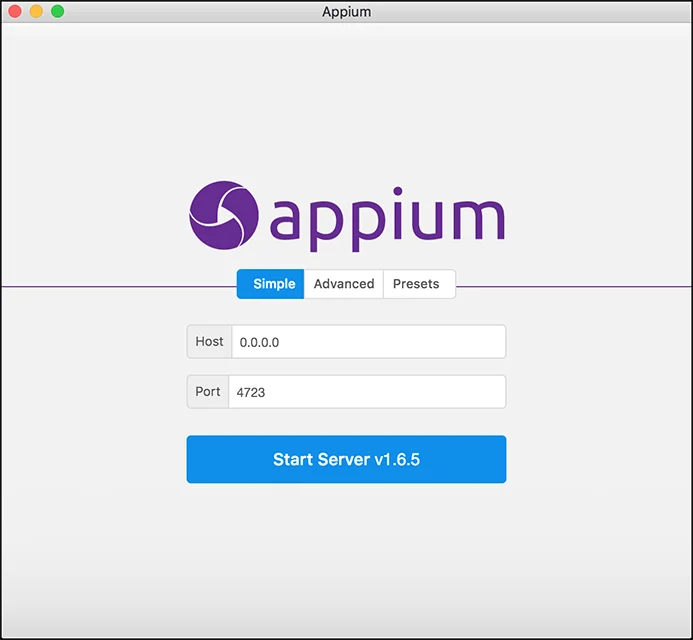
Figure 3: The Appium Desktop Splash Screen displays the default server as localhost
You start the Appium server by clicking the Start Server button. The server starts and the Desired Capabilities dialog appears. (Please see Figure 4, below.) You declare the the desired capabilities settings-- location of application artifact and other settings-- in order to bind your application to Appium.
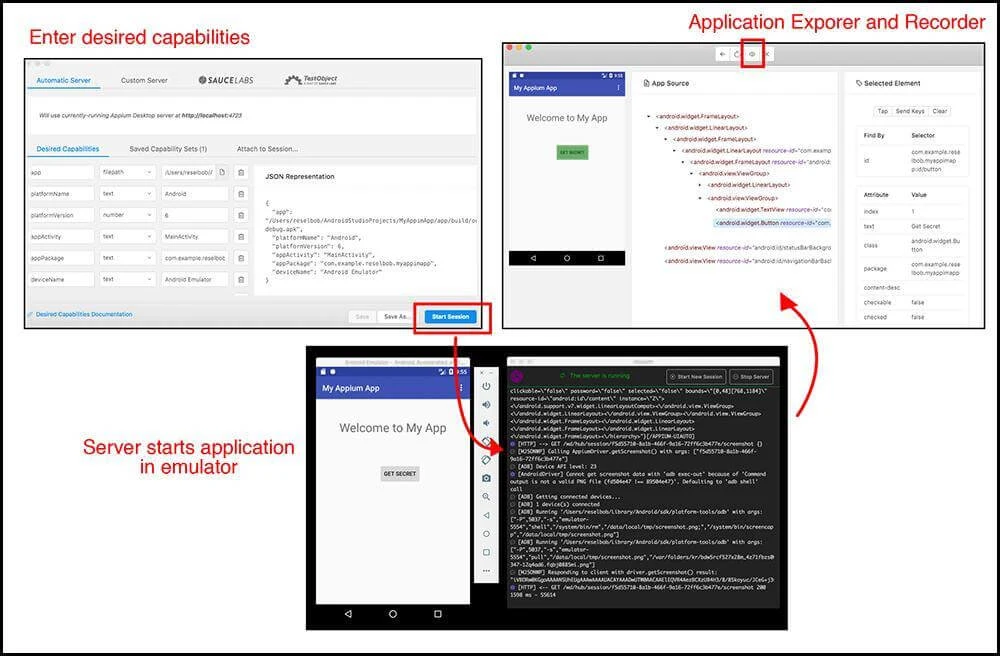
Figure 4: Setting desired configurations, identifying elements and executing actions using Appium Desktop
Once the session’s desired capabilities are properly configured, you click the Start Session button. Appium Desktop will load the desired capabilities into the underlying Appium server and then present the Appium Explorer.
You use the Appium Explorer to identify elements in your application and then interact with them.
Take a look at Figure 5, below, which shows the features of the Appium Explorer. You can see the Recorder feature (1) described above. The Selected Element (2) panel shows the attributes associated with the element you select. Also, you use the Tap, Send Keys and Clear buttons in the Selected Element panel to execute an action on an element. The App Source Panel (3) shows the XPath to the selected element. The Application Panel (4) is the place where you select an element for inspection.
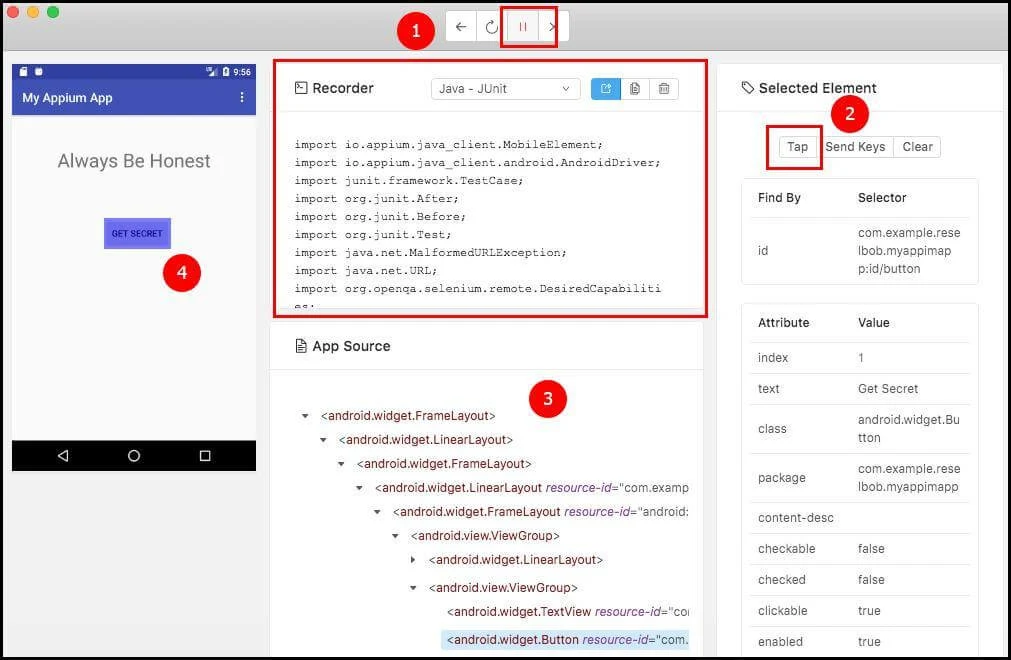
Figure 5: Parts of Appium Explorer (1) Recorder (2) Element Attributes and Actions (3) Element Tree (4) Select Element UI
Although it’s bad business to use the Recorder of the Appium Desktop as the sole technique for creating tests for your mobile application, you can use the Recorder output as a starting point from which to develop better, more comprehensive tests typical of experienced QA engineers. (See Figure 5, callout 1, above)
Figure 6 below shows code generated from the Appium Desktop Explorer adapted for use in a Maven/TestNG project running in Java under Eclipse. You can get the Eclipse code here.

Figure 6: Adapting code generated by the Appium Desktop Explorer into a test case in Eclipse.
Using this Appium Desktop to inspect and exercise your mobile application is useful at the Developer or QA Engineer level for creating tests. But, in order for your mobile testing to be useful in a modern enterprise, you need to be able use Appium within an automated, continuous integration process. This is where an Appium service provider such as Sauce Labs becomes useful.
Supporting Mobile Application Testing and Continuous Integration Using Appium in The Cloud
Setting up an Appium Server in a continuous integration environment can be challenging. You need to make sure all the dependencies Appium needs are in place. You need to make sure that the emulators for the devices you want your application to support are wired into Appium properly. Also, when it comes to time to run a test session, you need to start a server instance that is dedicated to the device emulator against which your test is to run. Should a new device come into the mix, you’ll need to upgrade accordingly. As I said, it’s a lot of work.
The easier way to go about facilitating Appium test support for variety of devices is to use a service such as SauceLabs. Using an Appium Service in conjunction with a CI a tool such as Jenkins is a pretty straight forward undertaking. Figure 7 below shows the concept behind the process.
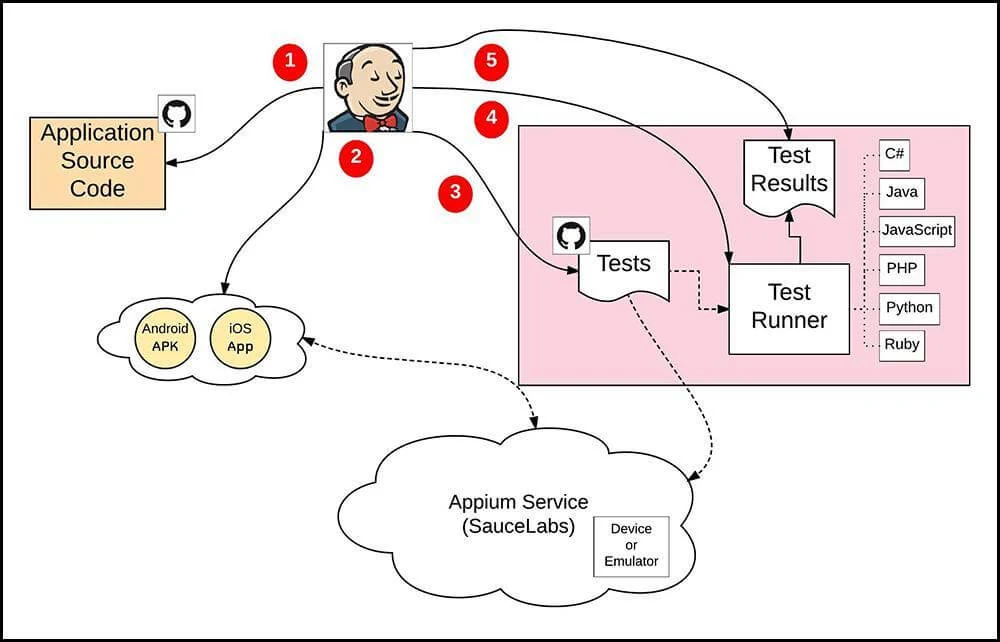
Figure 7: Jenkins works well with an Appium Service to test application code in a Continuous Integration environment.
A developer checks updated mobile application source code into GitHub. Jenkins is notified. (1) Jenkins gets the updated source code from GitHub, (2) compiles the code into a deployment artifact, Andriod APK or iOS App and sends the artifact to a location in the cloud that can be accessed by a URL. (3) Jenkins gets the test suite associated with the application artifact from GitHub, modifies the desired capability entry in the relevant tests to declare the location of the application artifact to be tested. Also Jenkins adjusts the driver initialization in the test to use the URL for a SauceLabs test instance. (4) Jenkins tells the test runner to run the test suite. (5) Jenkins analyzes and distributes test results.
Listing 3 below is a Java test that shows the modification required to have a cloud based application artifact tested against an Appium instance running on SauceLabs.
@BeforeTest
public void setUp() throws MalformedURLException {
DesiredCapabilities desiredCapabilities =new DesiredCapabilities();
desiredCapabilities.setCapability("app","http:/my.testlocation.com/tests/android/v01032387/my-app.apk");
desiredCapabilities.setCapability("platformName","Android");
desiredCapabilities.setCapability("platformVersion",6);
desiredCapabilities.setCapability("appActivity","MainActivity");
desiredCapabilities.setCapability("appPackage","com.example.reselbob.myappimapp");
desiredCapabilities.setCapability("deviceName","Android Emulator");.
URL remoteUrl =newURL("http://SAUCE_USERNAME:SAUCE_ACCESS_KEY@ondemand.saucelabs.com:80/wd/hub");
driver =new AndroidDriver<WebElement>(remoteUrl, desiredCapabilities);
}
Listing 3: A Java test that uses a cloud based application artifact and a SauceLabs’s Appium server instance
As you can see from the diagram above in Figure 7, using Appium as a service for CI is a pretty straight forward undertaking once you get the parts configured correctly.
Putting it all together
Given the number and variety of devices that need to be supported, testing mobile applications can be a laborious task that is difficult to automate. New devices are coming on the market all the time and new applications features are always in demand. However, using a mobile testing tool such Appium reduces the burden required to make quality software. And, because Appium is based on Selenium, you don’t have to reinvent the wheel (and Appium can be used for mobile website testing too). Quality Assurance engineers accustomed to writing test code for browsers using Selenium will have little problem expanding their expertise into Appium for mobile application testing. Lastly, when using an Appium Service such as SauceLabs, you’ll experience even more efficiency in terms of device and concurrency support, not to mention cost savings. Whether you are working as a QA Engineer creating mobile application tests or a DevOps engineer responsible for making sure those tests run in a Continuous Integration environment, you are sure to find Appium a welcome addition to your technology toolbox.
