Selenium is a popular open source framework for automated testing of web applications across multiple browsers, operating systems, and devices.
Selenium makes it easier for developers to create automated tests for web applications without having to worry about the underlying technology. Before Selenium, testing a web application was a time-consuming process. You had to manually perform different scenarios on various browsers to identify issues in the user experience.
The Selenium project offers built-in support for 5 languages: Java, JavaScript, Python, C#, and Ruby. Python has the advantage of being easy to learn and versatile, and it's popular among developers. It also offers powerful built-in functions and an expansive ecosystem of libraries that make it easy to write nearly any kind of script, and it's well-suited for test automation.
Prerequisites
To follow this tutorial, you need these installed on your computer:
The latest version of Python. This tutorial uses Python 3.11, and you need a fundamental knowledge of Python programming to follow along.
A free trial Sauce Labs account to automate your testing process for multiple devices.
A modern browser like Chrome, Edge, or Firefox. This tutorial uses Chrome.
Selenium v4.6+
As of Selenium versions 4.6, you no longer need to download the browser driver separately. The Selenium WebDriver employs a service object (Selenium Manager) to render a browser window, negating the requirement to download an external WebDriver.
Getting Started with Selenium
In addition to installing Python, you have to install the Selenium API for Python using pip.
Open your terminal and run the following command:
pip install selenium
After installing Selenium, you can begin writing your script.
1. The first step is to create a new Python script. Open your preferred text editor and create a new file called selenium_test.py. Then, import the Selenium library by adding the following lines of code to your script:
1from selenium import webdriver2from selenium.webdriver.chrome.options import Options3from time import sleep
2. Next, create a new instance of the webdriver class with additional Options. This class represents the web browser that will be used to run your tests. In this example, you'll be using the Chrome web browser, so you need to create a new instance of the Chrome class, and the Options class described above allows web drivers to run a browser instance with additional capabilities.
The example below sets the driver to start the web browser without the DevTools prompt:
1options = Options()23options.add_experimental_option("excludeSwitches", ["enable-logging"])4driver = webdriver.Chrome(options=options)
Setting Options is not mandatory, but it makes the output window much cleaner. You will, however, need to include the argument that the Chrome class should take a path to WebDriver, as Selenium uses it to initiate the browser window and perform the tests.
3. With your driver object set up, you can start the testing process by writing a simple script to test the title of a web page. For this tutorial, you'll run your tests on the Sauce Labs demo site, SwagLabs.
In your code editor, write the following code in selenium_test.py:
1from selenium import webdriver2from selenium.webdriver.chrome.options import Options34from time import sleep567# Set options for not prompting DevTools information8options = Options()9options.add_experimental_option("excludeSwitches", ["enable-logging"])1011print("testing started")12driver = webdriver.Chrome(options=options)13driver.get("https://www.saucedemo.com/")14sleep(3)1516# Get page title17title = driver.title1819# Test if title is correct20assert "Swag Labs" in title21print("TEST 0: `title` test passed")2223# Close the driver24driver.quit()
4. To run this test, open your terminal and run the following command:
python selenium_test.py
Running the command above should produce the following output:
testing started
TEST 0: `title` test passed
If the output does not return an AssertionError, it indicates that the tests passed successfully and the title of the demo website is correct.
Extending the Test Script
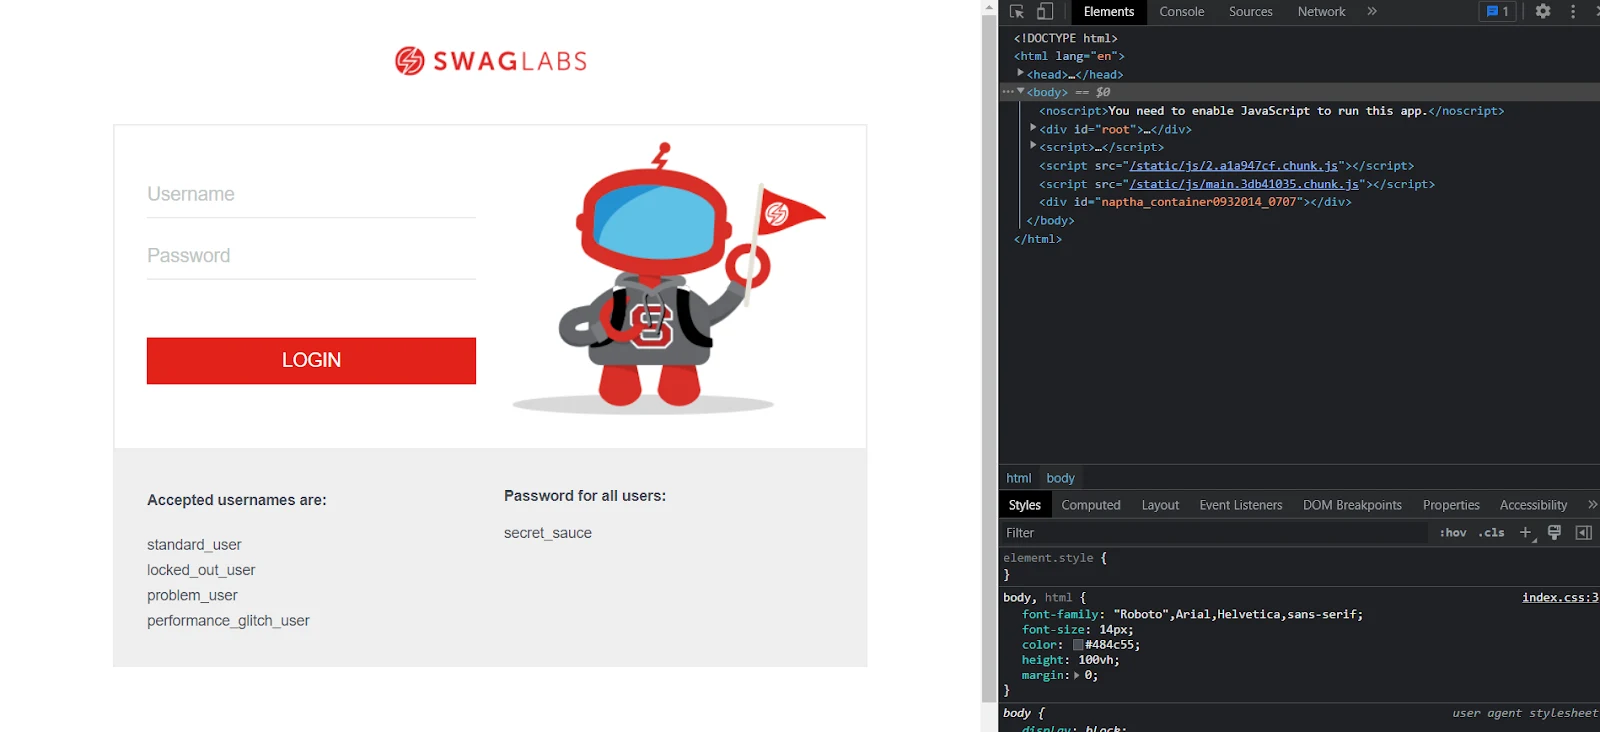
In this section, you'll extend your script to test the login functionality of the demo site. To do this, you'll need to grab the input boxes and submit button of the web page by inspecting its site elements. Right-click the page and select the Inspect menu option to see an Elements tab in the right pane of the browser window, as shown in the image below:
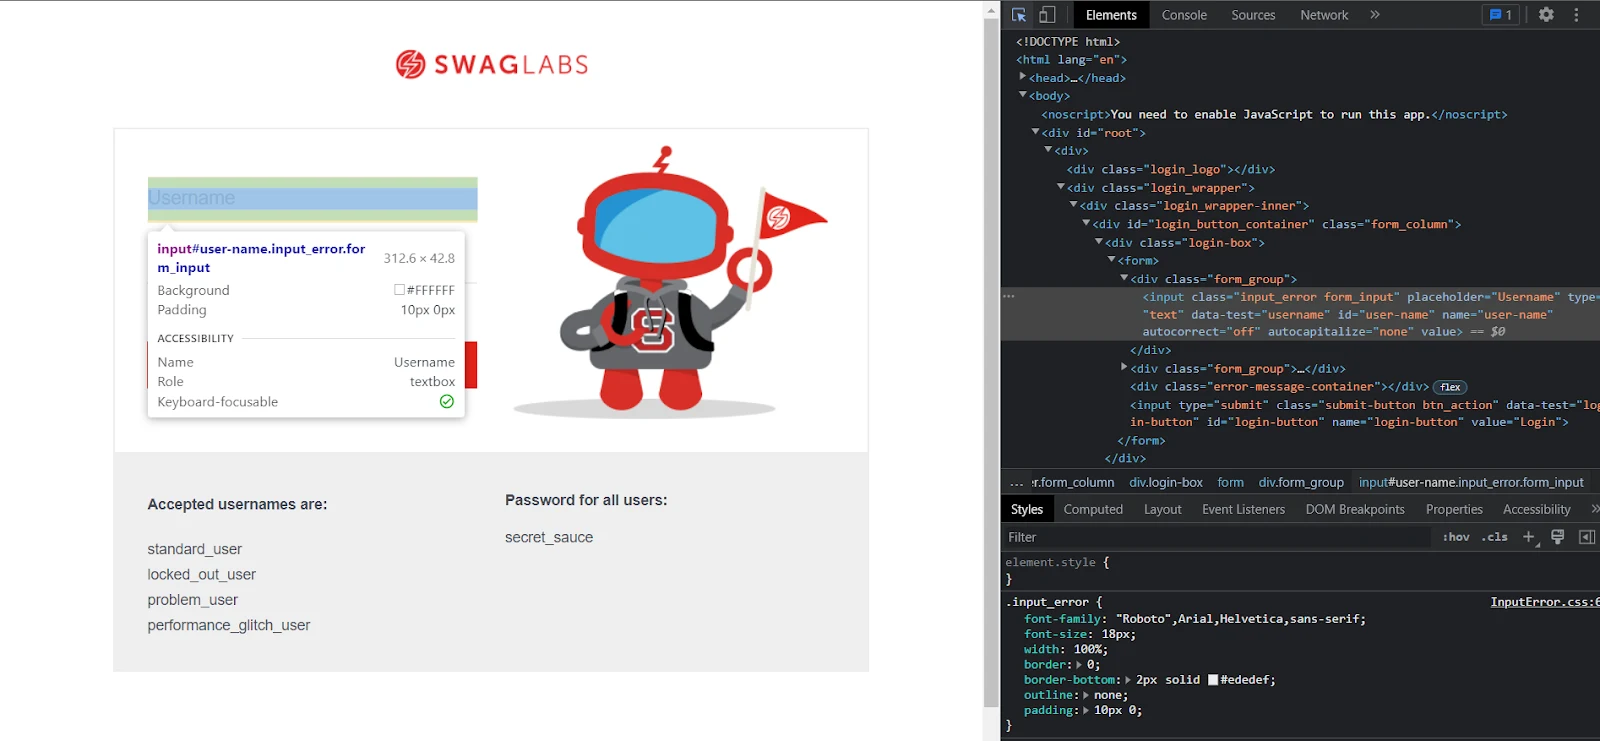
This pane is called DevTools. With it opened, grab the id or class attributes of the input boxes on the web page, depending on the elements you want to test. Click the icon in the top-left corner of the DevTools pane, then select elements on the web page. The corresponding code of the element will automatically highlight in the DevTools pane, as shown in the image below:
Testing Login Functionality
To test the login functionality of the demo site, Selenium will locate the username and password fields and populate them with appropriate credentials. You'll then programmatically click the login button, which can easily be done after selecting the button using its id.
To begin writing the script, create a new file named test_demo.py. Add the following code to import the required modules that will be used by the script:
1from selenium import webdriver2from selenium.webdriver.chrome.options import Options3from selenium.webdriver.common.by import By45from time import sleep
After importing the necessary modules, you must set the Options class for your webdriver and initiate Chrome WebDriver, as shown in the code below. This webdriver is responsible for rendering the browser window:
1# Set options for not prompting DevTools information2options = Options()3options.add_experimental_option("excludeSwitches", ["enable-logging"])45print("testing started")6driver = webdriver.Chrome(options=options)
Next, you must add the code below to open the demo website and begin your testing process. After opening the web page, the execution of the script halts for three seconds using the sleep(3) function so that all the elements in the web page load completely in the browser:
1driver.get("https://www.saucedemo.com/")2sleep(3)
In the code block below, you use find_element() and the By class in conjunction to grab the username and password fields. The By class is used to easily locate elements on the web page through class, id, and xpath. After getting the fields, you use the send_keys() function to populate the fields with credentials. You then use the find_element() function to get the login button and use the click() function for the button to initiate the login process:
1# Find element using element's id attribute2driver.find_element(By.ID, "user-name").send_keys("standard_user")3driver.find_element(By.ID, "password").send_keys("secret_sauce")4driver.find_element(By.ID, "login-button").click()5sleep(5)
To test whether the login was successful, you can check if the resulting web page loads as expected. In the code below, you assert that the element with title as its class attribute contains the string "products". If the assert is wrong, your string will throw an AssertionError. After performing the test, you have to quit the driver to release any memory held by the browser window:
1text = driver.find_element(By.CLASS_NAME, "title").text23# Check if login was successful4assert "products" in text.lower()56print("TEST PASSED : LOGIN SUCCESSFUL")78# Close the driver9driver.quit()
Running the above code should produce the following output:
$ python test_demo.py
testing started
TEST PASSED : LOGIN SUCCESSFUL
As you can see, the test passed, which means that the demo site is working as expected.
Note: Using sleep is generally not considered a best practice, and was done here for simplicity's sake. The WebDriverWait command is the proper way to go.
Testing Add/Remove Buttons
In this section, you'll extend your script to include two more tests. These will test the buttons for adding and removing items from the cart.
Open the test_demo.py file and add the code below before the driver.quit() statement. First, add a test that grabs all the "Add to Cart" buttons and clicks a certain number of buttons:
1print("testing add to cart")2add_to_cart_btns = driver.find_elements(By.CLASS_NAME, "btn_inventory")34# Click three buttons to make the cart_value 35for btns in add_to_cart_btns[:3]:6btns.click()
The code above uses the find_elements() function instead of find_element() to grab a list of elements with btn_inventory as the CLASS_NAME.
Now, you have to test the assertion that the cart_value is three after clicking the three buttons in add_to_cart_btns:
1cart_value = driver.find_element(By.CLASS_NAME, "shopping_cart_badge")2assert "3" in cart_value.text3print("TEST PASSED : ADD TO CART", "\n")
In the above code, you retrieve the element with the class name shopping_cart_badge and check if it contains the text "3", which would indicate that three items were successfully added to the cart.
To test the remove from cart button functionality, add the following code to your Selenium script:
1print("testing remove from cart")2remove_btns = driver.find_elements(By.CLASS_NAME, "btn_inventory")3for btns in remove_btns[:2]:4btns.click()5assert "1" in cart_value.text6print("TEST PASSED : REMOVE FROM CART", "\n")
The code uses the driver.find_elements method again to locate all the btn_inventory elements on the page, and clicks the first two of them. It then checks if the shopping_cart_badge element contains the text "1", which would indicate that two items were successfully removed from the cart. The code prints a success message if both of these checks pass.
The script above runs on your machine with a local browser, which is sufficient for learning the basics. However, testing an entire website locally isn't scalable--if it's on your work laptop, you can't do anything else while the tests are running. This is one of the reasons why testing should be done on a cloud-based testing platform like Sauce Labs.
A cloud-based testing platform lets you manage, run, and analyze the results of tests on a wide range of browsers and platforms on remote servers rather than on your local hardware. It also ensures that the results are reliable and consistent, even when running large numbers of tests in parallel.
A solution like Sauce Labs allows you to:
Run tests in parallel on multiple test machines to speed up test execution
Test across a range of environments, including different operating systems, browsers, and devices
Report and analyze test results in real time
Work together on testing projects with collaboration and sharing tools
Easily adjust the number of test machines and other testing resources for better scalability and flexibility
To use Sauce Labs for your current Selenium script, you have to make some changes to your file. Before making any changes, copy the on-demand URL from the User Settings section in your Sauce Labs dashboard.
Sauce Labs provides hundreds of devices and browser versions on which to run your tests. It also offers a platform configurator to generate custom options for your Selenium WebDriver. The image below shows generated Options for macOS Ventura with Safari 16:
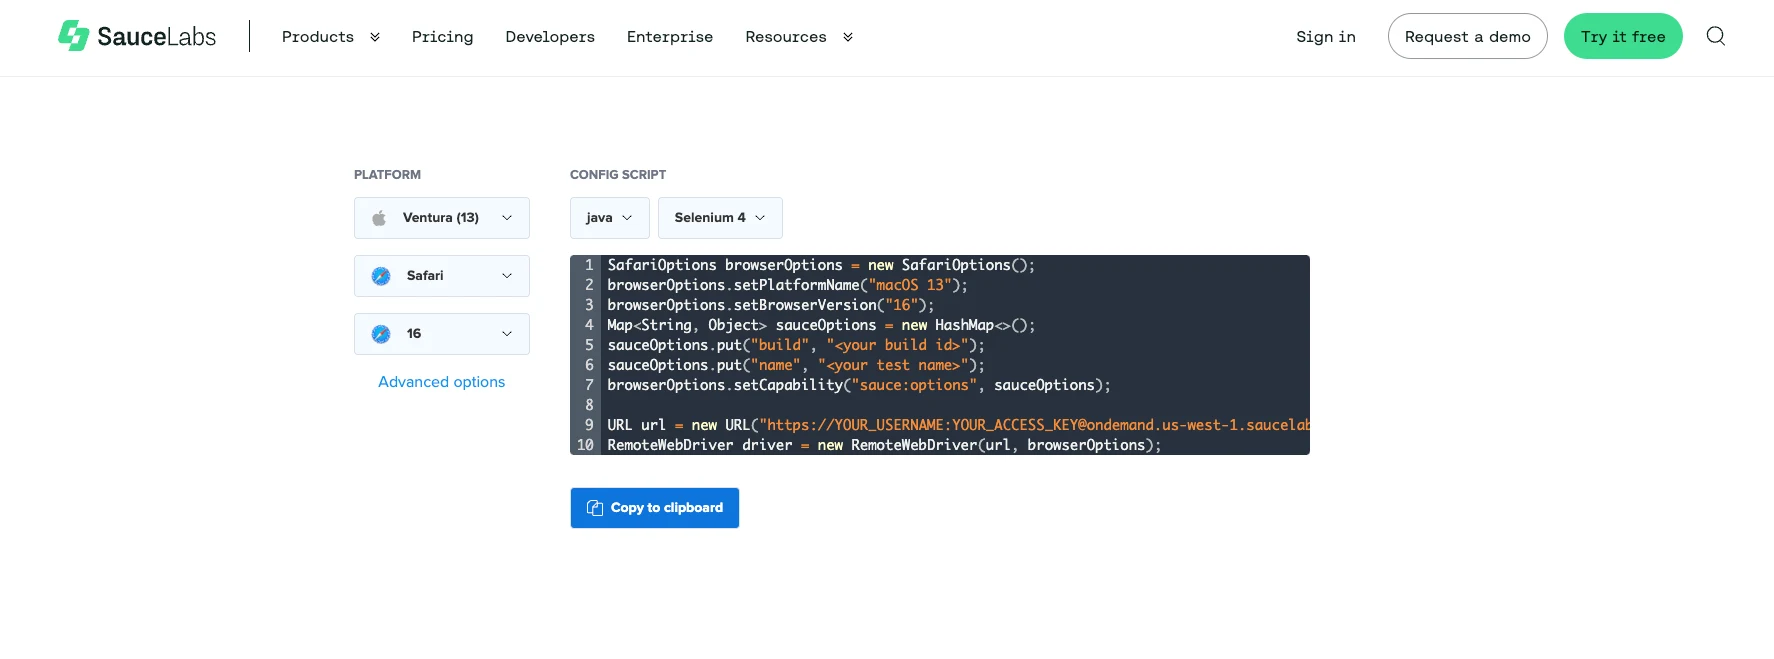
Copy these options and paste them into your Selenium script. Next, supply the build ID and test name of your choice and replace the url with the on-demand URL you copied earlier. The final file should look something like this:
1<script src="https://gist.github.com/vivekthedev/f8832087dd4da87f6b63750c8d0b4998.js"></script>
Run the test using the command below:
python test_demo.py
You should get the output below to show that the test worked as expected:
1testing started2TEST PASSED : LOGIN SUCCESSFUL34testing add to cart5TEST PASSED : ADD TO CART67testing remove from cart8TEST PASSED : REMOVE FROM CART
You can also get additional information about the tests from Sauce Labs, including screenshots, video recordings, logs, and command history. Go to the Test Results section in your Sauce Labs dashboard to see the in-depth test analysis.
Wrapping Up
In this tutorial, you learned how to use Selenium with Python to run tests on web applications. You tested a demo site by asserting its title and then expanded on the script to test the internal functionality of the web application.
You also learned how to adapt your script to work on the cross-browser cloud testing platform Sauce Labs, and you ran a Selenium script using Sauce Labs' built-in platform configurator.
Using a cloud-based cross-browser testing platform like Sauce Labs makes it easy to run tests on a wide range of browsers and platforms. Sauce Labs' reliable and stable platform also helps ensure that test results are reliable and consistent, even for large numbers of tests.


Jump to content
Prerequisites
Getting Started with Selenium
Extending the Test Script
Testing Login Functionality
Testing Add/Remove Buttons
Using a Cloud-Based Testing Platform
