One of the most important parts of continuous integration, continuous deployment (CI/CD) is continuous testing; however, it's also one of the challenging things to automate. Jenkins, an open source continuous integration (CI) server, is a popular choices for CI/CD pipeline orchestration because it allows you to build, test, and deploy your code continuously and autonomously.
When paired with the right tools, Jenkins can be used to automate end-to-end (E2E) testing. This enables your development team to focus on new features and shortens the time to market.
One of the advantages of Jenkins is its flexibility. However, this can also be a disadvantage. Deciding which methodologies, plugins, and tools to pair with Jenkins can be difficult. In this article, you'll learn about the best ways to use Jenkins and how to set it up.
What is Jenkins Test Automation?
Jenkins is a multifaceted automation server and orchestration tool that you can use as a foundation for your entire CI/CD workflow. However, since it's compatible with a myriad of test frameworks, plugins, and automation tools, you can also use it as a dedicated execution platform to develop and run comprehensive test automation. It can execute tests, aggregate results, and gather data on failures and bugs.
Because Jenkins is completely open source, it's highly customizable. It offers you an interactive GUI to manage your orchestrations. Additionally, it can be integrated with modern messaging and collaboration software, such as Microsoft Teams, Asana, and Slack. This helps you keep up-to-date with the progress of your builds and the status of your tests.
With Jenkins, you can schedule your tests (according to time) or trigger them according to a condition, such as a successfully completed build. It's also compatible with a wide variety of source code and version control management tools, such as Git, Github, and Azure DevOps Team Foundation.
These are just a few of the things that Jenkins test automation can do. Now it's time to see it in action!
Implementing Jenkins Test Automation
To begin this tutorial, you'll need to install Jenkins. However, before you do that, there are a few other prerequisites you need to be aware of:
Sufficient hard drive space and at least 256 MB of RAM
Maven installed and configured on your local system
Git locally installed
GitHub repository with at least one project
It's also important to know that this tutorial uses Sauce Labs to facilitate testing. Why? Well, Sauce Labs provides a unified platform for cross-platform web and mobile application testing. When you're developing multi-platform applications, you need to know that they perform consistently on all supported devices.
Getting access to all the devices you need can be difficult, but Sauce Labs can help. It supports thousands of real devices, emulators and simulators, browsers, and operating system versions, all from a single platform in the cloud.
In addition to this, it supports a host of backend, frontend, and E2E testing tools, such as Selenium, Appium, Cypress, Puppeteer, Playwright, and TestCafe.
In this tutorial, you'll use a Sauce Labs plugin to add test automation through your Jenkins-based CI/CD pipeline. This plugin makes it easier for you to configure the Sauce Lab–hosted tests for your pipeline. As you'll see, this guide uses it quite extensively.
To integrate Sauce Labs with Jenkins, you'll need the following:
A Sauce Labs account
Your Sauce Labs username, access key, and OnDemand URL
Set up Java for Jenkins
The following steps show you how to set up Jenkins for Windows computers. However, the concepts are somewhat transferable to non-Windows operating systems.
If you haven't already, you need to download and install the official Java Development Kit (JDK). As previously stated, Jenkins is only compatible with the 64-bit versions of JDKs 11 and 17. You will need JDK 17 to follow this guide.
Then you need to set the necessary Java environment variables to make it easier for Jenkins to find the JDK.
Configure and install Jenkins on Windows
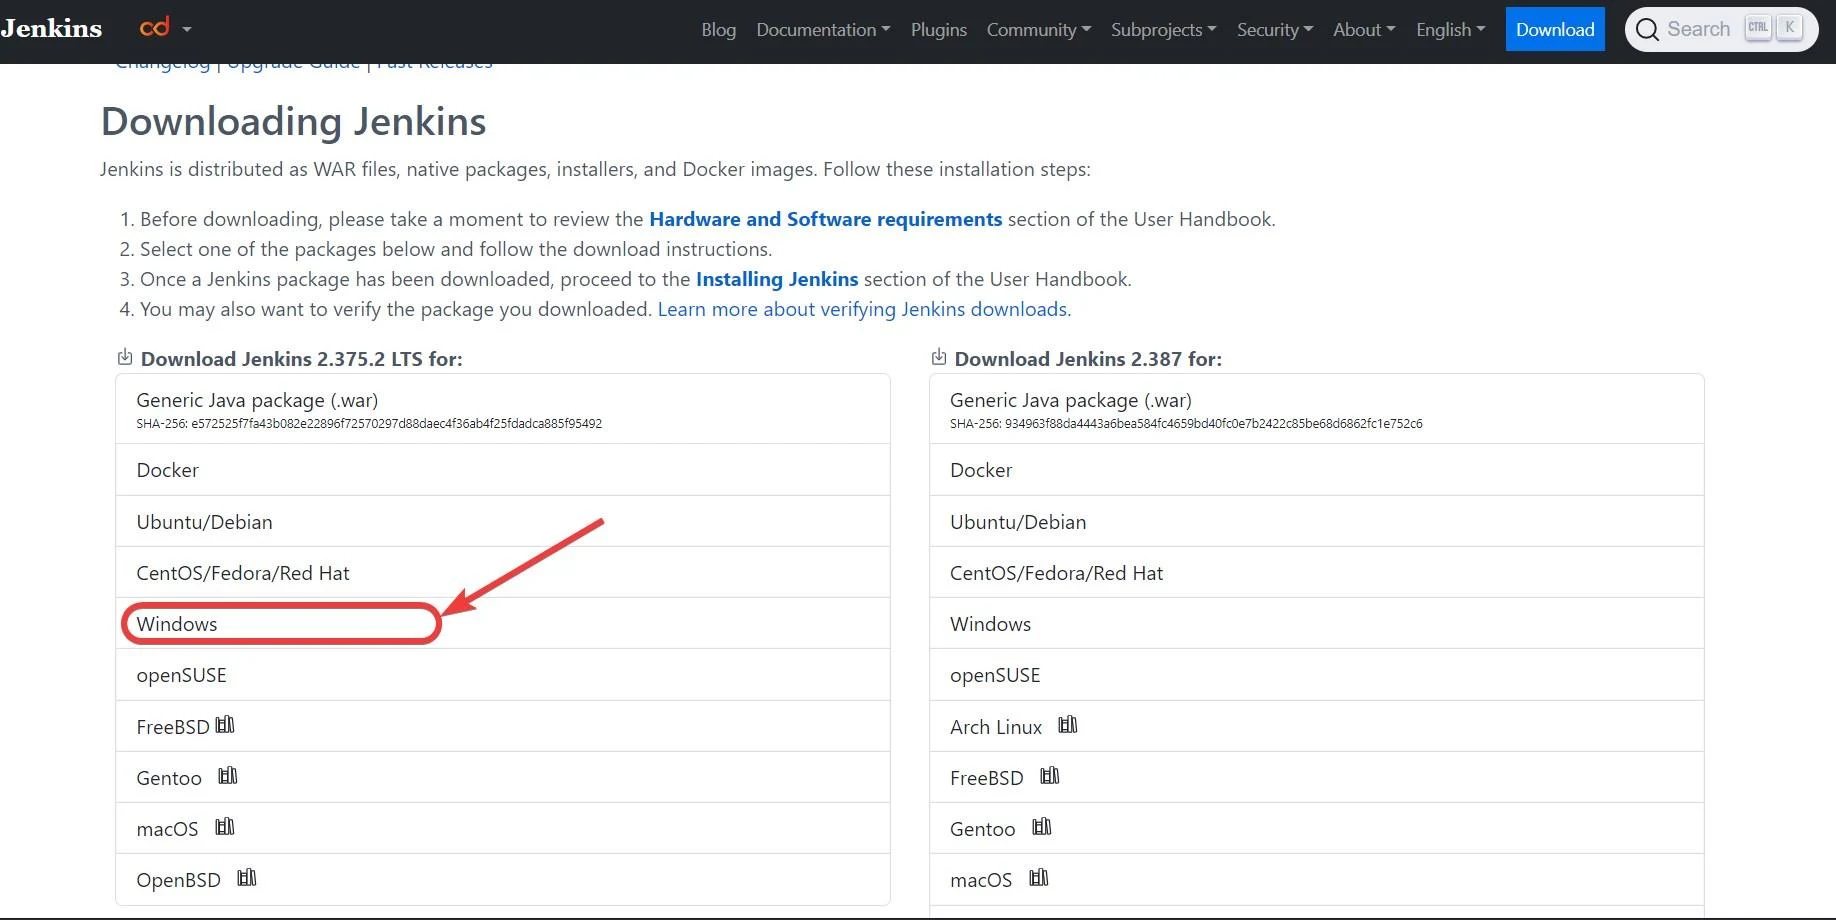
Navigate to the Jenkins download page and click on the Windows option underneath the stable (LTS) release:
Then use the official Jenkins handbook to configure and install Jenkins on your Windows PC.
Launch and use Jenkins
To launch and use Jenkins, start by running your preferred web browser and navigate to the following address: http://localhost:8080/.
Read the instructions on the screen to find your Admin password. Enter it and click Continue.
At this point, it will take a few moments for Jenkins to load. Make sure that you're connected to the internet and that your firewall isn't blocking Java.
When it loads successfully, you'll be taken to a customization screen where you can add plugins. If this is your first time using Jenkins, click on Install suggested plugins, and the installation should take a few minutes. You may notice that Git is one of the suggested plugins, which you'll need later for version management.
Once the installation is complete, Jenkins will ask you to create your first admin user. While it's best practice to complete this step, you can skip it if you want to. Once you're done filling out the admin user creation form, select Save and Continue:

You'll be prompted to customize your Jenkins URL; however, leave it as is, and select Save and finish. Once you click on the Start using Jenkins button, you should be able to configure and integrate Git with Jenkins.
Add Sauce Labs OnDemand Plugin to Jenkins
Once Jenkins is ready to use (for the first time), it will direct you to the dashboard, which acts as a home screen. You can also navigate to the dashboard by clicking on the Dashboard link near the top-left-hand corner.
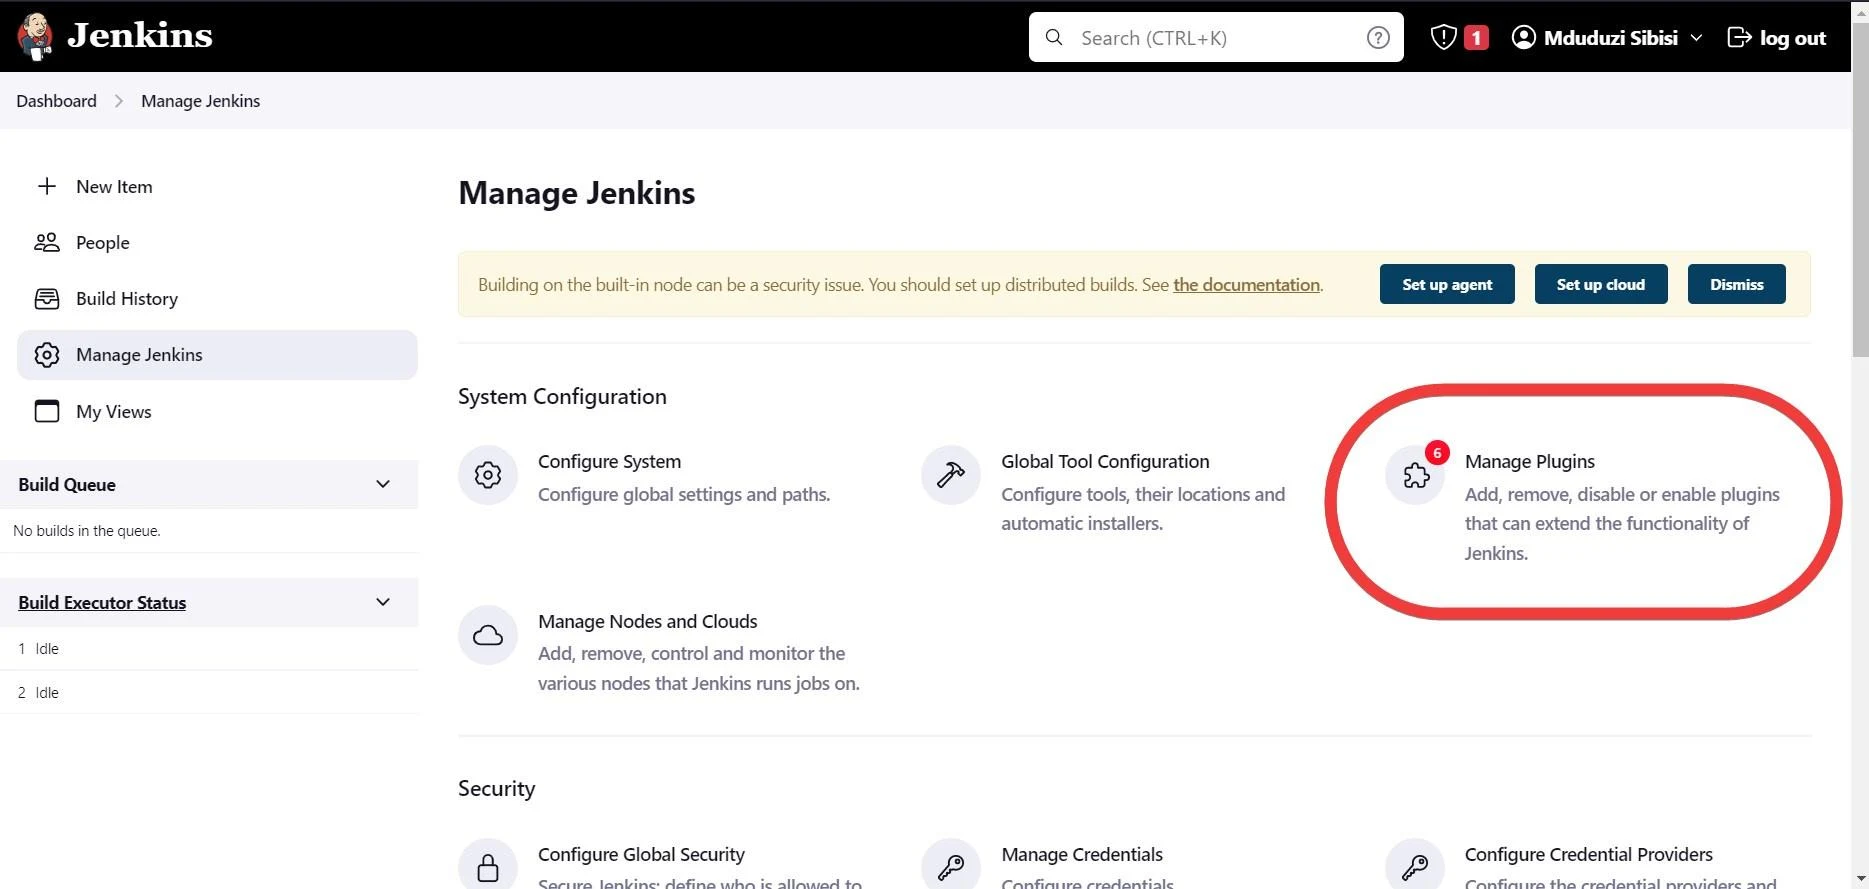
Select Manage Jenkins from the left panel:

And select Manage Plugins:
Next, click on Available Plugins from the left side panel; then type "Sauce OnDemand" into the search bar. In the list of results, tick the checkbox next to Sauce OnDemand and select Install without restart:

Restart Jenkins once all the plugins have been installed.
Create Sauce Labs credentials
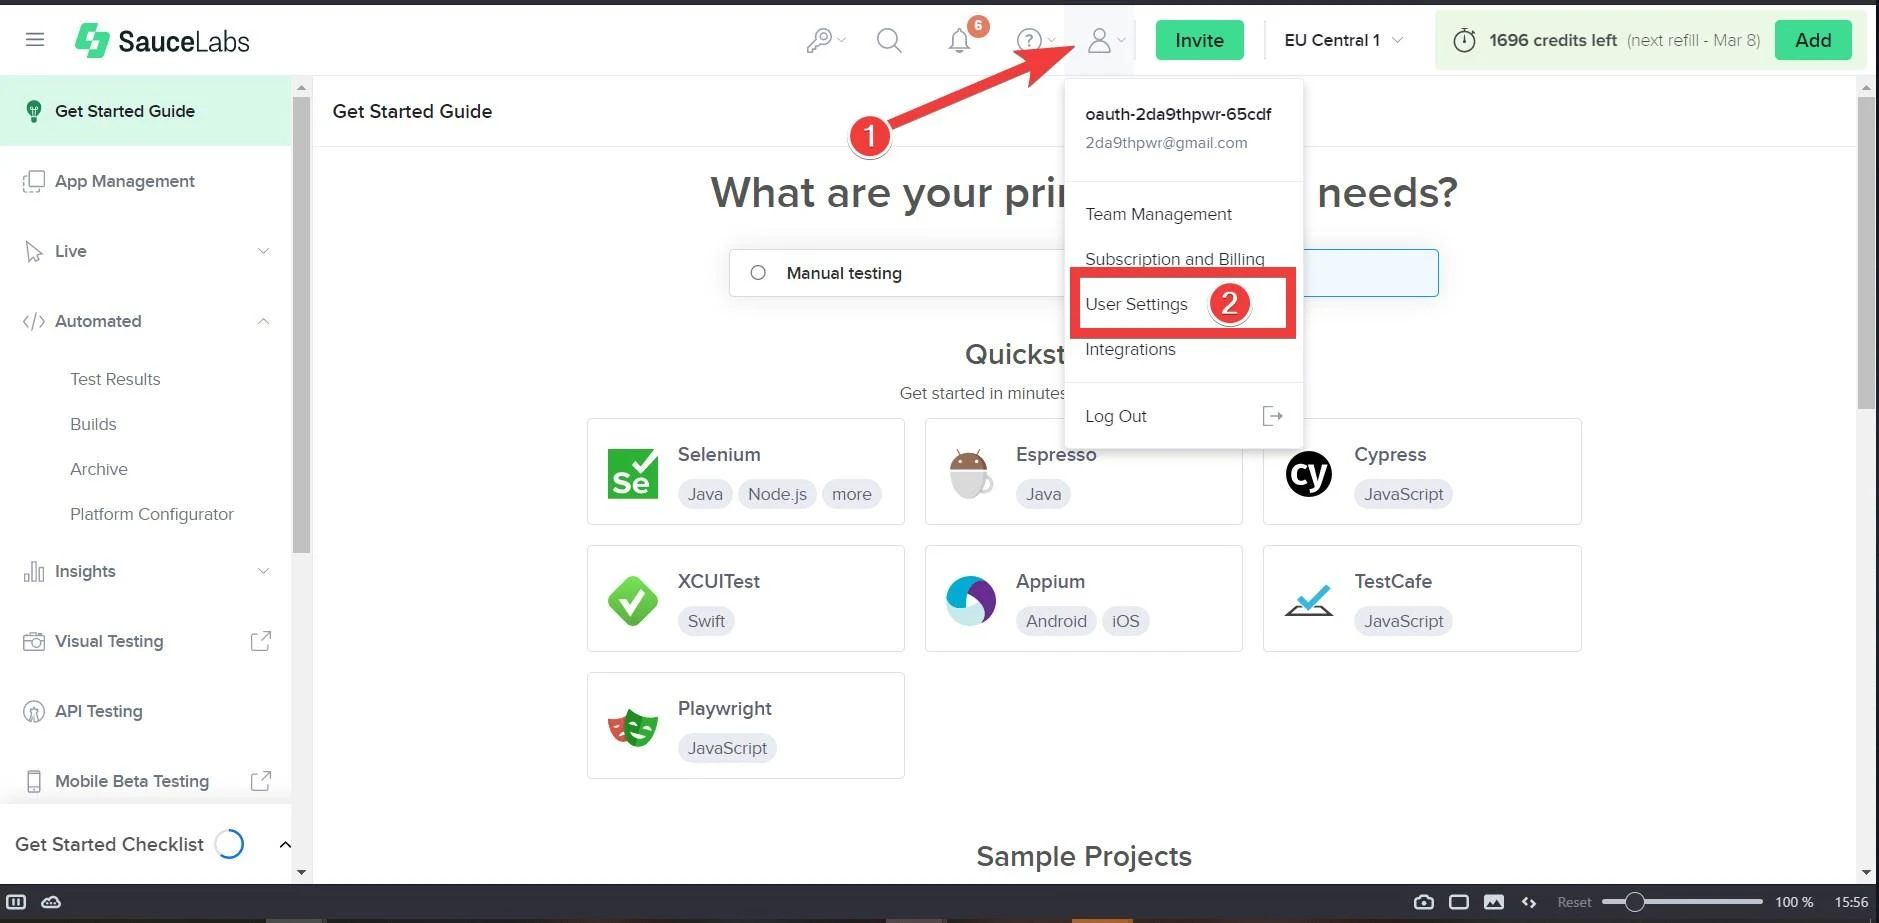
To find your Sauce Labs credentials, navigate to your Sauce Labs account dashboard. Click on the account icon located on the top toolbar and select User Settings from the drop-down menu:
Make sure you note or copy and save the username, access key, and OnDemand URL.
To fully integrate Jenkins with the Sauce Labs OnDemand plugin, you need to create a set of Jenkins Sauce Labs credentials. And because you just restarted Jenkins, you may be required to log back in.
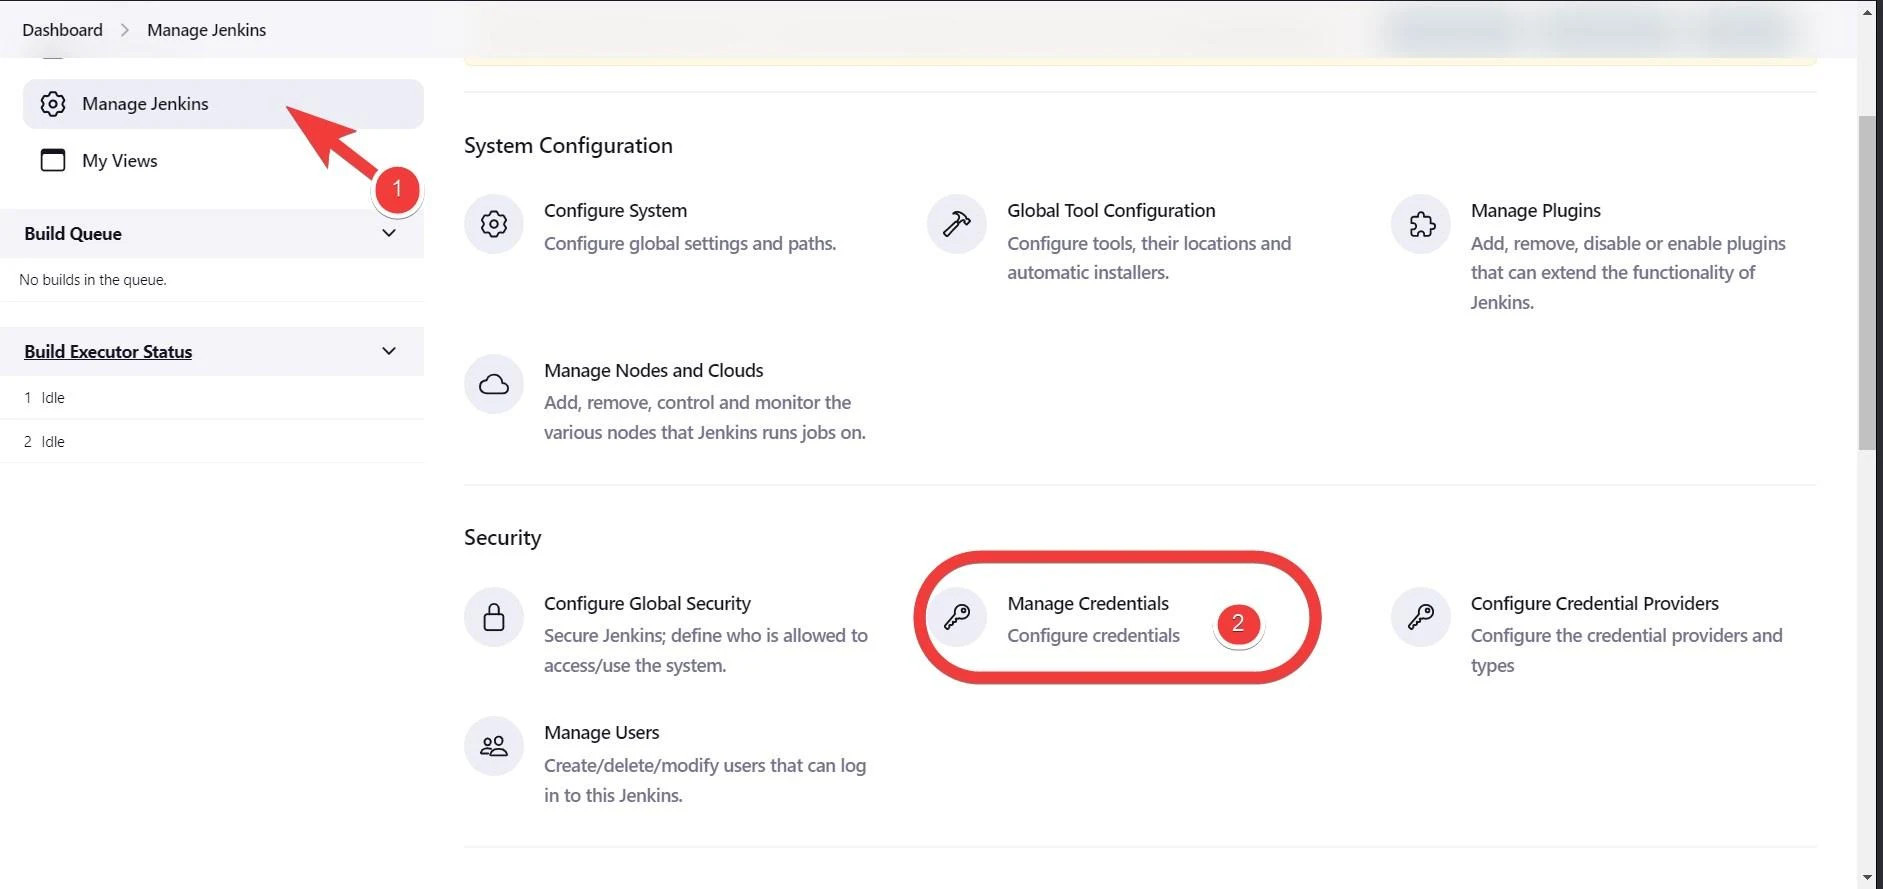
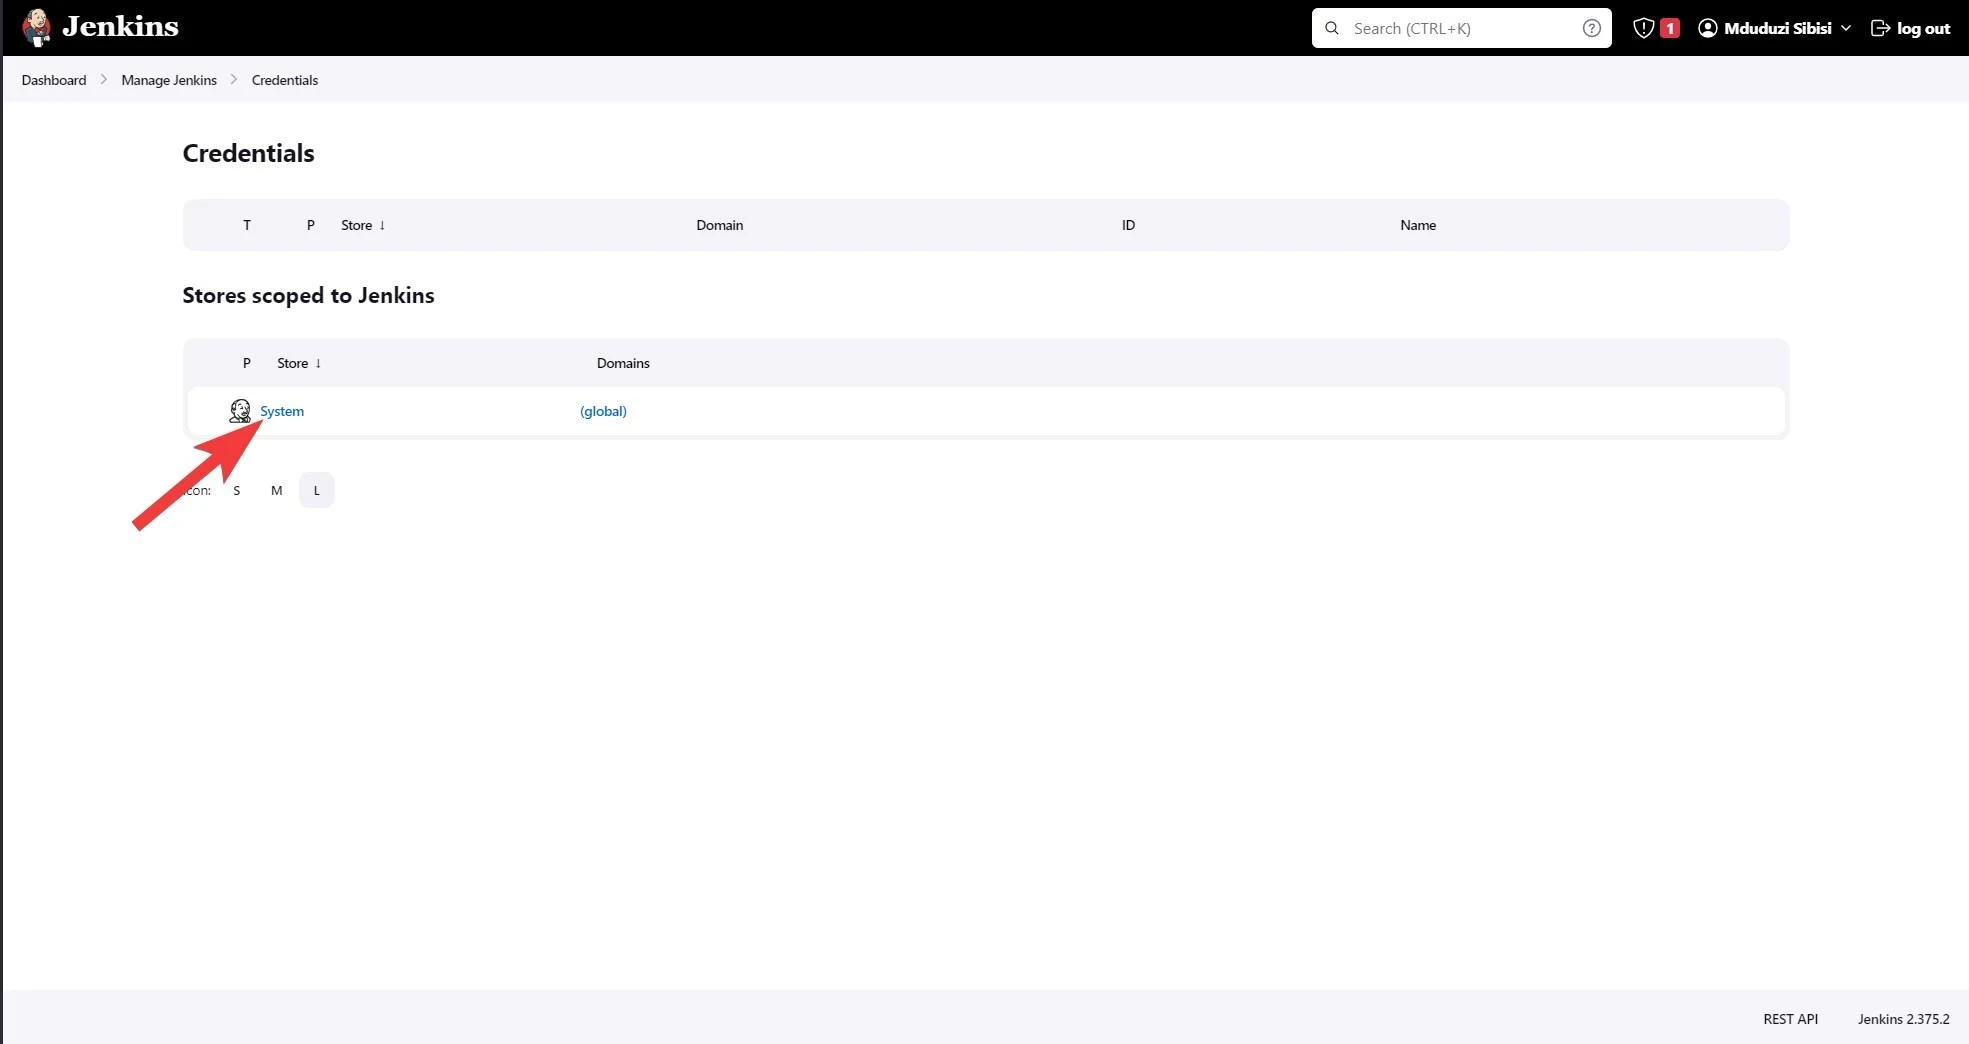
Once logged in again, select Manage Jenkins from the left side panel. Then scroll down until you reach the Security section and click on Manage Credentials:
Select System under Stores scoped to Jenkins:
And click on the Global credentials (unrestricted) link:

Then click on Add Credentials and select the drop-down menu under Kind and select "Sauce Labs".
Leave the Scope option as is and enter the username and access key from your Sauce Labs account. If you're sure you've entered the credentials correctly, you can ignore any error message that Jenkins displays under these fields. As with most forms, the validation process and the actual validation message may be out of sync.
Select the Sauce Data Center and leave the ID blank (Jenkins will create one for you). The Description field can be left blank as well. Finally, select Create:

If you navigate back to the Credentials Management screen, you'll find that Jenkins created an entry for your Sauce Labs credentials. If you have more than one set of credentials registered, it's recommended that you take note of your Sauce Lab credentials ID since it will be required when you create a Jenkins project.
Create the test
This guide contains a sample repository with a simple Java-based test tutorial. It uses Sauce Labs to navigate to a website https://www.saucedemo.com and verify its title. The two most important files in the repository are the `pom.xml` and the `test class` file.
Since the test is performed using Maven, the `pom.xml` file contains a list of all the necessary Sauce Labs and Selenium dependencies to make the test work.
Fork the repository and add your data center's OnDemand URL to this part of the code:
1/*2* OnDemand URL found under User Settings in Account Settings3* The following is just an example, add your own URL45*/67// URL url = new URL("<SAUCE_USERNAME>:<SAUCE_ACCESSKEY>@ondemand.eu-central-1.saucelabs.com:443/wd/hub");8URL url = new URL(ON_DEMAND); //Replace ON_DEMAND with your onDemand URL here or the test will not work
If you want to learn more about WebDriver and how to use Selenium with Sauce Labs, Sauce Labs has a host of comprehensive guides. These guides include tutorials and samples for Java, Ruby, C#, and Python. This means that while this guide uses a Java-based example, you're not limited to that option.
Integrate Git into Jenkins
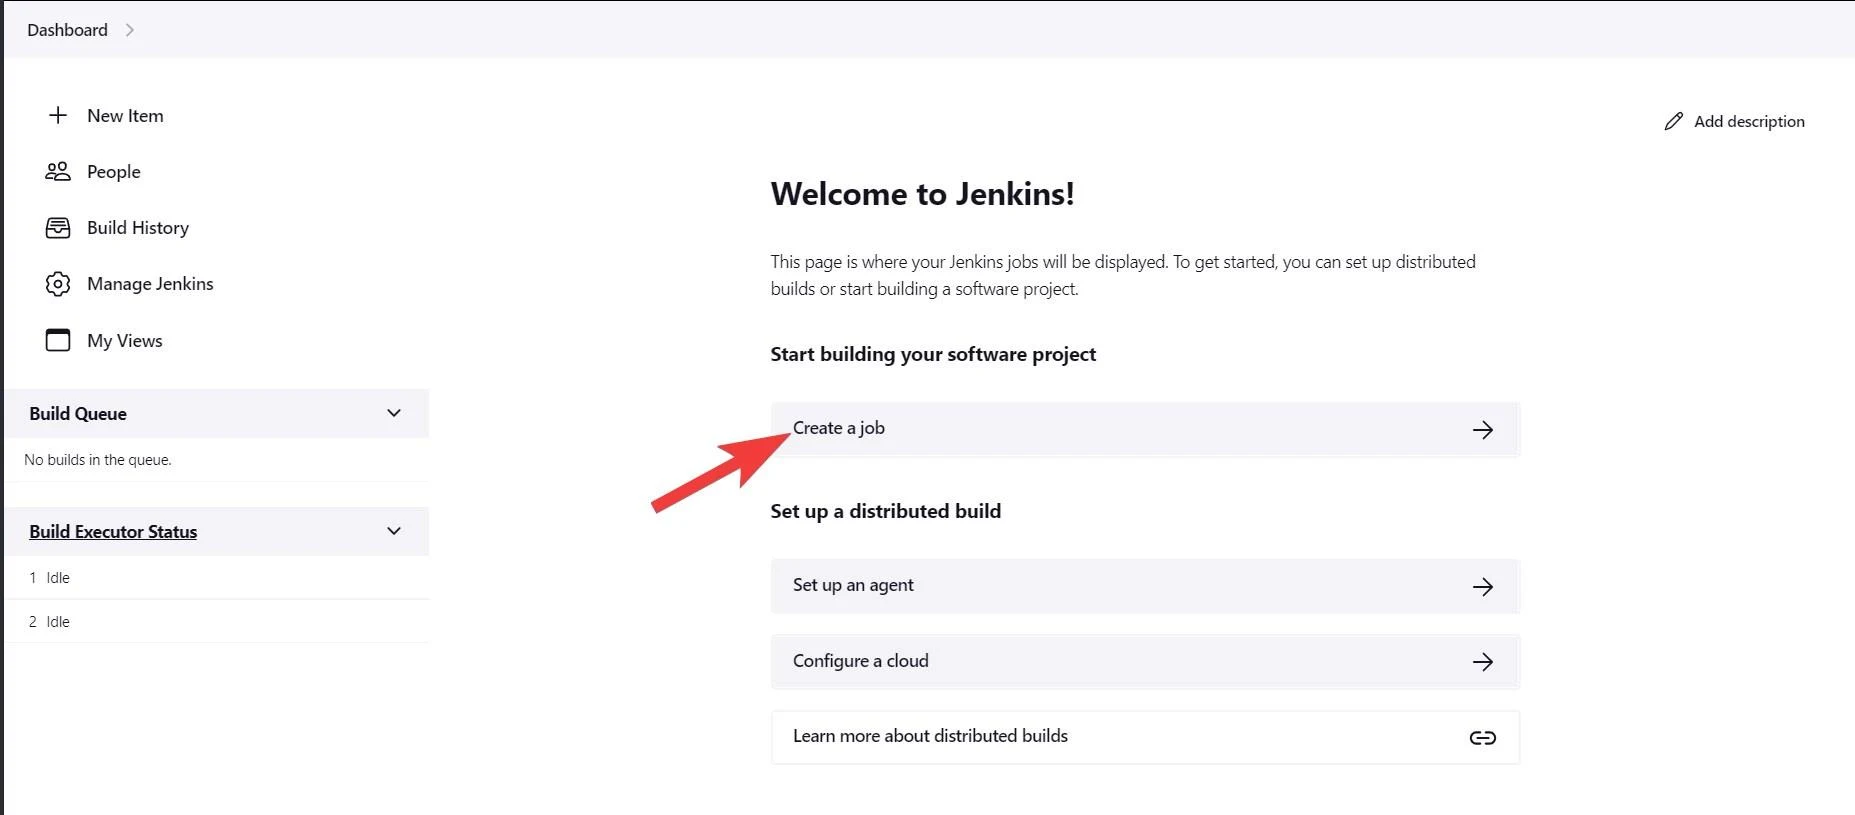
Once you've created your credentials, navigate back to your dashboard and select Create a job under Start building your software project:
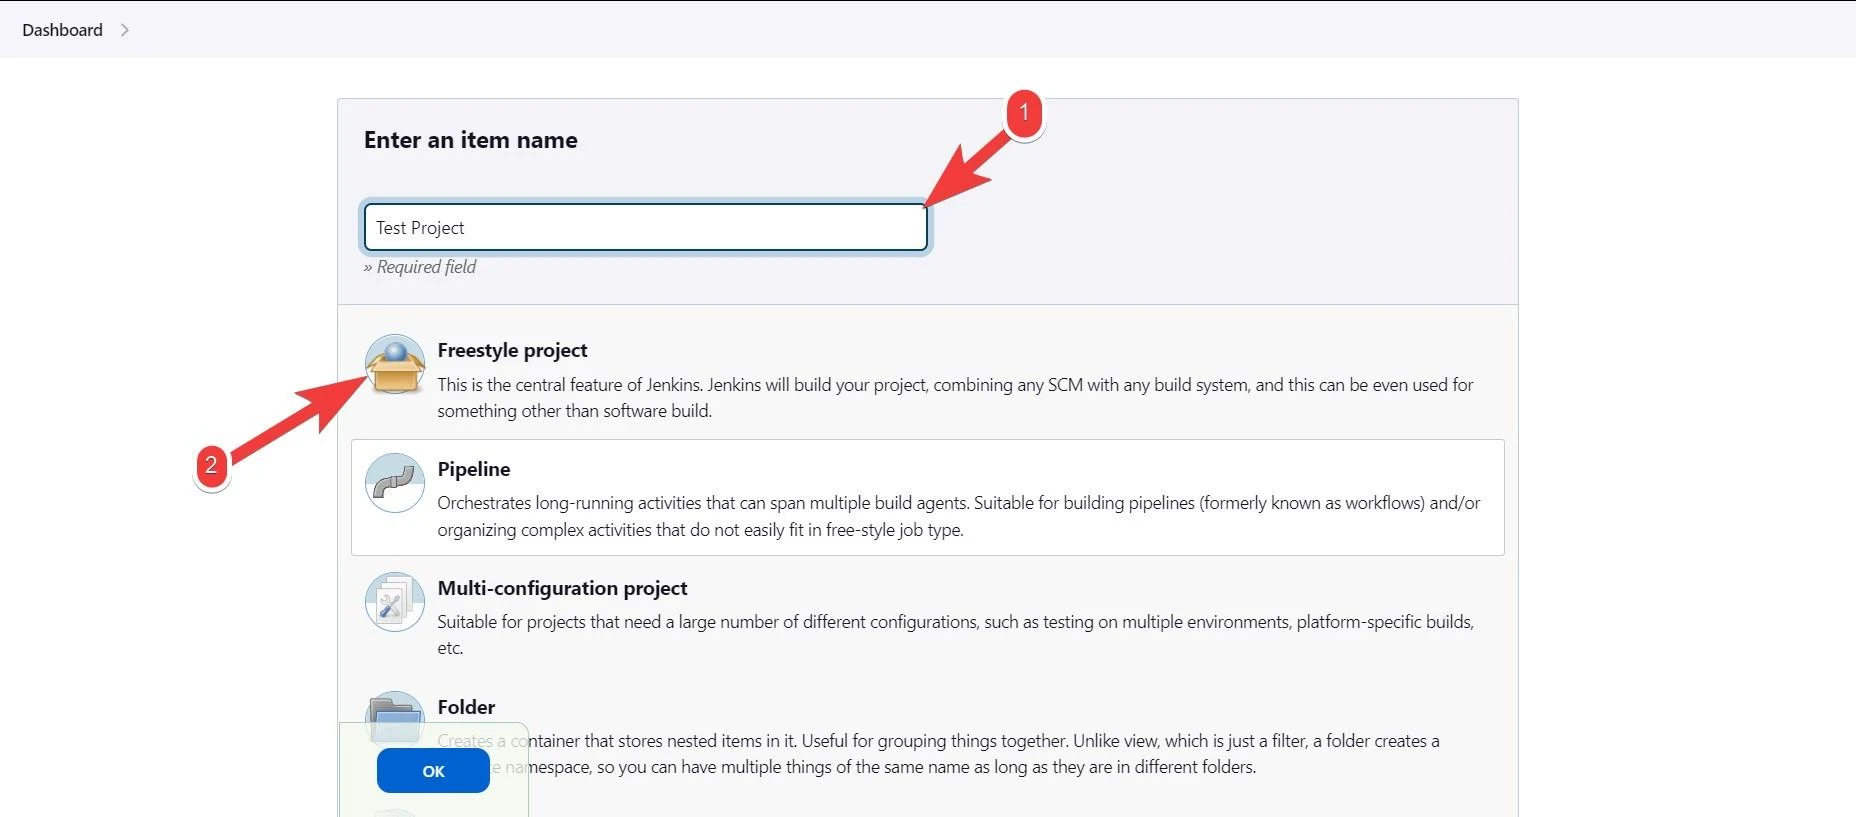
Enter the name of your project under the Item name field and select Freestyle project. Then click on the floating OK button near the bottom of the screen:
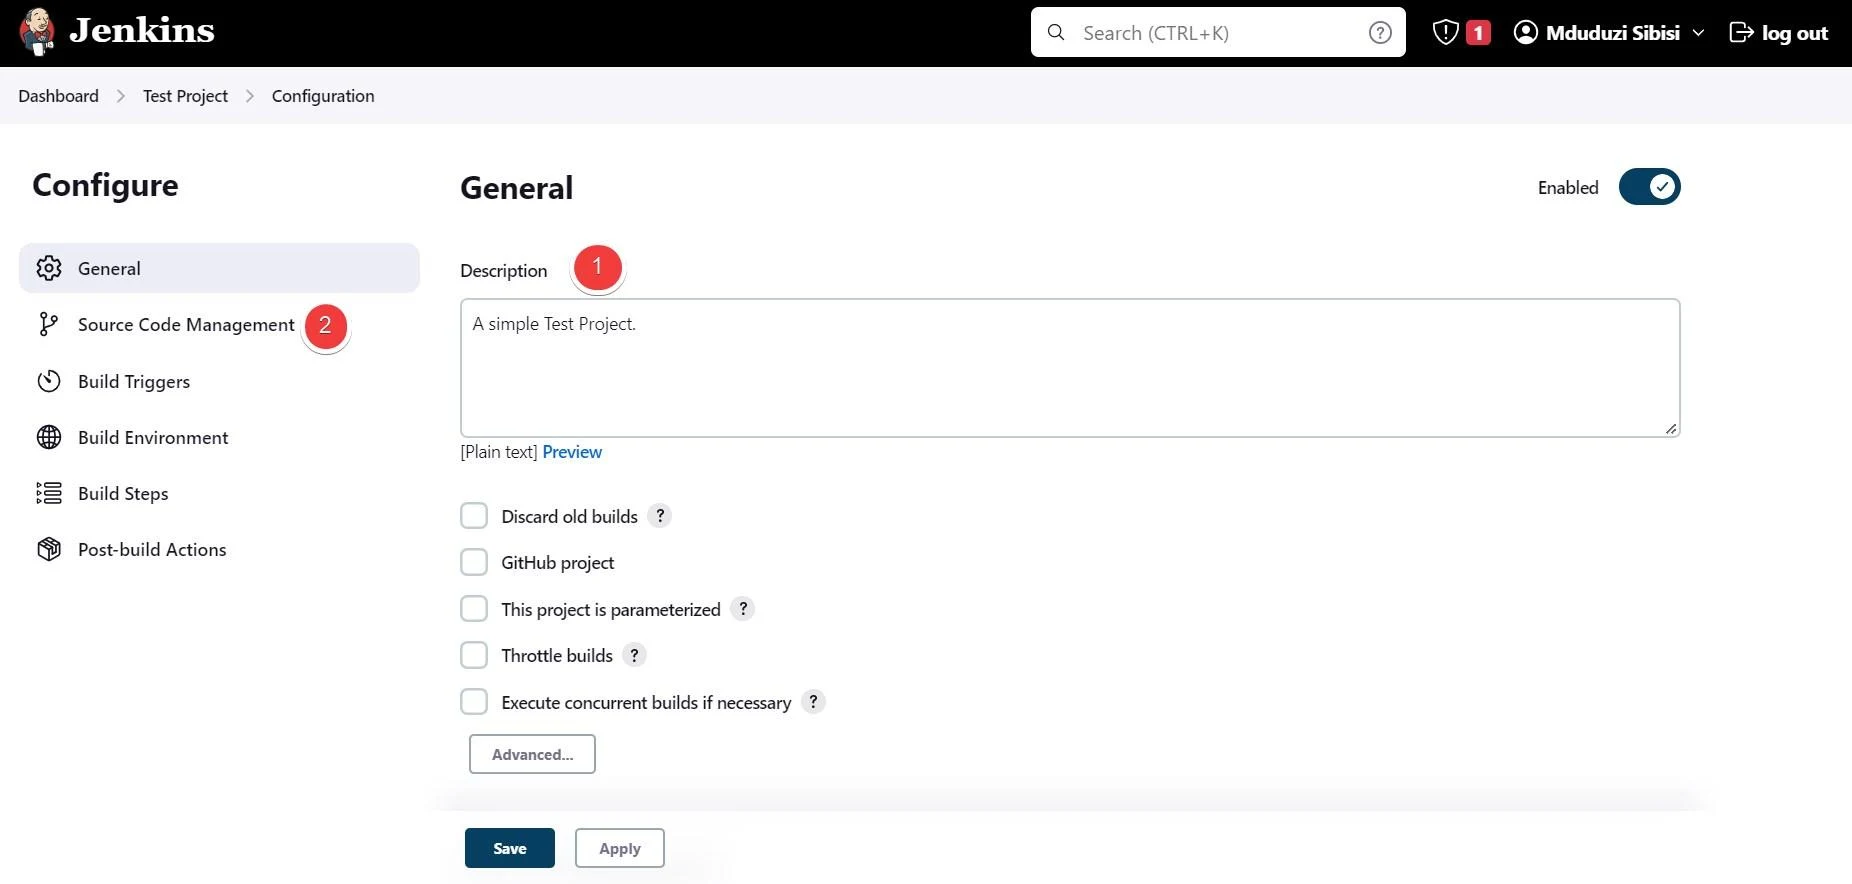
Jenkins will require you to input a few details about your project. Go ahead and enter a simple description like "A simple test project"; then click on the Source Code Management tab from the left panel. Alternatively, you can manually scroll down until you reach the Source Code Management section:
Click on the Git radio button, which will reveal a new container asking you to add details related to your Git repository. Insert a link to your GitHub repo into the Repository URL field. Then click on the button labeled + Add and then the small Jenkins pop-up:
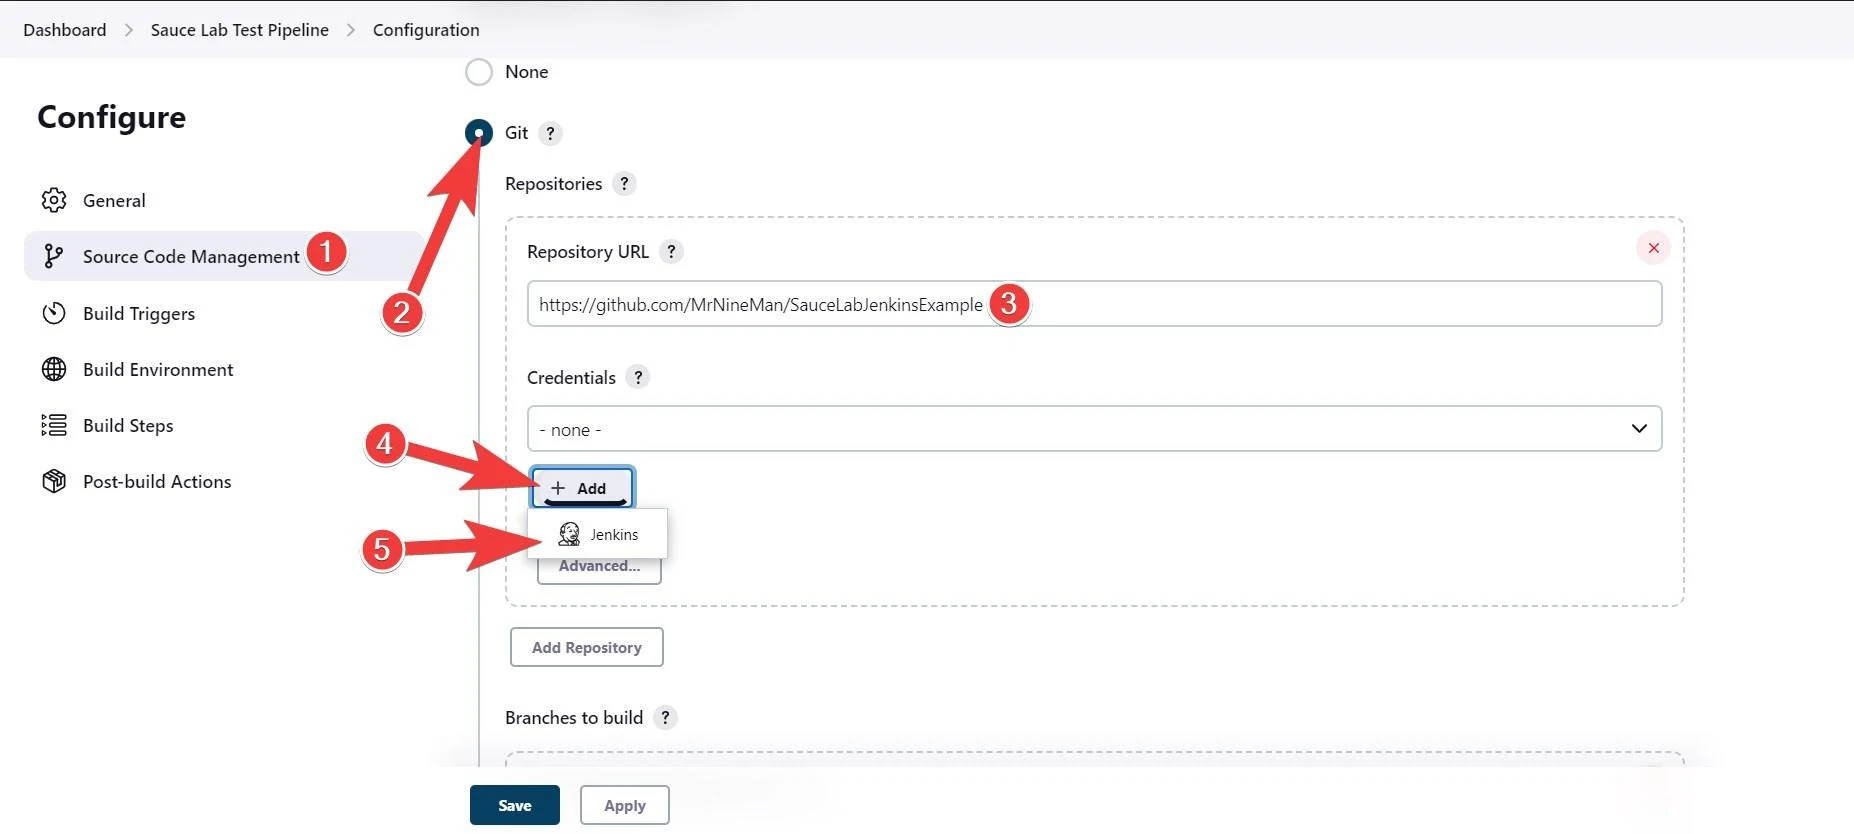
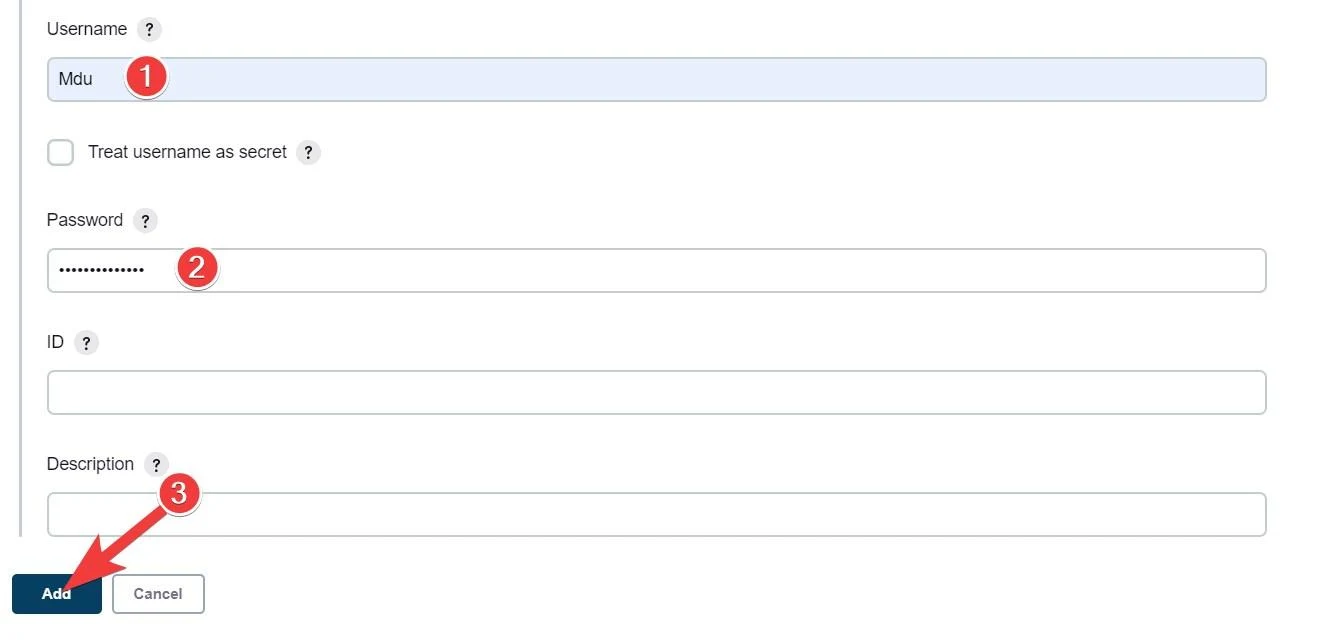
This will launch the Jenkins Credentials Provider screen. Leave the Domain, Kind, and Scope fields as they are, and enter your GitHub username and password in the applicable fields. Then scroll down and click on Add:
When you click Add, you'll be taken to the configuration screen, where you need to expand the drop-down field under the Credentials section and select your GitHub credentials.
Scroll down to the Branches to build section. There, you'll find that `/master` is currently the default value. Go ahead and remove this value, which will force Jenkins to scan all branches in the repository and build them if it finds any changes. If you want Jenkins to only monitor a specific branch, you can add its relative path here (i.e., `/main`).
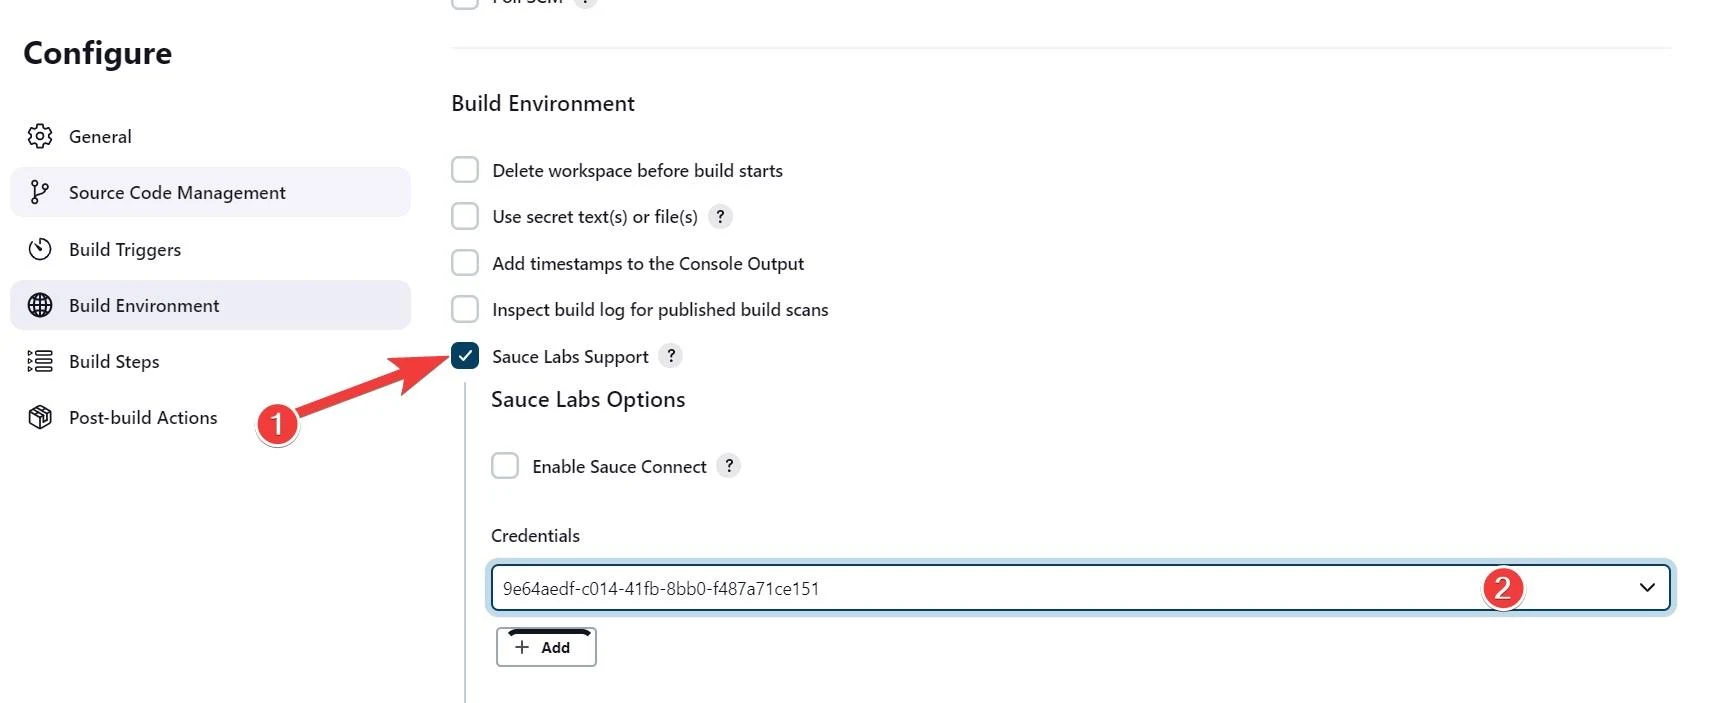
Next, scroll down to the Build Environment section and select the Sauce Labs Support checkbox, which will reveal a new form. Leave the Enable Sauce Connect box unticked and click on the Credentials drop-down field and select your Sauce Lab credentials from the list:
Next, click on the WebDriver field. This will display a drop-down menu containing a list of various browsers. Select the web browser(s) you plan to use for testing. This example uses the latest version of Microsoft Edge for Windows 10:
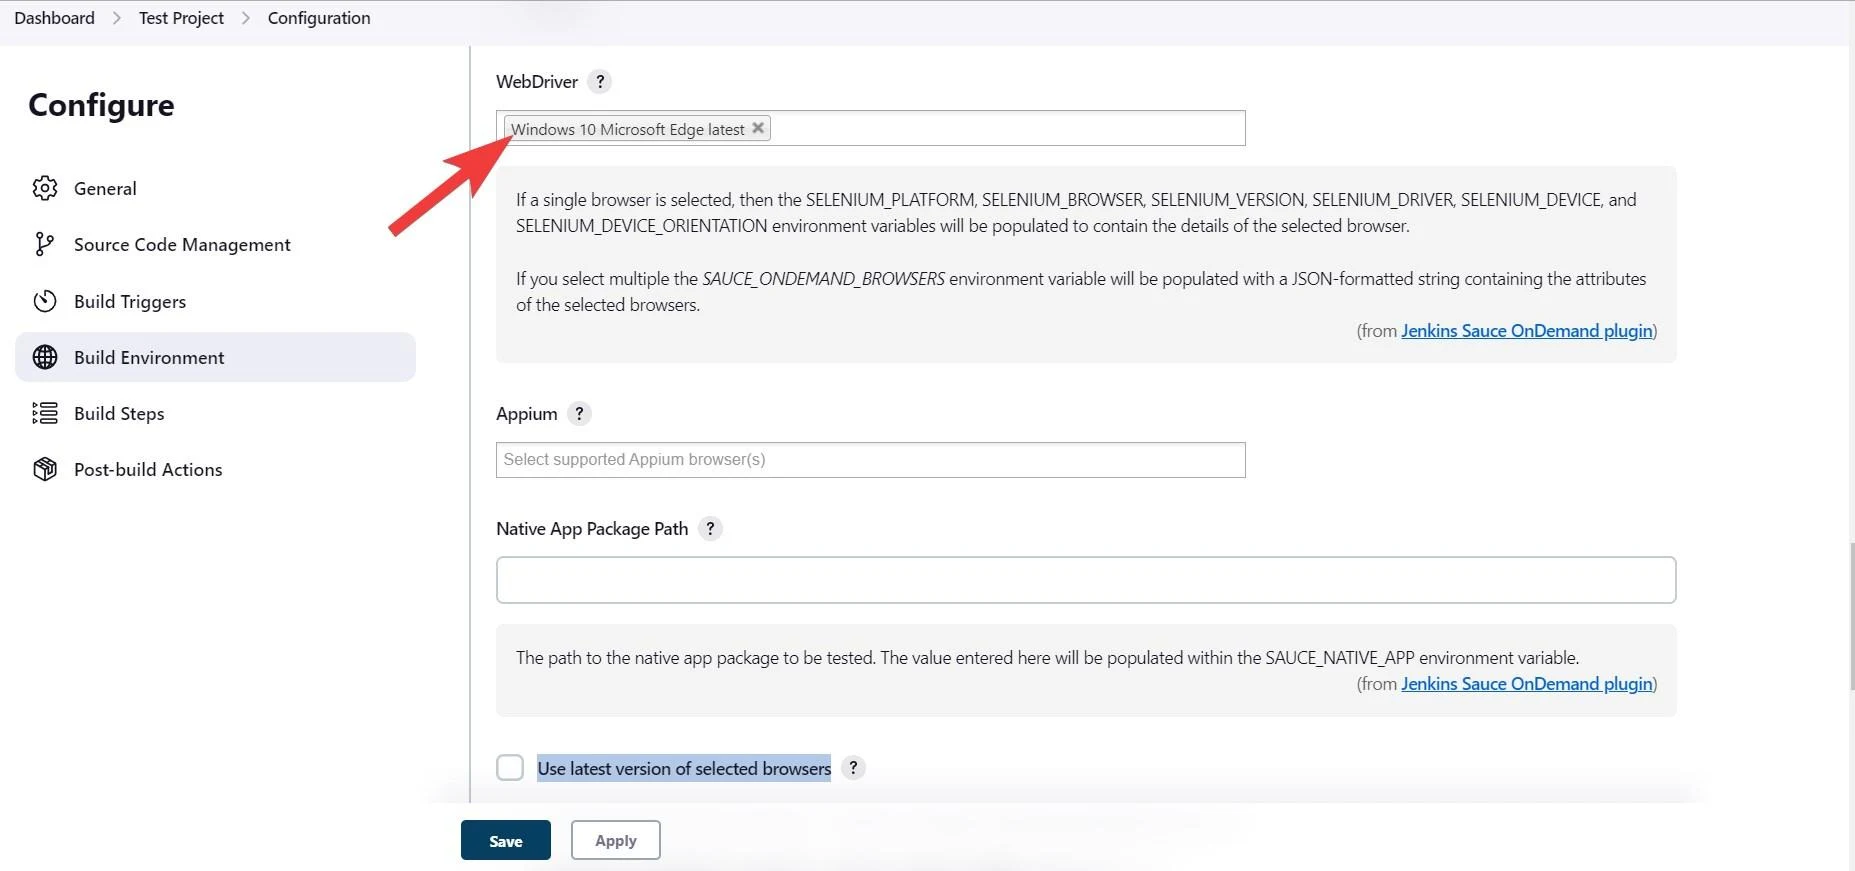
> Please note: The WebDriver field allows you to select multiple browsers. It's recommended that you stick to one for simplicity's sake. You can also set a path to a built-in application to test, but again, you should keep it simple and stick to web-based applications.
Next, check the box labeled Use latest version of selected browsers.
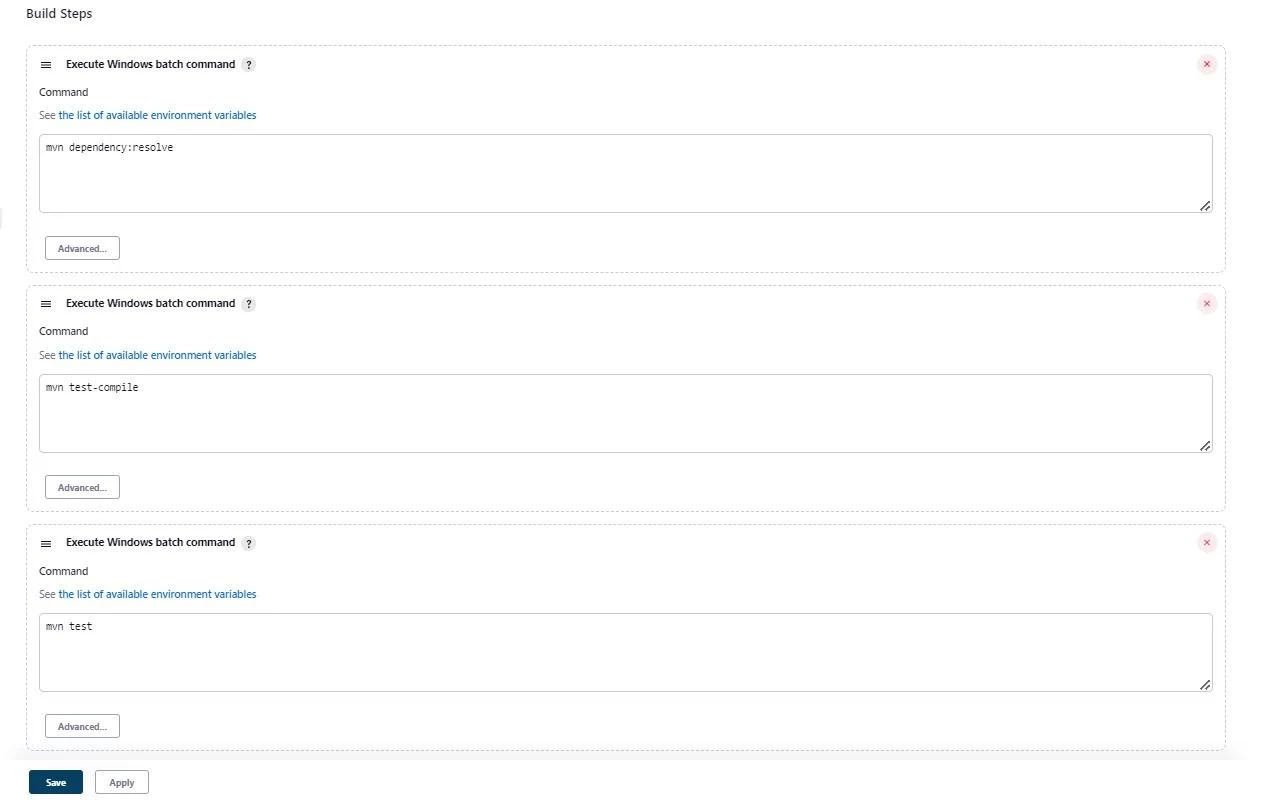
Leave everything else as is and scroll down until you see the Build Steps section. The following steps will cover how to initiate the actual instructions required to build and run the test. You'll be required to add three Windows Maven batch commands.
Click on the Add build step drop-down menu and select Execute Windows batch command:
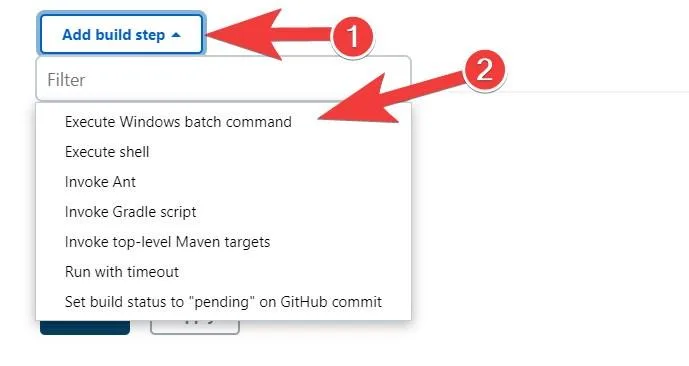
A new form should appear consisting of a text area and a few controls. The first thing you need to do is ensure that all the necessary dependencies are downloaded and added for the test. Then type the following command into the text area:
mvn dependency:resolve
Add another Windows batch command execution build step. This step will be used to test if the references were added correctly. To do so, type the following command into the build step's text area:
mvn test-compile
The final batch command will run the test. As with the previous steps, add another Windows batch command execution and add the following command to the text area:
mvn test
Your Build Steps section should look similar to this:
Now scroll down and click on the Save button. This should redirect you to the pipelines information screen, where you can run your Jenkins pipeline and build and activate your test. Click on Build Now to run the pipeline.
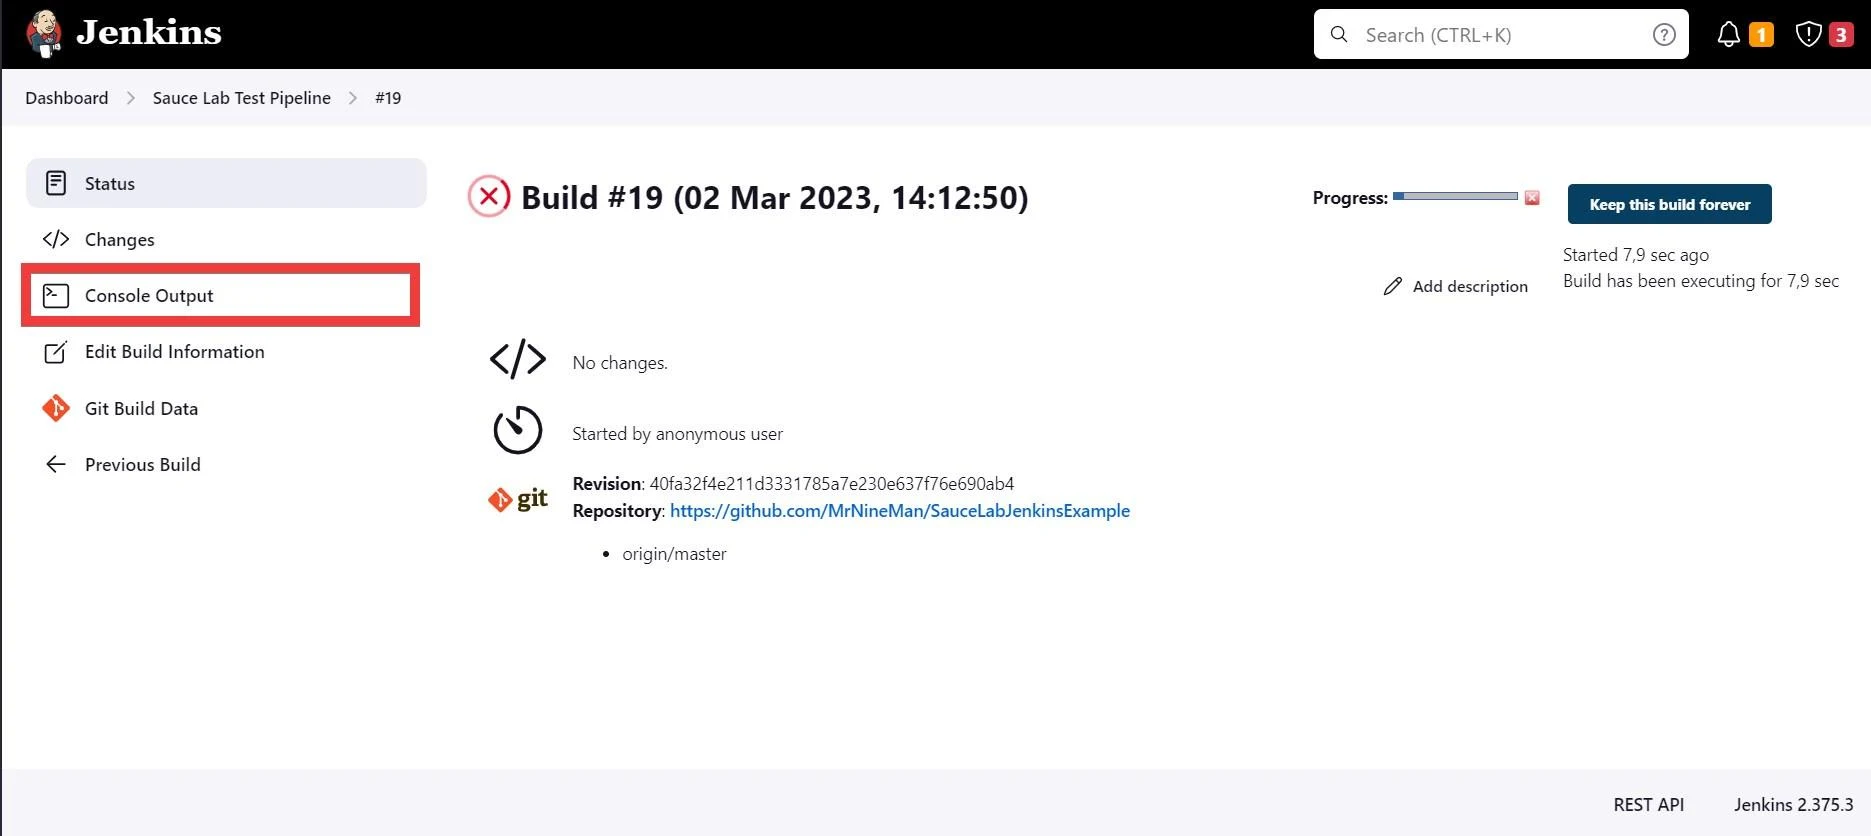
Clicking on the build underneath Build History will take you to the build's property screen.
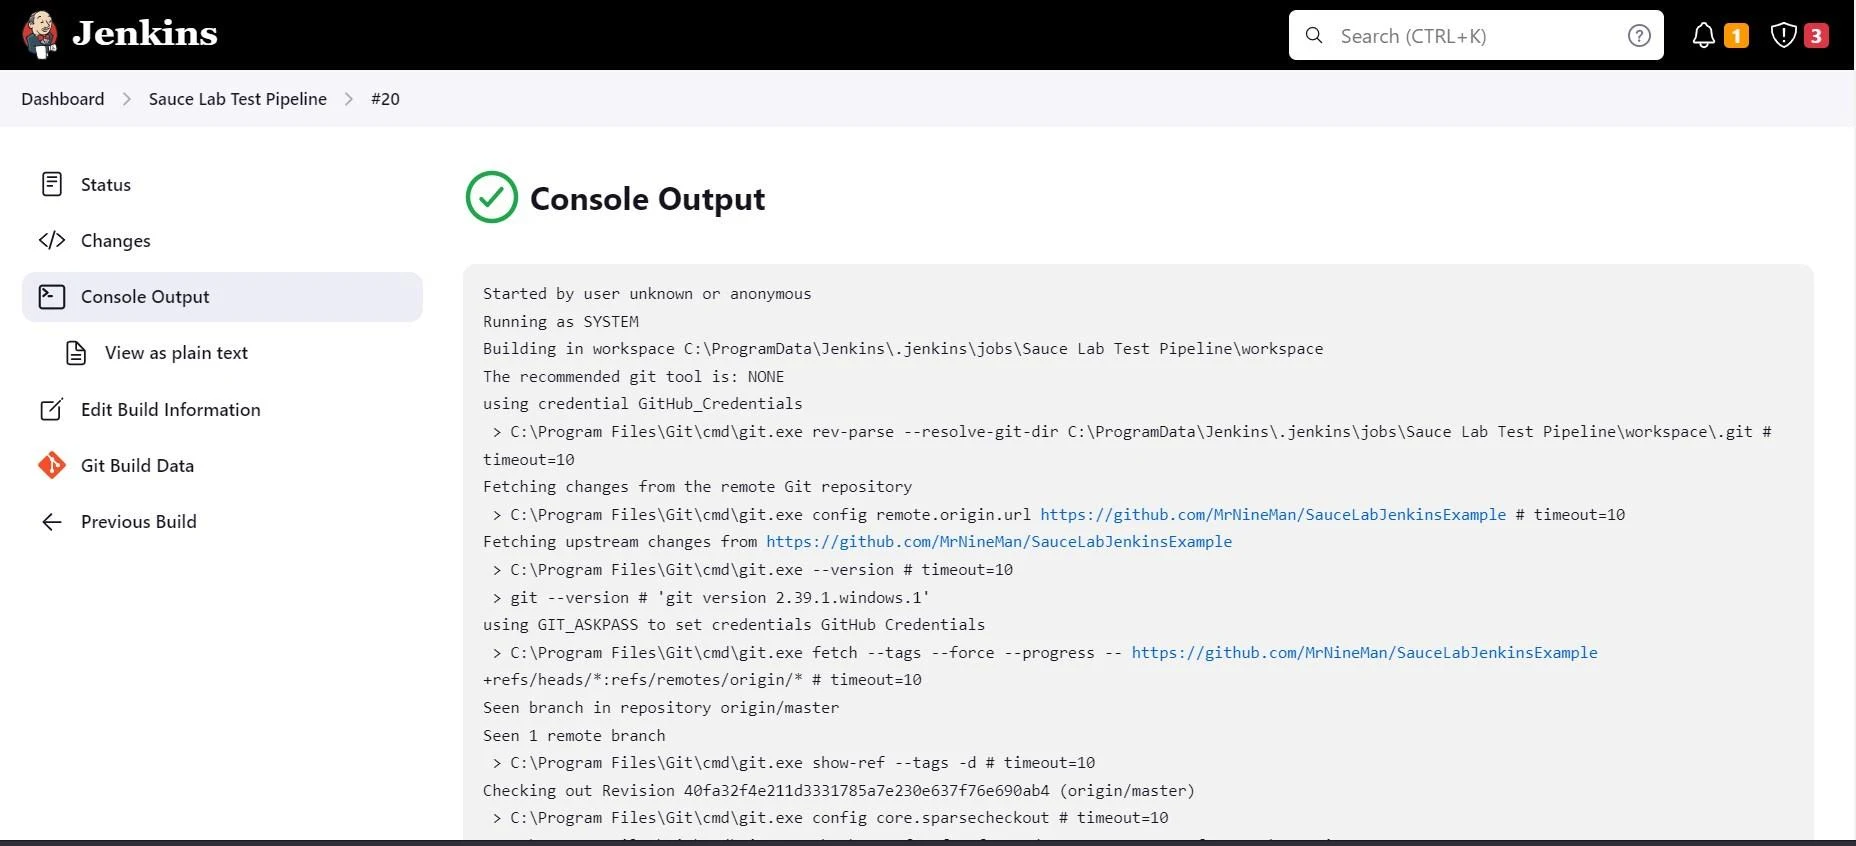
This screen gives you a view of all the build details. The best way to see the details of each build step is through the Console Output screen:
From here, you can view the console output as plain text and download it. Then, you can use a text editor or reader to scan through the information. You'll notice that it includes exhaustive details of each phase of the build, from the dependency reconciliation process to the final test. This makes it easier for you to debug your build:
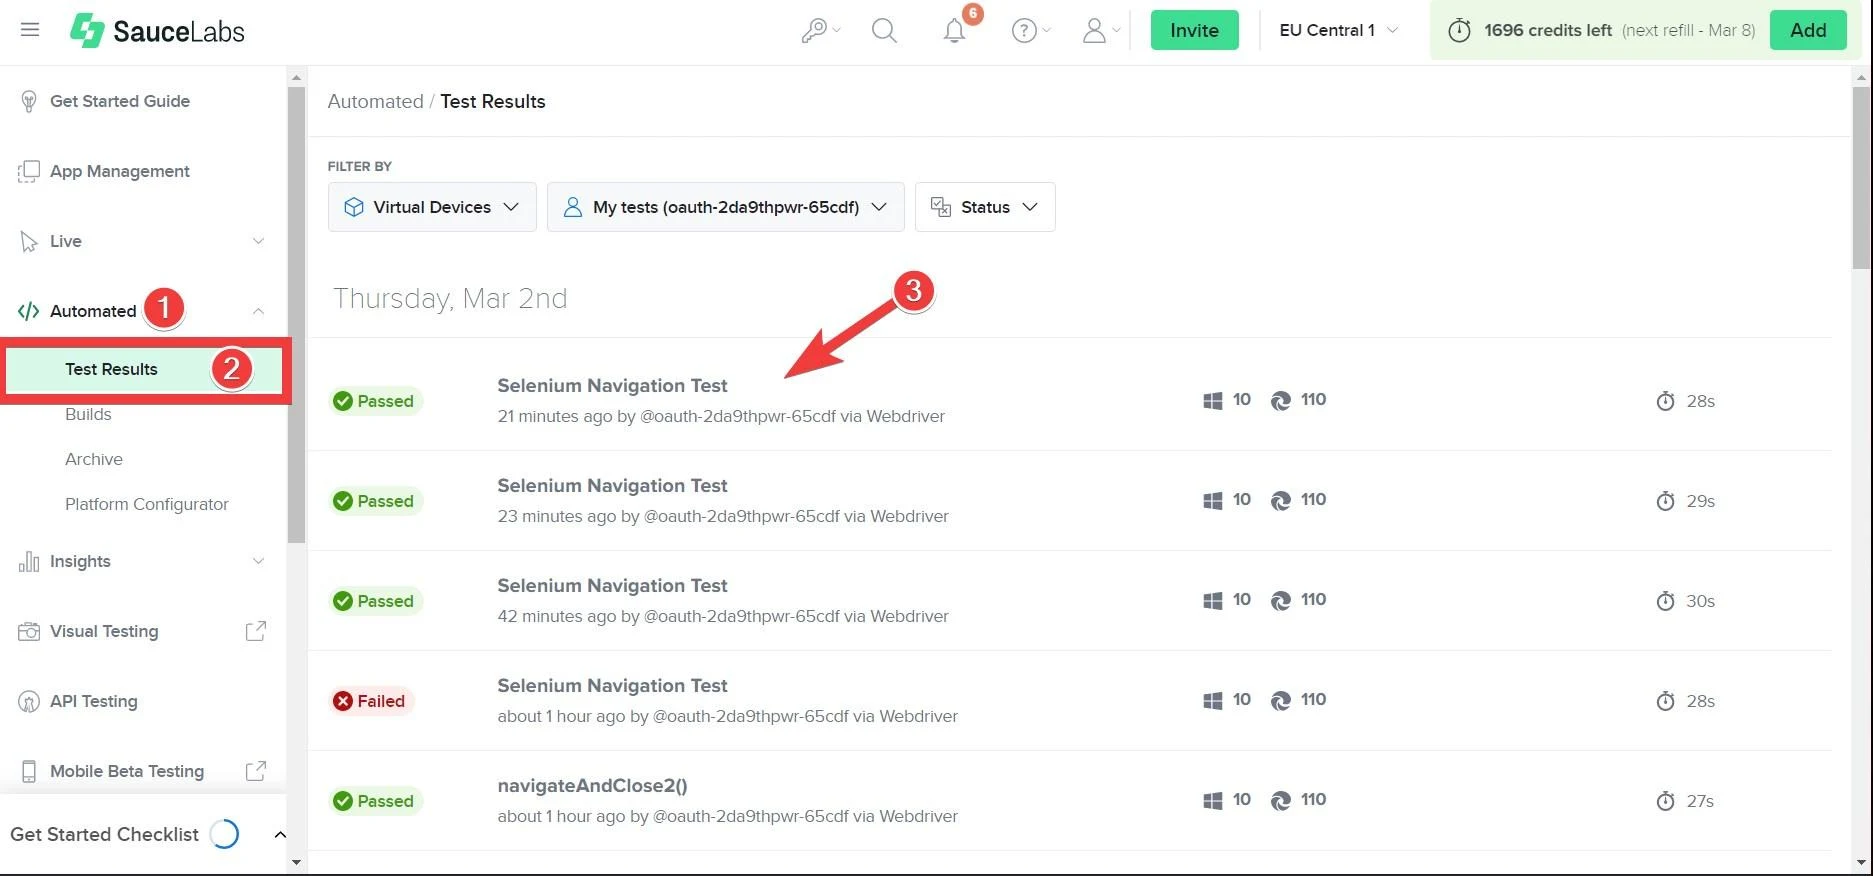
You can also see more details about the builds and tests from your Sauce Labs account dashboard. Expand the Automated menu item from the left panel. Then click on the Test Results sub-item. The main panel will display a list of all Sauce Labs tests that you've run. If you click on the latest one, you should see something like this:
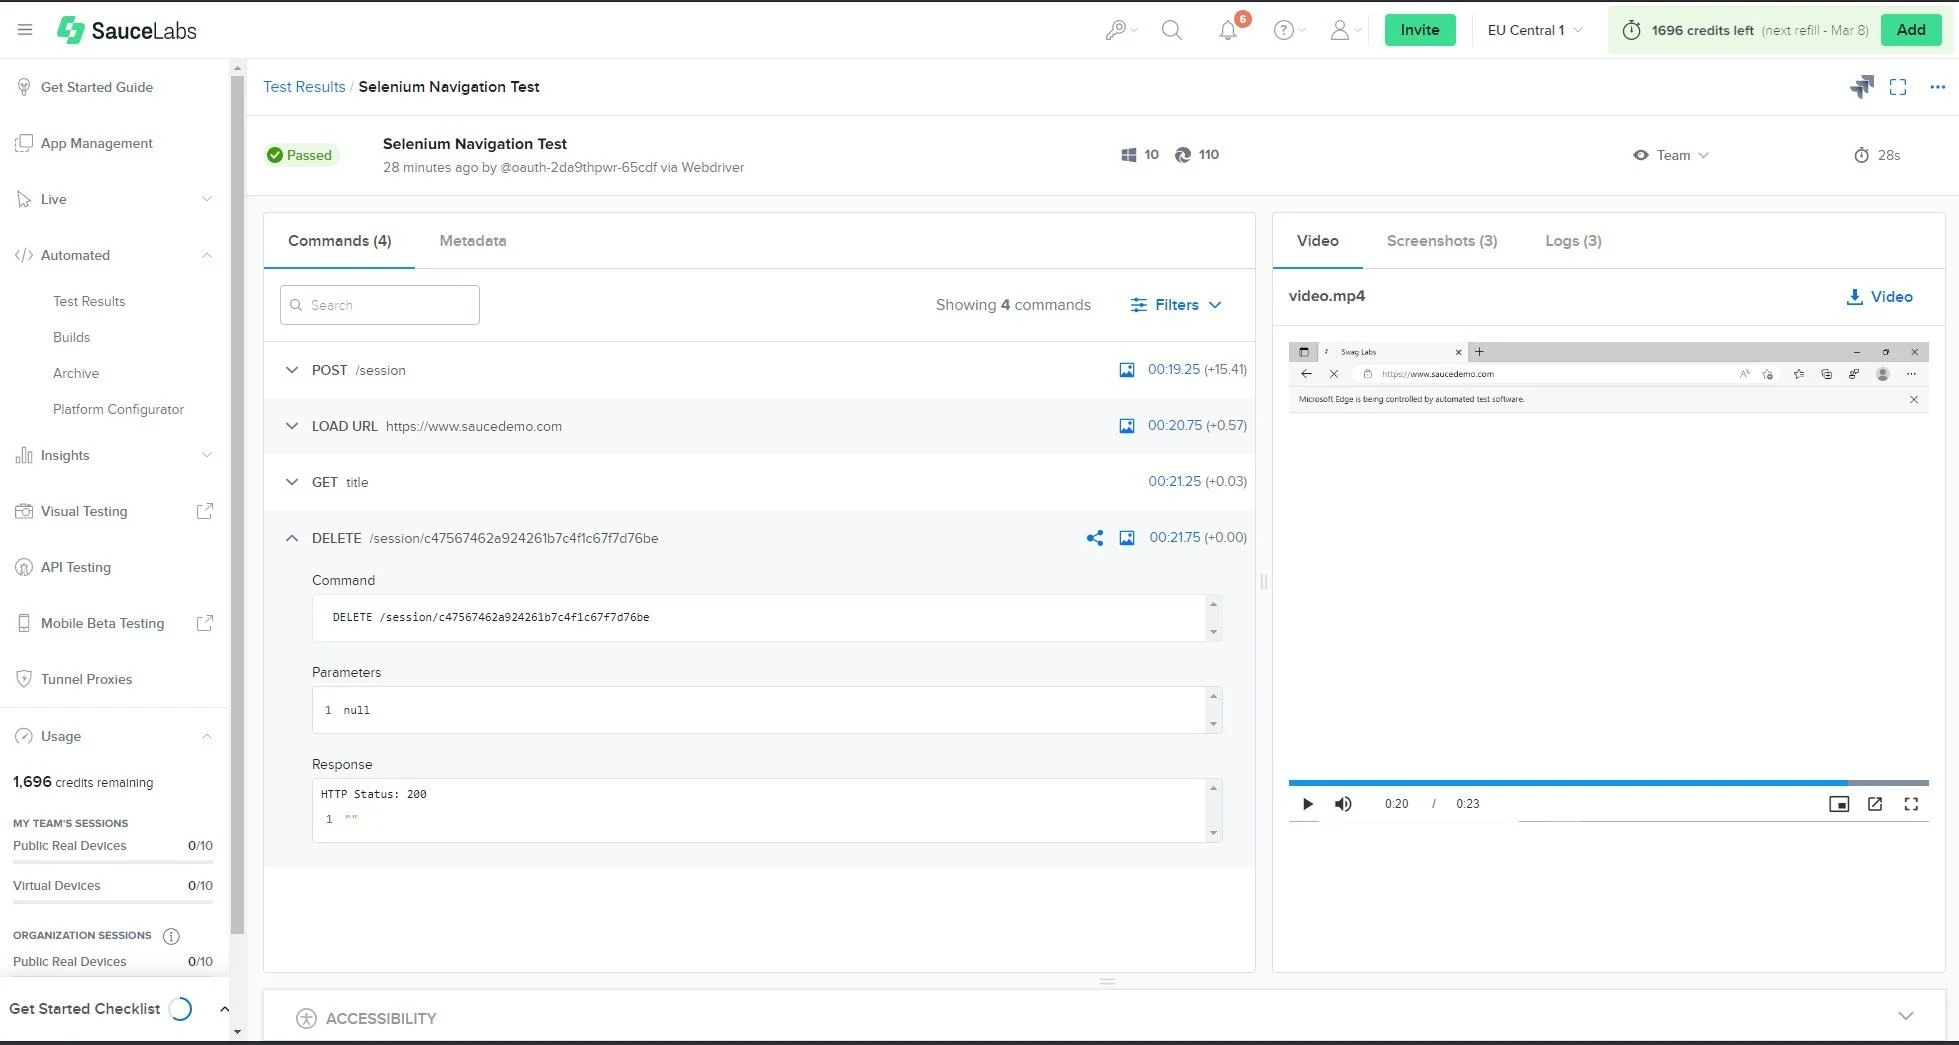
This screen allows you to see all the commands your test performed. You can also view a video of the test actually happening on the Sauce Labs server. Moreover, you can read over the metadata and logs:
As for the Jenkins side, you can add post-build actions, such as reporting or garbage collection. Moreover, you can add build triggers that will automatically run the pipeline for you, allowing you to perform more sophisticated automated tests. It's recommended that you experiment as much as you can with these tools, as it's the best path to proficiency.
Conclusion
Thanks to Jenkins, automating the testing and building process of an application is easy. In many cases, you don't even have to write a script to implement your CI/CD pipeline, making defining your CI/CD workflow easier.
Nevertheless, as accessible as Jenkins is, not every tool you integrate with it is as forgiving. Building and orchestrating reliable testing can be difficult, especially if you're attempting to use a tool that may not have built-in Jenkins support (in the form of a plugin).
Fortunately, this isn't an issue for Sauce Labs, the industry's most comprehensive test and error monitoring platform that helps you deliver a trusted and secure digital experience to your customers. Sauce Labs supports multiple platforms, allowing developers to have complete visibility into the performance and quality of their projects. That means you don't have to apply a different service for each platform your code runs on.

