When it comes to front-end development, automated testing can feel overwhelming. Unlike more backend-focused technologies, measuring the quality of the front end can feel highly subjective, which can, in turn, make scripting difficult. Meanwhile, lower-level methods like unit testing often don't feel like they go deep enough to provide a true measurement of confidence. This is where a test automation tool like Puppeteer comes into play.
What is Puppeteer?
Puppeteer is a Node-based browser automation library that can be used to test the look, performance, and usability of any web page in a Google Chrome-based (or Chromium-based) browser. What makes Puppeteer particularly valuable is its ability to perform these actions in a headless (background) environment, allowing for a robust yet non-intrusive test suite.
This allows you to run visual tests, but also its underlying interactivity – from the way the page gets laid out to how it actually responds to user input. Puppeteer is an incredibly powerful tool that can go a long way toward reducing the burden of manual testing and improving the overall quality of an organization’s efforts.
Getting Started with Puppeteer
To get started with Puppeteer, you first need to install the package to your development dependencies. This can be handled using a standard npm i --save-dev command (or yarn add if that's more your speed):
npm i --save-dev puppeteer
# OR `yarn add --dev puppeteer`
Once you have Puppeteer installed in your project, you can spin up a simple test script that loads a web page and downloads it as a PDF file. For this example, you’ll use a personal website, but any website will do.
The code above should be fairly straightforward, but let's take a minute to walk through it. The first thing that needs to happen is that Puppeteer needs to launch a headless Chrome browser window using the puppeteer.launch() command. As you can see in the example above, we disabled GPU acceleration (args: ["--disable-gpu"]). This is not required, but if you are having trouble getting Puppeteer to work (from within a non-standard environment, for example, such as a Windows Subsystem for Linux), we've found that it can help with stability for most common use cases.
Next, we need to open a new tab in our headless browser to interact with using the browser.newPage() method. Once we have our new tab, we can navigate to a given URL using the page.goto() function. This is when the magic can finally happen. For this example, we’ll simply export the page as a PDF (shown below). As you'll see a little later on, however, we can gather much more information from the page and really test its layout and functionality.
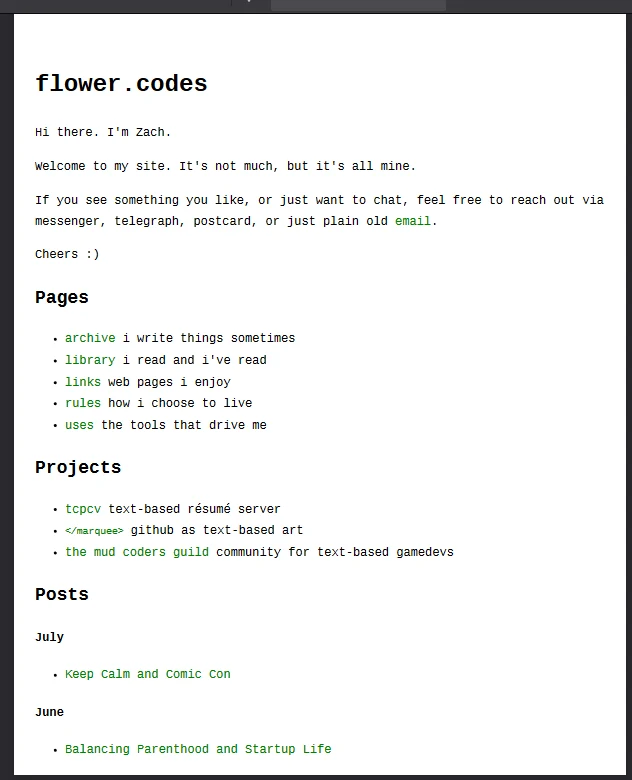
Finally, to make sure that we’re cleaning up our messes, we’ll close the page and the tab. When we run our example script (which will look something like “node-example.js”), we should see a new file generated in our project directory called flower-codes.pdf, which will look something like this:
Pretty neat, huh?
Automated Testing with Puppeteer
Now, loading a website and manipulating it is interesting, but it's hardly what one would call "test automation." That would require actual testing to go along with the automation. To do that, we need to pull in one of the many test frameworks that are available out there. For this particular example, we will use Mocha for the test framework and Chai for our assertions (although the patterns below should work for any alternative testing solutions).
To get started, let's install a few more packages (namely mocha and chai):
npm i --save-dev mocha chai
# OR `yarn add --dev mocha chai`
Once those are installed, we should also add a test command to the scripts section of our package.json file. This will allow us to run our automated tests using a simple npm test command (which doesn't seem like a big gain, but after the thousandth test run, you'll be glad you did it):
"scripts": {
	"test": "mocha --timeout=10000 tests/**/*.spec.js"
},
Now we're cooking with gas! But don't get too excited. We're still just getting things set up. Once we've got our test suite plumbed, it will be time to write our first tests. If you look at the test command above, we will be executing all .spec.js files in the tests/ directory using mocha. So, to start testing with Puppeteer, all we need to do is create a file called tests/puppeteer.spec.js, and it will get picked up when we run our tests.
Before we get too deep though, let's first take a look at a fairly basic test suite that utilizes all three of our packages: Mocha, Chai, and Puppeteer:
1const expect = require("chai").expect;2const puppeteer = require("puppeteer");3// open a new browser before tests4before(async function () {5global.expect = expect;6global.browser = await puppeteer.launch({7args: ["--disable-gpu"],8});9});10// close the browser when the tests are finished11after(async function () {12await global.browser.close();13});14describe('smoke test', function () {15let page;16// create a browser tab and navigate to locally running website17before(async function () {18page = await browser.newPage();19await page.goto("https://flower.codes");20});21// close browser tab after all tests22after(async function () {23await page.close();24});25it("should return a browser version", async function () {26expect(await global.browser.version()).to.be.a('String');27});28it("has an expected title", async function () {29expect(await page.title()).to.eql("flower.codes");30});31it("has a valid posts section", async function () {32expect(await page.$eval('h2#posts', element => element.innerText)).to.eql('Posts');33});34it("has an single footer", async function () {35expect(await page.$$('footer')).to.have.lengthOf(1);36});37});38
At a high level, what this suite does is to load the website (again) and then make a few assertions (that the page title is accurate, for example, and that there is only one footer as well as a valid posts section). Despite being fairly lightweight, there is a lot going on here, so let's break it down and go over it in sections.
Setting Up and Tearing Down
There is a bit of setup required for each test – namely, launching our browser window and navigating to the expected page (not to mention the cleanup afterward). We showcased what that looks like in a simple Puppeteer script, but these actions are handled in a somewhat more structured way thanks to before() and after() hooks, which run (as you might expect) before and after the suite:
1// open a new browser before tests2before(async function () {3global.expect = expect;4global.browser = await puppeteer.launch({5args: ["--disable-gpu"],6});7});8// close the browser when the tests are finished9after(async function () {10await global.browser.close();11});1213describe('smoke test', function () {14let page;15// create a browser tab and navigate to locally running website16before(async function () {17page = await browser.newPage();18await page.goto("https://flower.codes");19});20// close browser tab after all tests21after(async function () {22await page.close();23});24// ...25});26
As you can see, we first need to launch our browser using puppeteer.launch(). Then, we load a tab and navigate to our target website in the smoke test section. Once our tests are done, we close() the tab and then the browser window itself.
Making Assertions
But what about the tests themselves? In this example, we are making four separate assertions: that we get a valid browser version, that the page title is an expected value, that a particular page header exists with an expected text value, and that there is only one footer element. Let's break down those scenarios:
it("should return a browser version", async function () {
	expect(await global.browser.version()).to.be.a('String');
});
The first thing we want to check is that Puppeteer gives us a "valid" browser version. Although a String type is not technically a browser version, we can assume for our purposes that if the browser.version() call returns a String, then Puppeteer is working as expected (the test will fail with any other datatype or exception). It's a simple smoke test, but it helps us make sure we’re on the right track.
it("has an expected title", async function () {
	expect(await page.title()).to.eql("flower.codes");
});
Next, we want to check that the page title is what we expect it to be. In this case, the page title of the website is the same as the domain name, so this one should be pretty easy. To get the page title, Puppeteer gives us a handy title() function. We can assert that it equals flower.codes (spoiler alert: it does):
it("has a valid posts section", async function () {
	expect(await page.$eval('h2#posts', element => element.innerText)).to.eql('Posts');
});
Now, checking page titles is fun and all, but what about something more complicated? Thanks to Puppeteer's $eval() function, we can grab individual elements using CSS selectors and then run standard JS functions against them. So, if we want to ensure that there is an h2 tag with a #posts ID tag and an innerText value of Posts, we can do that without too much overhead.
it("has an single footer", async function () {
	expect(await page.$$('footer')).to.have.lengthOf(1);
});
For our final test, we'd like to retrieve all elements that match a given CSS selector rather than just the first match that $eval() returns. To do this, we can rely on the $$() function. To make sure that our page only has a single footer element, we can retrieve "all" of the footer elements and assert that the length of the resulting array is exactly 1.
Run, Tests, Run!
Now that we have a fully-fledged (albeit lightweight) test suite, we finally get to use the npm test command we defined way up above. As a quick reminder, this command executes all of the files in the tests/ directory that end in .spec.js using mocha. It’s also worth noting that we've set a 10000ms timeout to mocha since even headless browsers can be a little slow – and we don't want our test suite to fail because the internet was acting a little sluggish:
$ npm test
> test
> mocha --timeout=10000 tests/**/*.spec.js
  smoke test
    ✔ should return a browser version
    ✔ has an expected title
    ✔ should have a posts section
    ✔ has a single paragraph
4 passing (237ms)
Et voila! As promised, four tests and four passes!
Shifting Testing Left
While the above example outlines the necessary steps for loading a website using Puppeteer and running some basic assertions against it, statically defining a public URL is hardly the definition of "shift left testing." If we were running our automation tests against a production website, it would be far too late to react quickly. In an ideal scenario, these tests would have been executed against a development environment long before the underlying code ever reaches the public.
To do that, you only need to do two things. The first is to have a local web server that your web application can run on. This can be as simple as booting up a static site using node-http-server or as complicated as having a fully-fledged set of Docker containers running a Laravel application and MySQL server.
Once you can access your application locally, you can run your tests against it. This brings us to the second thing we need to do: change the target URL. Although we hard-coded https://flower.codes into our page.goto() function for our example, in an ideal scenario, we would set this value using environment variables that can be changed as needed depending on the underlying environment. This would allow us to run the same test suite against a local development environment and higher environments like staging and production. In general, it requires more setup time to get right, but shifting this effort as far left as possible will save you a lot of headache and rework in the future.
Taking Things Further
Puppeteer is an incredibly powerful browser automation tool, and the examples discussed here barely scratch the surface. It can be used not just to make assertions about the layout and markup of a given webpage, but also to actually test the underlying interactivity of a page. Everything from simulating touch screen taps to actually uploading files can be automated, which means that the depth of your automated tests is limited only by your own creativity.