In the world of fast-paced software delivery, automated testing is all but a necessity. Automated testing enables development teams to validate code changes in a fast and repeatable fashion, providing assurances of quality as new features and modifications are delivered to end users.
Below, we will discuss the Selenium test automation framework. We will focus on what it is and how Selenium WebDriver is used in web application testing. Furthermore, we will discuss the Java programming language and demonstrate how to get started writing automated tests using Selenium WebDriver and Java.
What is Selenium?
Selenium refers to several projects that help automate actions taken in a web browser. One such project is Selenium WebDriver. WebDriver provides an object-oriented API and bindings for several popular programming languages. Thus, it enables developers to write UI test scripts for the major browsers in use today in programming languages with which they are familiar. Development teams can leverage WebDriver to build suites of these test scripts and run them in an automated fashion at various stages of the software development lifecycle.
WebDriver enables development organizations to reap the benefits of test automation. For instance, automated UI testing is faster than manually testing the UI. This saves time and allows important development and QA resources to focus on other initiatives, such as building more features that increase the value of the product or providing more time for exploratory testing.
Furthermore, automating UI tests is a step toward increasing test coverage. Because manual testing takes longer and chews up more resources, teams are limited in how much they can actually test. By automating this process, more tests can be executed in less time, allowing for a greater percentage of functionality to be validated with each integration or release.
Finally, automated UI testing eliminates the risk of human error (assuming the script is properly developed and maintained). Each automated test script will execute each step in exactly the same fashion each time. In manual testing, however, there is always a risk that the tester will take incorrect action at some point in the testing process, thereby invalidating the result. This could lead to the deployment of code that is not working as expected into production.
What is Java?
Java is a popular programming language and software platform. It is class-based and object-oriented, enabling experienced developers to build applications with concise, readable, and easily maintained codebases. Java is also portable, which allows Java applications to run on many different systems.
Java can be leveraged for a variety of use cases including web development, machine learning, data processing, and more.
Benefits of Selenium with Java for developers
Owing in part to its popularity, Java offers the following benefits for developers writing Selenium test scripts:
Java has been around for a long time and is used by many organizations. Therefore, it can be easier to find developers with Java experience.
Additionally, Java has excellent community support. When a developer runs into difficulty doing something in Java, help is often easy to find. Java’s longevity and popularity mean that countless developers have likely encountered the same problem, leading to a plethora of online resources available for troubleshooting.
Combining the above with the fact that Selenium WebDriver itself is well-documented and has excellent community support, development teams may find that it’s easier to start writing automated UI test scripts with Selenium and Java than they thought.
Getting Started with Selenium in Java
Now that we’ve covered the basics of what Selenium and Java are and how automated UI testing can benefit your organization, it’s time to dive into the tutorial portion of this article. Below, we will walk you through the following:
Setting up Java on your local machine
Installing and configuring the Eclipse IDE
Creating your Java project
Importing Selenium and JUnit dependencies
Writing a simple UI test script using Java and Selenium WebDriver
1. Set up Java on your local machine
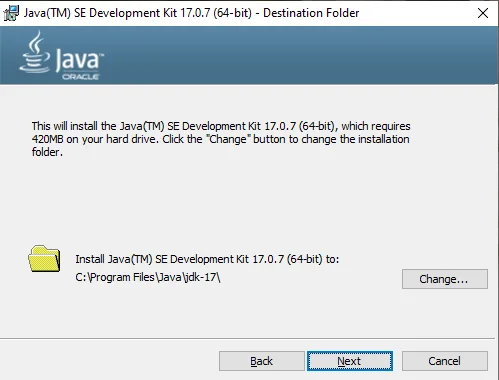
Our first step in getting our local environment configured will be to install the Java Development Kit (or JDK). For our purposes, JDK 17 is appropriate and can be downloaded here.
Choose the appropriate option for the OS on which you are working, then download and install it. For Windows 10 users, the x64 Installer will suffice. After downloading, the installer allows you to set the location where the JDK will be installed. The default installation location in this instance is C:\Program Files\Java\jdk-17\.
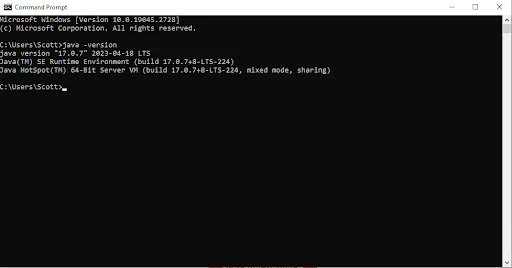
After completing the installation, verify it by opening a command prompt and running the following command:
java -version
2. Install and configure the Eclipse IDE
With Java installed, we will need an IDE in which we’ll write our code. The Eclipse IDE is a popular option that will suit our purposes just fine. Eclipse can be downloaded here.
Choose Eclipse IDE for Java Developers and select the download that will work with your operating system. Proceed with the installation, installing to the directory of your choice.
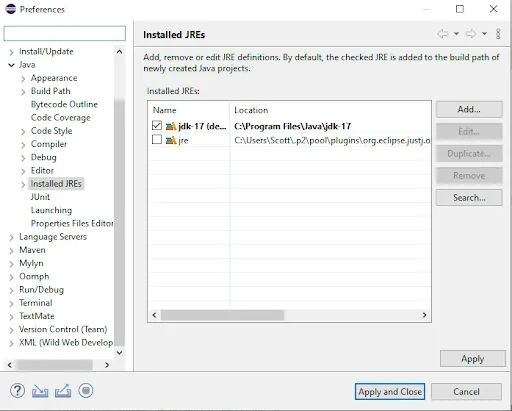
After installing and opening Eclipse, we can ensure that it uses the JDK we installed in the previous step. In the navbar at the top of Eclipse, click Window followed by Preferences.
In the Preferences modal, expand Java and select Installed JREs. From within the Installed JREs window, click Add and select Standard VM.

Click Next and set JRE home to the location of the newly installed JDK. Click Finish and check the box next to the JRE entry that you just configured.
3. Create your Java project
Now, let’s create a very simple Maven project that we can use to import Selenium and JUnit dependencies and write our sample test script.
Open Eclipse to a clean workspace location. I’ll be using the following location on my machine:
C:\development\workspace
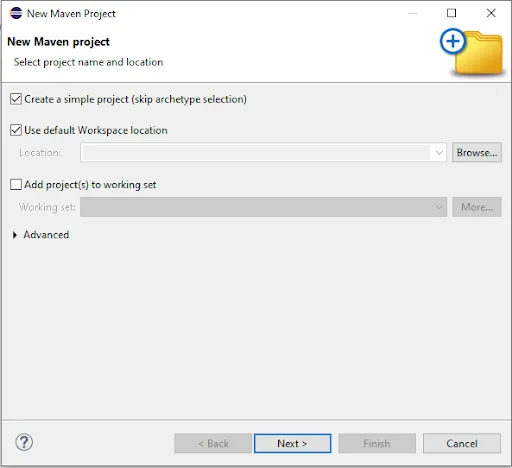
To create your project in Eclipse, go to File, then New, and then click Maven Project. Check the box Create a simple project (skip archetype selection) and leave Use default Workspace location checked. Click Next to proceed.
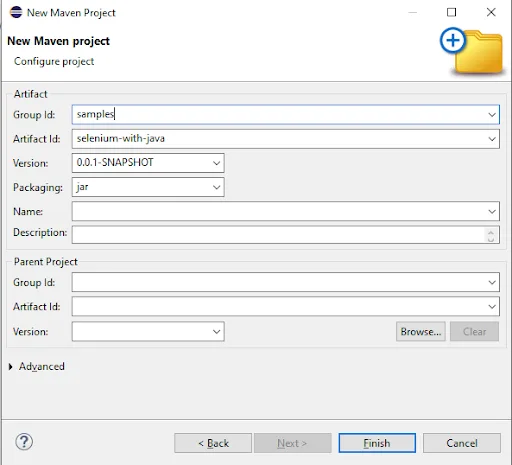
On the next screen, enter samples as the Group Id and selenium-with-java as the Artifact Id. Then click Finish.
With that, the project has been created and we can get to work. It should now show in the Package Explorer view within your Eclipse IDE.
4. Import the Selenium and JUnit dependencies
The next step is to bring in the dependencies required to write our sample test script. For the purposes of this demonstration, we’ll need the Selenium WebDriver language bindings for Java as well as the JUnit Jupiter API.
To pull in version 4.10.0 of the Selenium libraries for Java, add the following to the dependencies portion of your POM file:
<dependency>
<groupId>org.seleniumhq.selenium</groupId>
<artifactId>selenium-java</artifactId>
<version>4.10.0</version>
</dependency>
More information on this can be found in the Selenium WebDriver installation documentation.
Similarly, to pull in version 5.9.3 of the JUnit Jupiter API, add the following to the dependencies portion of your POM file:
<dependency>
<groupId>org.junit.jupiter</groupId>
<artifactId>junit-jupiter-engine</artifactId>
<version>5.9.3</version>
</dependency>
Right-click on your project, navigate to Maven, then Update Project, and select the sample project to update. Clicking OK should ensure that the above dependencies are pulled in and can now be utilized within your code.
5. Write a simple UI Test script using Java and Selenium WebDriver
With our new Java project created and our dependencies pulled in, we can now proceed with developing a test script.
For this example, we’ll navigate to the Sauce Labs Request a Demo page in Google Chrome and ensure that the first name field, last name field, and company field are present on the page.
The first step is to create a Java class within our project. To do so in Eclipse, go to File, then New, and select Class. Enter the package in which you wish to create your class as well as the class name. Let’s store this class in a package called selenium and name the class SauceTest.
Click Finish to create the file SauceTest.java.
The next step is to create our setUp and tearDown methods. We will annotate these with @BeforeEach and @AfterEach, respectively, so that they run before and after each method annotated with @Test. The setUp method will be responsible for configuring our class variable webDriver as a ChromeDriver, while tearDown will be responsible for calling quit on webDriver and closing all associated Chrome windows. Here’s what those two methods will look like:
@BeforeEach
public void setUp() {
System.out.println("*** set up ***");
System.setProperty("webdriver.chrome.driver", "C://development//chromedriver//chromedriver.exe");
webDriver = new ChromeDriver();
}
@AfterEach
public void tearDown() {
System.out.println("*** tear down ***");
webDriver.quit();
}
Next, we’ll build our demoFormTest method annotated with @Test. This method will use the Selenium dependencies that we’ve pulled into our project to accomplish the following:
Open a Chrome window
Navigate to https://saucelabs.com/request-demo
Check for the existence of the first name, last name, and company fields
The test will pass if all three fields are present. If any of the three fields are not present, the test will fail. Please see the full SauceTest class below:
package selenium;
import static org.junit.jupiter.api.Assertions.assertTrue;
import org.junit.jupiter.api.AfterEach;
import org.junit.jupiter.api.BeforeEach;
import org.junit.jupiter.api.Test;
import org.openqa.selenium.By;
import org.openqa.selenium.NoSuchElementException;
import org.openqa.selenium.WebDriver;
import org.openqa.selenium.chrome.ChromeDriver;
public class SauceTest {
private WebDriver webDriver;
@BeforeEach
public void setUp() {
System.out.println("*** set up ***");
System.setProperty("webdriver.chrome.driver", "C://development//chromedriver//chromedriver.exe");
webDriver = new ChromeDriver();
}
@Test
public void demoFormTest() {
System.out.println("*** test ***");
webDriver.get("https://saucelabs.com/request-demo");
boolean expectedFieldsExist;
try {
webDriver.findElement(By.id("FirstName"));
webDriver.findElement(By.id("LastName"));
webDriver.findElement(By.id("Company"));
expectedFieldsExist = true;
} catch (NoSuchElementException e) {
expectedFieldsExist = false;
}
assertTrue(expectedFieldsExist);
}
@AfterEach
public void tearDown() {
System.out.println("*** tear down ***");
webDriver.quit();
}
}
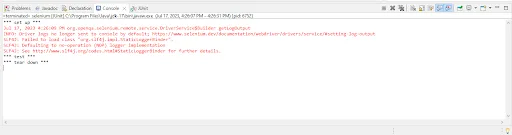
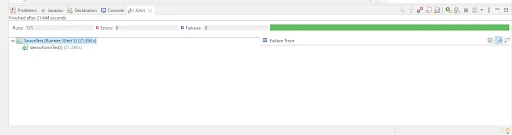
After executing the test, you can check the Console and JUnit views in Eclipse for information regarding the output. The images below show what can be expected:
Wrapping Up
Both Java and Selenium are well documented and supported, and they provide great value to many software development teams. As such, they are an excellent match when used in conjunction with one another.
Considering the often rapid pace at which software is developed and modified, it’s important to test your code base as it evolves. When done manually, this can be a time-consuming and error-prone process. When accomplished with the help of automated testing tools such as Selenium, it is efficient and consistent.