
[UPDATE- November 2019] You can find the newest Get Started with Appium white papers here: Get Started with Appium- Java and Get Started with Appium- Ruby
This is the first post in a series called Appium Bootcamp by noted Selenium expert Dave Haeffner.
Dave recently immersed himself in the open source Appium project and collaborated with leading Appium contributor Matthew Edwards to bring us this material. Appium Bootcamp is for those who are brand new to mobile test automation with Appium. No familiarity with Selenium is required, although it may be useful. This is the first of eight posts; a new post will be released each week.
Before You Get Started
Appium is built to test mobile apps of all kinds (native, hybrid, and mobile web), has client libraries written in every popular programming language, it's open source, works on every prominent operating system, and best of all -- it works for iOS and Android. But before you jump in with both feet, know that there is a bit of setup in order to get things up and running on your local machine.
A brief Appium primer
Appium is architected similarly to Selenium -- there is a server which receives commands and executes them on a desired node. But instead of a desktop browser, the desired node is running a mobile app on a mobile device (which can be either a simulator, an emulator, or a physical device). So in order for Appium to work, we will need to install the dependent libraries for each device we care about.
Initial Setup
Testing an iOS app? Here's what you'll need:
+ Install Java (version 7 of the JDK or higher)
+ Install Xcode
+ Install Xcode Command-line Build Tools
For more info on supported Xcode versions, read this.
Testing an Android app? Here's what you'll need:
+ Install Java (version 7 of the JDK or higher)
+ Install the Android SDK (version 17 or higher)
+ Install the necessary packages for your Android platform version in the Android SDK Manager
+ Configure an Android Virtual Device (AVD) that mimics the device you want to test against
For more info on setting up the Android SDK and configuring an AVD, read this.
Next, you'll need to install Appium. Luckily, there's a handy binary for it Appium.app for OSX and Appium.exe for Windows. This binary also happens to be a GUI wrapper for Appium.
Alternatively, if you want the absolute latest version of Appium and aren't afraid to get your hands dirty, then you can install Appium from source and run it from the command line.
But if you're new to mobile testing, then the one-click installer is a better place to start.
An Appium GUI primer
The Appium GUI is a one-click installer for the Appium server that enables easy configuration of your app and Appium. Aside from the easy install, it adds a key piece of functionality -- an inspector. The inspector enables a host of functionality, most notably: + Shows you all of the elements in your app + Enables you to record and playback user actions
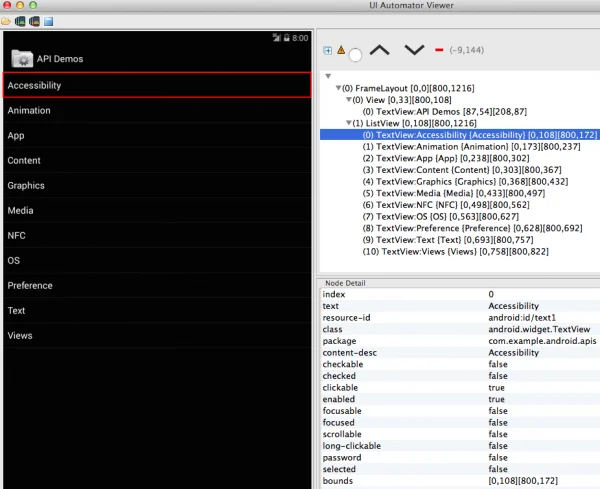
While the inspector works well for iOS, there are some problem areas with it in Android on Appium at the moment. To that end, the Appium team encourages the use of uiautomatorviewer (which is an inspector tool provided by Google that provides similar functionality to the Appium inspector tool). For more info on how to set that up, read this.
More on inspectors and how to use them in a later post. It's worth noting that while we can configure our app within the Appium GUI, it's not necessary since we will be able to do it more flexibly in code. More on that in the next post.
Making Sure Appium Is Setup
After you have your Appium one-click installer up and running, you can verify your setup by using it's Doctor functionality. It is the button on the left of the `Launch` button. It is the one that looks like a doctor's stethoscope. Click on that, and it should output information in the center console window of the Appium GUI.

If you don't see anything outputted, refer to this open issue.
What About A Programming Language?
Before you do a victory lap, you'll also want to have chosen a programming language to write your tests in, installed said programming language, and installed it's client bindings for Appium. Currently, Appium has client bindings for Java, JavaScript, Objective C, .NET, PHP, Python, and Ruby. The examples in this series will be written in Ruby. You can use version 1.9.3 or later, but it's advisable to use the latest stable version. For instructions on installing Ruby and the necessary client libraries (a.k.a. "gems"), read this.
Outro
Now that you have Appium setup with all of it's requisite dependencies, along with a programming language and Appium client bindings, we're ready to load up a test app and step through it.
About Dave Haeffner: Dave is a recent Appium convert and the author of Elemental Selenium (a free, once weekly Selenium tip newsletter that is read by thousands of testing professionals) as well as The Selenium Guidebook (a step-by-step guide on how to use Selenium Successfully). He is also the creator and maintainer of ChemistryKit (an open-source Selenium framework). He has helped numerous companies successfully implement automated acceptance testing; including The Motley Fool, ManTech International, Sittercity, and Animoto. He is a founder and co-organizer of the Selenium Hangout and has spoken at numerous conferences and meetups about acceptance testing.
Continue the reading the other chapters:
