Selenium and Cucumber are open source frameworks used for automated testing. Using them together can promote collaboration between business and technical teams by making it easy for everyone to understand an application's workflow and expectations.
In this tutorial, you'll learn how to use Selenium with Cucumber for setting up and running some automated browser tests.
Selenium and Cucumber Explained
Before getting into the tutorial, let's consider what these two tools are and what they're used for in more detail.
Selenium is the industry-standard open source testing framework. Testing teams can use Selenium to run fast and repeatable tests across all browsers and operating systems. It's most widely used to automate web applications for end-to-end testing. End-to-end tests are important because they lead to immense confidence in the overall functional correctness of an application. Occupying the apex of the testing pyramid, they cover user journeys to simulate end users' interactions with the application.
Selenium comes with an array of features, and it supports all major web browsers, including Chrome, Firefox, and Safari. It also supports all major programming languages, including Java, Python, C#, and JavaScript.
Cucumber is a framework that facilitates behavior-driven development and helps business and technical teams collaborate on business rules and requirements.
Cucumber executes specifications or acceptance criteria written in Gherkin, a plain-text language with a defined set of rules that Cucumber understands. It then maps these specifications to an underlying implementation (Selenium, in the case of this tutorial) and validates that the application meets these specifications.
How to Use Selenium and Cucumber for Automated Testing
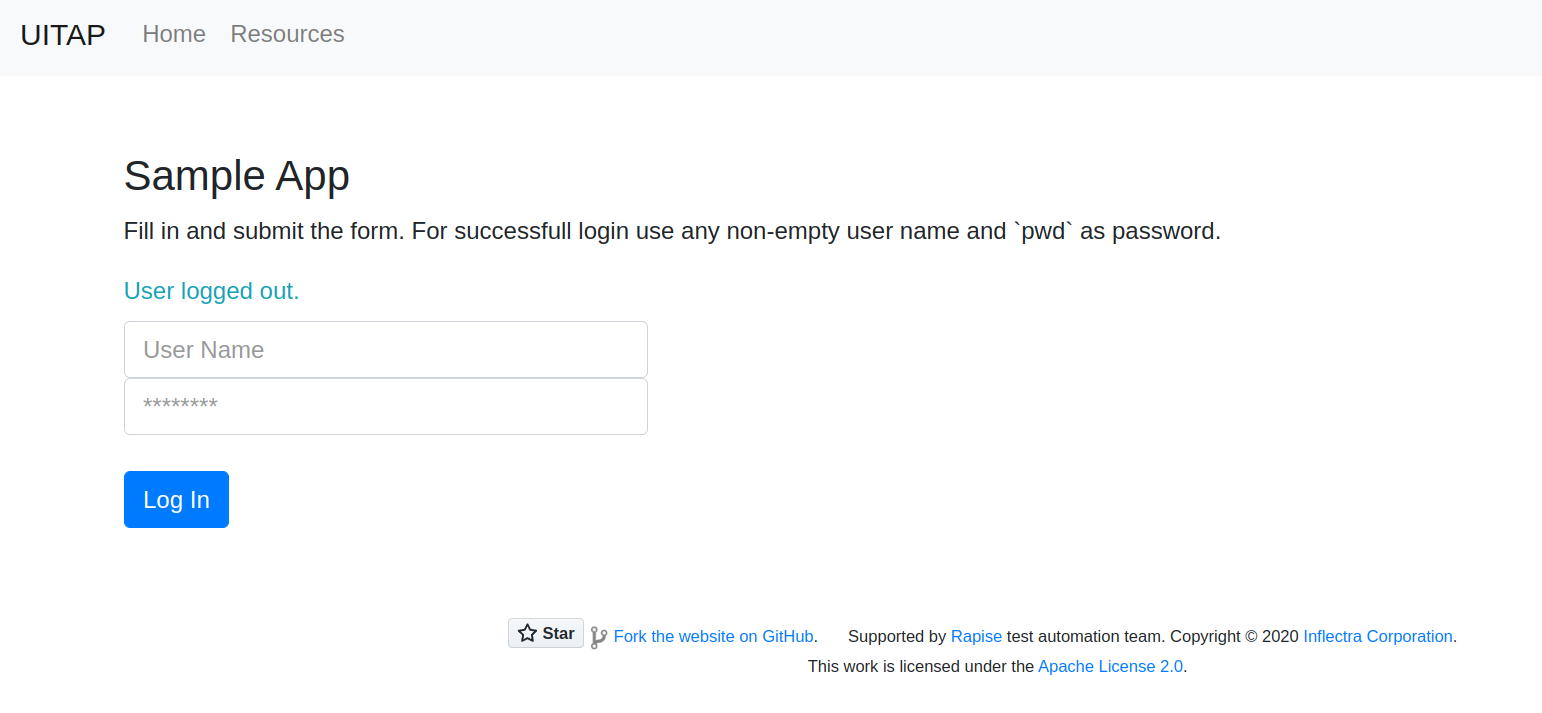
This tutorial will use the UI Test Automation Playground website's Sample App page. This web page simulates a login page and has a username field, a password field, and a submit button to play with:

You'll be implementing two test cases, or scenarios: a successful login attempt and an unsuccessful login attempt.
Prerequisites for using Selenium and Cucumber
This tutorial uses Java and Google Chrome, so make sure that you have the following downloaded and installed:
Setup
Before proceeding, first open IntelliJ IDEA and create a new Gradle project. Name it `selenium-with-cucumber-demo.` Then, modify the `build.gradle` file in your project root to match the following:
```gradle plugins { id 'java' }
group 'org.example' version '1.0-SNAPSHOT'
repositories { mavenCentral() }
dependencies { implementation 'org.seleniumhq.selenium:selenium-java:4.7.2' implementation 'io.github.bonigarcia:webdrivermanager:5.3.1' implementation 'io.cucumber:cucumber-java:7.10.1' implementation 'org.junit.vintage:junit-vintage-engine:5.9.1' testImplementation 'io.cucumber:cucumber-junit:7.10.1' testImplementation 'org.junit.jupiter:junit-jupiter-api:5.8.1' testRuntimeOnly 'org.junit.jupiter:junit-jupiter-engine:5.8.1' }
test { useJUnitPlatform() } ```
Once you're done with your modification, make sure to load the Gradle changes by using ⇧⌘I for macOS or Ctrl+Shift+O for Windows and Linux.
Implementing the tests
A Cucumber test suite is made up of three major parts: the feature file, step definitions, and test runner.
1. Feature file
The feature file ends with a `.feature` extension and contains your test cases, which are represented as scenarios and steps in the Gherkin language.
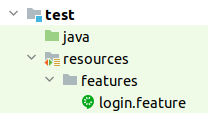
Start by creating a folder called `features` under the test resources root (`src/test/resources`). Next, create a feature file called `login.feature` under the `features` folder:

At this point, IntelliJ may prompt you to install the Gherkin plugin and the Cucumber plugin. Go ahead and install them so that you receive context-aware code completion support and code highlighting support.
Paste the following text into the feature file `login.feature`:
```gherkin Feature: Login functionality
Scenario: Successful login attempt Given I am on the Sample App login page And I fill in the User Name as "admin" And I fill in the Password as "pwd" When I click on the Log In button Then I see the message "Welcome, admin!"
Scenario: Unsuccessful login attempt Given I am on the Sample App login page And I fill in the User Name as "admin" And I fill in the Password as "admin" When I click on the Log In button Then I see the message "Invalid username/password" ```
In the above code:
The first line of a feature file must contain the keyword `Feature` followed by a colon (`:`) and a brief description of the feature.
Each feature file comprises one or more scenarios or test cases. A scenario starts with the keyword `Scenario` followed by a colon (`:`) and a brief description of the scenario.
Steps aren't Gherkin language syntax, but they're an integral concept. In a given scenario, the keywords `Given`, `And`, `When`, and `Then` represent Gherkin steps. These keywords are not followed by a colon (`:`) but by a description. The Cucumber engine searches for step definition files to understand what to do in each of the steps.
2. Step definitions
A step definition is a Java method that maps to one of the Gherkin steps. When Cucumber runs a step in a scenario, it searches for a matching step definition to execute.
For example, consider the following Gherkin step:
```gherkin And I fill in the User Name as "admin" ```
To execute the step, Cucumber looks for the following Java method:
```java @And("I fill in the User Name as {string}") public void i_fill_in_the_user_name_as(String userName) { ...
}
```
Here, the method name `i_fill_in_the_user_name_as` and the associated step annotation, along with the description `@And("I fill in the User Name as {string}")`, are important.
Also, note that the text `"admin"` is double-quoted in the feature file so that it is passed as an argument to the step definition. In the step annotation, this text is replaced with its data type, surrounded by curly braces.
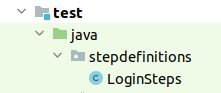
For this tutorial, create a `stepdefinitions` package under the test sources root (`src/test/java`). Next, create a Java file called `LoginSteps.java` under the `stepdefinitions` package:

Paste the following code into the step definition file `LoginSteps.java`:
1```java2package stepdefinitions;3import io.cucumber.java.After;4import io.cucumber.java.Before;5import io.cucumber.java.en.And;6import io.cucumber.java.en.Given;7import io.cucumber.java.en.Then;8import io.cucumber.java.en.When;9import io.github.bonigarcia.wdm.WebDriverManager;10import org.openqa.selenium.By;11import org.openqa.selenium.WebDriver;12import org.openqa.selenium.chrome.ChromeDriver;13import static org.junit.jupiter.api.Assertions.assertEquals;14public class LoginSteps {15private WebDriver driver;16@Before17public void initializeDriver() {18WebDriverManager.chromedriver().setup();19driver = new ChromeDriver();20}21@Given("I am on the Sample App login page")22public void i_am_on_the_sample_app_login_page() {23driver.get("http://uitestingplayground.com/sampleapp");24}25@And("I fill in the User Name as {string}")26public void i_fill_in_the_user_name_as(String userName) {27driver.findElement(By.name("Password")).sendKeys(password);28}29@And("I fill in the Password as {string}")30public void i_fill_in_the_password_as(String password) {31driver.findElement(By.name("Password")).sendKeys(password);32}33@When("I click on the Log In button")34public void i_click_on_the_log_in_button() {35driver.findElement(By.id("login")).click();36}37@Then("I see the message {string}")38public void i_see_the_message(String message) {39assertEquals(driver.findElement(By.id("loginstatus")).getText(), (message));40}41@After42public void closeBrowser() {43driver.quit();44}45}46```
The `@Before` and `@After` annotations ensure that the associated method runs before the first step of each scenario and after the last step of each scenario, respectively. In other words, it's creating a WebDriver instance under the `@Before` annotation and terminating the WebDriver session under the `@After` annotation.
The methods associated with the `@Given`, `@And`, and `@When` annotations are simply translating the corresponding steps in the feature file into browser actions using Selenium WebDriver.
The `@Then` annotation is calling a JUnit assertion to validate whether the actual and expected messages are equivalent or not. This is to ensure that the specifications are met.
3. Test runner
To run your Cucumber test, you need a test runner file. A test runner file is a JUnit class that contains `@RunWith` annotations for instructing it to execute feature files as JUnit tests and `@CucumberOptions` annotations to reference the location of feature files and step definitions.
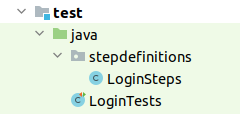
For this tutorial, create a Java file called `LoginTests.java` under the test sources root (`src/test/java`):

Paste the following code into `LoginTests.java`:
1```java2import io.cucumber.junit.Cucumber;3import io.cucumber.junit.CucumberOptions;4import org.junit.runner.RunWith;5@RunWith(Cucumber.class)6@CucumberOptions(features = {"src/test/resources/features"}, glue = {"stepdefinitions"})7public class LoginTests {8}9```
Executing the tests
It's now time to run your Cucumber tests.
Simply click the `LoginTests.java` file in the Project tool window in IntelliJ and press the keyboard keys Shift+F10 for Windows/Linux or ⌃R for macOS.
After execution and completion, make sure to enable the ✓ Show Passed option on the Test Runner toolbar so that you can see the results:

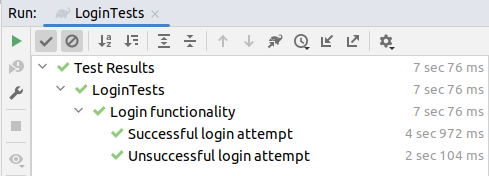
Here, the green check marks indicate that both tests passed successfully, and the time it took to execute the tests is shown in milliseconds.
Conclusion
Selenium and Cucumber can help business and technical teams collaborate on implementing automated end-to-end tests. In this article, you learned more about these frameworks and how to use them to set up, write, and run some automated tests.
As part of your end-to-end test automation suite, consider using Sauce Labs for running your Selenium tests and conducting cross-browser testing.