


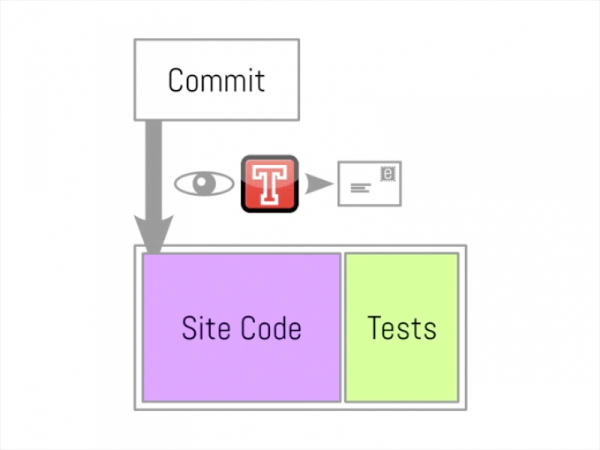
Today I'm going to show you how you can use Selenium Builder with GitHub, Travis, and Sauce Labs to make a continuous integration solution for your website that's all on the Internet, nothing stored locally. You can either follow along with the demo video below or read on for the written tutorial. The great thing about this setup is that if you put your site code and your tests into the same GitHub repository, then whenever you update the site code, and whenever you update the tests, Travis will rerun your Selenium tests on Sauce OnDemand - and then send you an email about whether or not they still work!

So you can get a full Selenium CI solution by putting together these components. And because they're all components, if you want to use something else in part - for example Jenkins instead of Travis - you can construct your own solution. For now I'm going to show you this set of four things that work really well together. The great thing about this is that you store everything on GitHub, so all your tests are stored in the cloud, nothing is stored on some local machine somewhere. You can record and edit tests from any computer that runs Firefox. You can access your tests, edit them, & play them back locally. And all of the actual execution of the testing - the CI - is handled by Travis and Sauce. So you actually don't need to build any of your own testing infrastructure!
OK! So how do you actually do this?
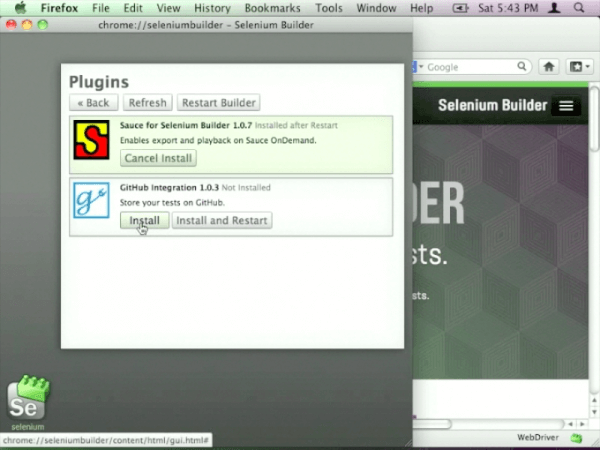
The first thing you need to do is install the plugins. You go into Selenium Builder, you go into Plugins, and you just click install on GitHub integration and Sauce. Restart Builder.
Next up, you want to record some tests. Let's just say for now we're testing this website.
Let's record a verification.
Now we're going to save this test. In the File menu, save the test to GitHub.
Because this is the first time we're using it, I'm going to have to enter my details.
Now, as you can see, we can access our repositories. And I've set up this little repo here as an example one.
So let's save this test in here, as JSON, which is the standard format Builder works in. This means we can later open it again and edit it.
Let's do another test.
Now we save that one as well. Just record as many tests as you want and put them all into this place.
Now we've done that, the next thing we need to do is configure the Selenium interpreter, which is actually a little node.js program that takes these JSON scripts and uses Webdriver to play them back. Let's clone the repo to disk so we can add the config files we need.
Create a new text file. I've just pasted in a bunch of things, which are actually reasonably straightforward.
The config is a JSON file that contains two things: the settings that you want to run the tests (in this case, we want to run them on Firefox) and if you want to run them on Sauce Labs' infrastructure. You have to tell Sauce your username and access key before this can happen, but it's not a good idea to commit your Sauce access key to a GitHub repository. So instead, we're going to put the username and access key into environment variables. As long as we run the interpreter with the SAUCE_USERNAME and SAUCE_ACCESS_KEY environment variables set to the right values, it will work fine. And how we set those variables, we'll get to in a moment, as that will be in the Travis configuration. Here we have the tests we actually want to run. This config format supports glob syntax, so you don't have to list each test individually. Just put in the path to the directory with an asterisk at the end, and it will find the tests. And it will ignore anything that's not a JSON file. That's the entirety of the config, so let's save that in our repo.
And commit and push it.
Now the next thing we need to do is to tell Travis that we exist, and that we would like to use its services.
You can log yourself in...
...using your GitHub account.
And then you go in here...
...and you enable Travis integration for this particular repo.
OK. Now the final step is to configure Travis. We need to tell Travis what running an integration test for this particular project actually means. That's done by putting a file into the top level of the repository, which tells Travis what to do. It's called .travis.yml. So again, I've just pasted in something.
Now we tell it to install the Selenium interpreter, and then run it with the configuration we already made. And the one thing we're lacking here is the environment variable for the Sauce access key. Setting variables in Travis is easy if you don't mind them being public, which you probably don't mind for your Sauce username. Now this is the one tricky bit in this tutorial. You need to encrypt your access key to let Travis know what it is without revealing it to the world. The way to do that is to first install a Ruby gem.
Once that's installed, make sure you're in the repository you want to encrypt something for and log in to Travis.
Then you can use this command to encrypt an environment variable.
What comes out is a blob of encrypted data...
...which you can paste into the .travis.yml config file like this. The encrypted data is tied to your git credentials and this particular repo, so it should be safe from snooping or theft. Your access key should also be safe. If it does ever become compromised, you can also generate a new one. That's what I'll be doing in a few minutes.
Now you can save this file...
...commit it, and push it. And of course this means Travis now goes "Oh, this has been pushed to! OK, is there a .travis.yml? Yeah, there is."
Let's actually go onto Travis. We can see it's in the queue right now.
Ok, good, it's running the tests.
You can see the details of each test being run.
But you don't need to know any of the details, because in the end, we get an email saying, "Hey! It's succeeded, everything's fine!"
So I'll just show you what happens if you break things. You can edit these JSON scripts with a text editor, which is pretty easy.
Let's go in here and change this verify to something that's not actually the case.
Save, commit, and push, and Travis runs again.
And now we get told that the build is broken! One of our tests failed!
So let's fix the test up again.
Save, commit, push.
And shortly after, Travis tells us that we've fixed the build. Excellent.
That's all really - you can use these four components to make a continuous integration system for your site. If you have any questions, drop Adam or me an email.
Thanks for following along!


